How to install Let’s Encrypt with Apache on CentOS 7
How to install Let’s Encrypt with Apache on CentOS 7
Date: 24.04.2020
Introduction:
Let’s Encrypt is a free and open-source certificate authority (CA) that allows obtaining and installing certificates through simple, automated commands.
It provides a valid SSL certificate for your domain without any cost.
Let’s Encrypt certificates are valid for 90 days by default. So it is recommended to renew the certificate before it expires.
It is improving your website security through SSL encryption can increase your visitors’ trust in your website.
Step 1: Connect via SSH and update the OS:
Connect to your server via SSH as the root user using the following command:
ssh root@your server IP -p port number
We make sure the system is fully up to date before installing any packages.
# yum -y update
Step 2: Install and Configure Apache:
We are going to use Apache as our web server.
Install Apache:
# yum -y install httpd
Start the Apache:
#systemctl start httpd
Enable Apache: To start on server boot.
#systemctl enable httpd
Create a document root folder for your site:
# mkdir /var/www/pheonixsolutions
Make sure your document root has the default permissions:
#chmod -R 755 /var/www
We need to create a new Apache configuration file by using the following command:
#nano /etc/httpd/conf.d/pheonixsolutions.com.conf
Add the following lines:
<VirtualHost *:80>
    ServerAdmin admin@pheonixsolutions.com
    DocumentRoot "/var/www/pheonixsolutions"
    ServerName pheonixsolutions.com
    ServerAlias www.pheonixsolutions.com
    ErrorLog "/var/log/httpd/pheonixsolutions.error_log"
    CustomLog "/var/log/httpd/pheonixsolutions.access_log" common
</VirtualHost>
Save and close the file.
Add an index.html file for testing purposes later with the following contents:
# nano /var/www/pheonixsolutions/index.html
Add the following lines:
<html>
Test - Welcome to The Apache Web Server.
</html>
Save the file and change owner of the ‘/var/www/html/index.html’ file to the apache user so Apache can read the file:
#chown -R apache: apache /var/www/pheonixsolutions/index.html
Step 3: Install Certbot:
Certbot is a simple tool and easy to use.
Enable the “mod_ssl” Apache module on the server.
Install the mod_ssl module:
# yum -y install mod_ssl
By default, the Certbot package is not available in the CentOS 7 default OS repository. We need to enable the EPEL repository,
To add the EPEL repository run the following command:
# yum -y install epel-release
Then install Certbot for Apache:
# yum -y install certbot-apache
Step 4: Obtain and Install SSL for your Domain:
Now Certbot is installed, you can use it to obtain and install an SSL certificate for your domain.
Run Certbot:
# certbot -apache
Certbot will ask you for the names you to activate HTTPS for which domains like below:
Saving debug log to /var/log/letsencrypt/letsencrypt.log
Plugins selected: Authenticator apache, Installer apache
Starting new HTTPS connection (1): acme-v01.api.letsencrypt.org

Which names would you like to activate HTTPS for?
-------------------------------------------------------------------------------
1: pheonixsolutions.com
2: www.pheonixsolutions.com
-------------------------------------------------------------------------------
Select the appropriate numbers separated by commas and/or spaces, or leave input
blank to select all options shown (Enter 'c' to cancel):
Run the following command to obtain and install an SSL certificate for your single domain:
#certbot -apache -d pheonixsolutions.com
We can also install a single certificate for multiple domains and subdomains hosted on the server with the ‘-d’ flag.
#certbot -apache -d pheonixsolutions.com -d www.pheonixsolutions.com
We will be asked to provide an email address and agree to the terms of service.
Saving debug log to /var/log/letsencrypt/letsencrypt.log
Plugins selected: Authenticator apache, Installer apache
Enter email address (used for urgent renewal and security notices) (Enter 'c' to
cancel): admin@pheonixsolutions.com
Starting new HTTPS connection (1): acme-v02.api.letsencrypt.org

- - - - - - - - - - - - - - - - - - - - - - - - - - - - - - - - - - - - - - - -
Please read the Terms of Service at
https://letsencrypt.org/documents/LE-SA-v1.2-November-15-2020.pdf. You must
agree in order to register with the ACME server at
https://acme-v02.api.letsencrypt.org/directory
- - - - - - - - - - - - - - - - - - - - - - - - - - - - - - - - - - - - - - - -
(A)gree/(C)ancel: A

- - - - - - - - - - - - - - - - - - - - - - - - - - - - - - - - - - - - - - - -
Would you be willing to share your email address with the Electronic Frontier
Foundation, a founding partner of the Let's Encrypt project and the non-profit
organization that develops Certbot? We'd like to send you email about our work
encrypting the web, EFF news, campaigns, and ways to support digital freedom.
- - - - - - - - - - - - - - - - - - - - - - - - - - - - - - - - - - - - - - - -
(Y)es/(N)o: N
Starting new HTTPS connection (1): api.letsencrypt.org
Obtaining a new certificate
Performing the following challenges:
http-01 challenge for pheonixsolutions.com
http-01 challenge for www.pheonixsolutions.com
Waiting for verification...
Cleaning up challenges
Created an SSL vhost at /etc/httpd/conf.d/pheonixsolutions.com-le-ssl.conf
Deploying Certificate to VirtualHost /etc/httpd/conf.d/pheonixsolutions.com-le-ssl.conf
Type Y and hit [Enter], and you should see the following output:
Please choose whether or not to redirect HTTP traffic to HTTPS, removing HTTP access.
- - - - - - - - - - - - - - - - - - - - - - - - - - - - - - - - - - - - - - - -
1: No redirect - Make no further changes to the webserver configuration.
2: Redirect - Make all requests redirect to secure HTTPS access. Choose this for
new sites, or if you're confident your site works on HTTPS. You can undo this
change by editing your web server's configuration.
- - - - - - - - - - - - - - - - - - - - - - - - - - - - - - - - - - - - - - - -
Select the appropriate number [1-2] then [enter] (press 'c' to cancel): 2
Here, you need to choose any one option to continue.
If you choose option 1, it will only download an SSL certificate and you need to configure Apache manually to use an SSL certificate.
If you choose option 2, it will automatically download and configure Apache to use an SSL certificate.
In this case, choose option 2 and hit [Enter]. When the installation is successfully finished, you will see a message similar to this:
- - - - - - - - - - - - - - - - - - - - - - - - - - - - - - - - - - - - - - - -
Congratulations! You have successfully enabled https://pheonixsolutions.com and https://www.pheonixsolutions.com

You should test your configuration at:
https://www.ssllabs.com/ssltest/analyze.html?d=pheonixsolutions.com
https://www.ssllabs.com/ssltest/analyze.html?d=www.pheonixsolutions.com

IMPORTANT NOTES: - Congratulations! Your certificate and chain have been saved at: /etc/letsencrypt/live/pheonixsolutions.com-0001/fullchain.pem Your key file has been saved at: /etc/letsencrypt/live/pheonixsolutions.com-0001/privkey.pem Your cert will expire on 2020-07-22. To obtain a new or tweaked version of this certificate in the future, simply run certbot again with the "certonly" option. To non-interactively renew *all* of your certificates, run "certbot renew" - If you like Certbot, please consider supporting our work by: Donating to ISRG / Let's Encrypt: https://letsencrypt.org/donate Donating to EFF: https://eff.org/donate-le
The generated certificate files are available in the /etc/letsencrpt/live/pheonixsolutions.com directory. You can check the newly created SSL certificate with the following command:
#ls /etc/letsencrypt/live/pheonixsolutions.com/
You should see the following output:
cert.pem chain.pem fullchain.pem privkey.pem
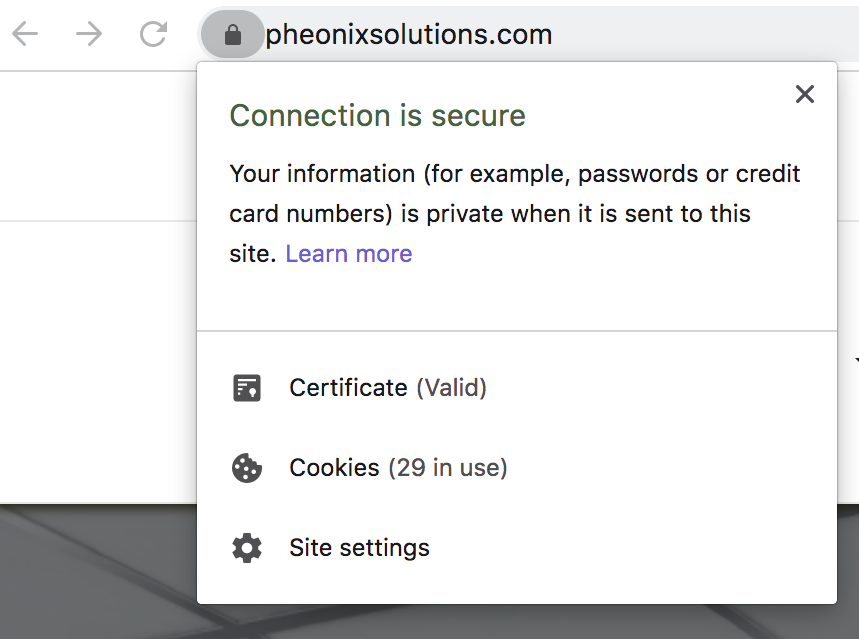
Step 5: Check Your SSL Certificate:
Open your web browser and type the URL https://pheonixsolutions.com . To check the SSL certificate in Chrome, click on the padlock icon in the address bar for https://pheonixsolutions.com, and from the pop-up box, click on ‘Valid’ under the ‘Certificate’ prompt.
Step 6: Set up Automatic Renewal:
We can test the renewal process manually with the following command.
#certbot renew
We can also add a cronjob to automatically run the above command twice a day.
Execute the following command to edit the crontab:
# crontab -e
Add the following line:
* */12 * * * root /usr/bin/certbot renew >/dev/null 2>&1
Save and close the file.
Conclusion:
Thank you.
We have successfully installed and configured Let’s Encrypt with Apache on CentOS 7.
