Mail Configuration using the SMTP Gsuite relay service
Please find the below steps in configuring the SMTP Gsuite relay service:
1) Disable 2 factor. You can check the below link to disable the 2factor. https://support.google.com/accounts/answer/185833?hl=en
2) Turn on Less secure apps. Please find the below link to turn on.
https://myaccount.google.com/u/1/lesssecureapps

3) Sign-in to you google admin console using administrator account
4) From the Admin console Home page, go to Apps>>GSuite>Gmail>>Advanced settings.
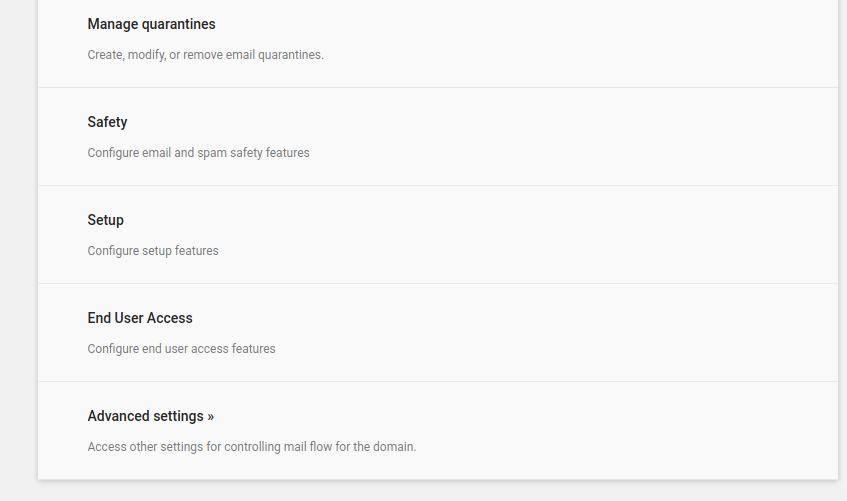
5) Scroll down to the SMTP relay service setting in the Routing section and click configure and edit it.
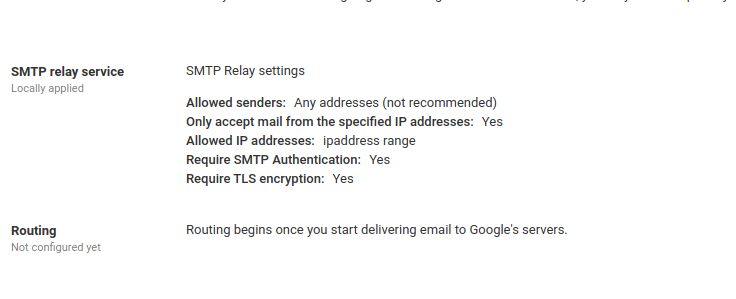
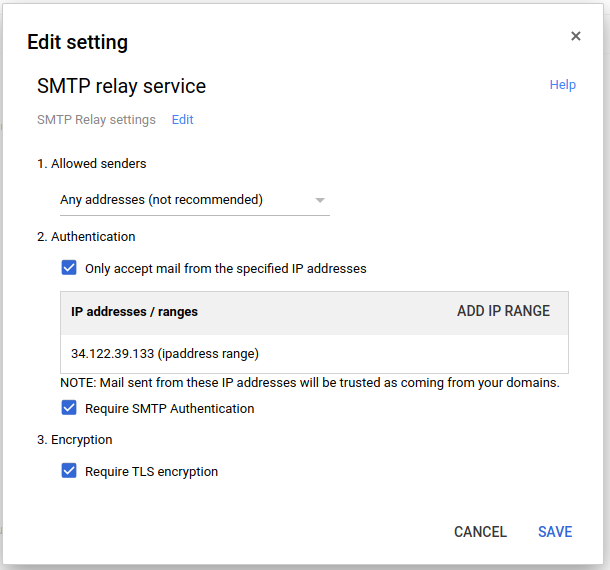
6) In the Allowed senders section, select the users who are allowed to send messages through the SMTP relay service:
a) Only registered Apps users in my domain
b) Only addresses in my domains
c) Any addresses (not recommended)
Choose according to your requirement.
7) In the Authentication section, check one or both boxes to set an authentication method:
- Only accept mail from the specified IP addresses—The system only accepts mail sent from these IP addresses as coming from your domains.
- Require SMTP Authentication—Enforces the use of SMTP authentication to identify the sending domain. Using this option requires your clients to connect via TLS.
- If you chose to only accept messages from specified IP addresses, enter the IP addresses:
a) Click Add IP RANGE.
b) Enter a description for the IP address or range.
c) Enter the IP address or range.
Example : Use the Classless Inter-Domain Routing (CIDR) format to enter an IP range; for example, 123.123.123.123. Use your own public IP address. The maximum number of IP addresses that you can specify in the range is 65,536. We recommendthat you keep the allowed IP range as narrow as possible for security reasons
8)Check the Enabled box to enable (or uncheck to disable) this IP address or range.
9) Click Save.
10) In the Encryption section, check the Require TLS encryption box to require that the communication between your server and Google’s server be TLS encrypted, including the message contents.
Note: If your email server doesn’t support TLS, do not check this box. If you check this box, Google rejects messages that are not encrypted.
11) Click Add setting or Save. Any new settings are added to the Advanced settings page.
12) At the bottom, click Save.
Setting up a firewall rule to allow outbound traffic on a custom port
To allow outbound traffic through a custom port, you need to set up a firewall rule. For example, the following steps set up a rule that allows outbound traffic on port 2525. Replace port 2525 with the custom port of your choice. Please find the steps below.
- In the Google Cloud Console, go to the Create a firewall rule page.
- Choose a name for the firewall rule.
- Under Network, select the network that is hosting the VM instance that you intend to send email messages from.
- Under Direction of traffic, select Egress.
- Under Targets, choose the appropriate target for this rule. For example, you might choose Specified target tags if you want the rule to apply to particular instance.
- Under Destination filter, set
0.0.0.0/0if you want to allow egress traffic from the VM instance to any destination. If you want to limit the destination, enter another IP range here. - Under Protocols and ports, select Specified protocols and ports, select tcp, and enter
2525. - Click Create to save your changes.
Go to the terminal and log in to your server.
1) Search for exim, postfix etc. As we did with exim we will go with the exim configuration.
2) open /etc/exim/exim.conf and search for “begin routers”
Add the below lines under “begin routers”
send_via_gmail: driver = manualroute domains = ! +local_domains transport = gmail_smtp route_list = * smtp.gmail.com
3) Next search for “begin transport”
Add the below lines under “begin transport”
gmail_smtp: driver = smtp port = 587 hosts_require_auth = * hosts_require_tls = *
4) Next search for “begin authenticators”
Add the below lines under “begin authenticators”
gmail_login: driver = plaintext public_name = LOGIN client_send = : user@gmail.com : myPassw0rd
Replace the credentials with your actual credentials on the client_send line.
Restart Exim with the below command service exim restart
5) Send a mail and check for the mail.