Introduction
Creating a website is now easier than ever, thanks to user-friendly tools like cPanel and Softaculous. WordPress is one of the most widely used content management systems (CMS) in the world, powering millions of websites due to its flexibility and ease of use.
In this guide, you will learn how to install WordPress on your domain using cPanel in just a few simple steps. This method is ideal for beginners and does not require any coding or technical expertise. By the end of this tutorial, your website will be live and ready for customization.
Prerequisites
Before you begin the installation process, make sure you have the following:
- A domain name (e.g., yourdomain.com)
- A hosting account with cPanel access
- cPanel login credentials (username and password)
- An SSL certificate installed (optional but recommended for HTTPS)
- A stable internet connection
Having these ready will ensure a smooth and hassle-free installation process.
Implementation
Follow the steps below to install WordPress using Softaculous in cPanel:
Step 1: Access cPanel
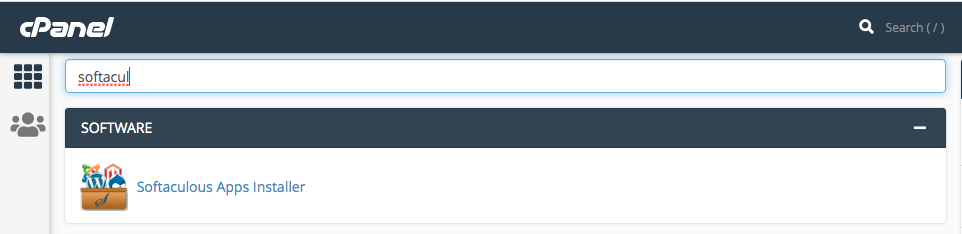
Login to your cPanel account and in the search box on the top , search for the word “softaculous” and locate “SOFTACULOUS APPS INSTALLER” which is under Softwares section.
Step 2: Choose WordPress
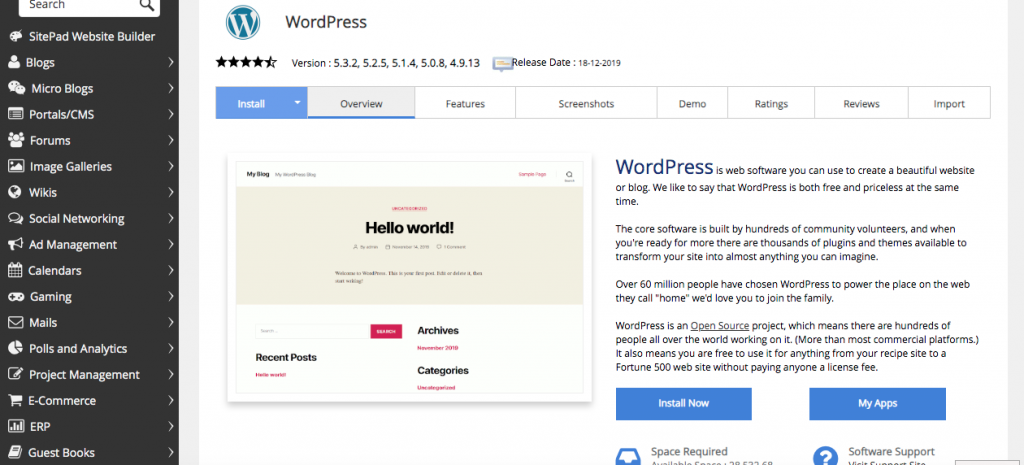
You can see “WordPress” logo as the first option at the centre of the screen.
Click on it.

Step 3: Start Installation
Upon clicking on the “WordPress” logo, you will find a new screen opened as below.
Now, click on the Install option on the left top. It will take you to the setup page as below.
Step 4: Configure Software Setup
First section is Software Setup. You will find two fields below it.
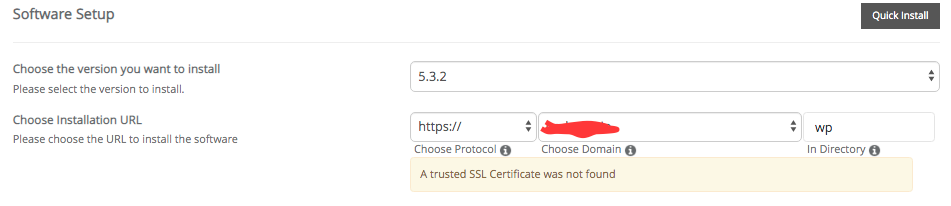
- Choose the version you want to install – Select the wordpress version that you want to install on your site.
- Choose Installation URL– In this field, you will have 3 separate parts
(i) Choose Protocol – There will be four options( http:// , https:// , http://www , https://www.) You can choose any of the 4 options. Choose https only if you have SSL certificate installed on your domain.
(ii) Choose Domain – Choose the domain on which you want to install wordpress
(iii) In Directory – Leave this field empty if you’re adding WordPress to your domain root – if you want it to be available underYOURDOMAIN.com. If you’re adding WordPress in a sub-site/sub domain of an already existing site, you’ll want to set the directory to a folder name of your sub-site/subdomain(which is your preference)
Step 5: Site Settings
Next section is Site Settings where you will have 3 fields
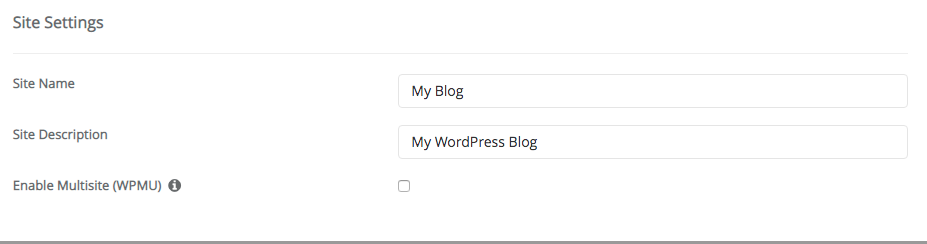
- Site Name – Enter the name of your site. You can also change it later from your wordpress.
- Site Description – Just give a small detail about your site or you can leave it blank.
- Enable Multisite (WPMU)- Check this option if you want to run more than one wordpress installation on the same domain. To use this feature, your server must support apache mod_rewrite
Step 6: Admin Account Setup
Next section is Admin Account which contains 3 fields. This is your wordpress account login credentials setup.
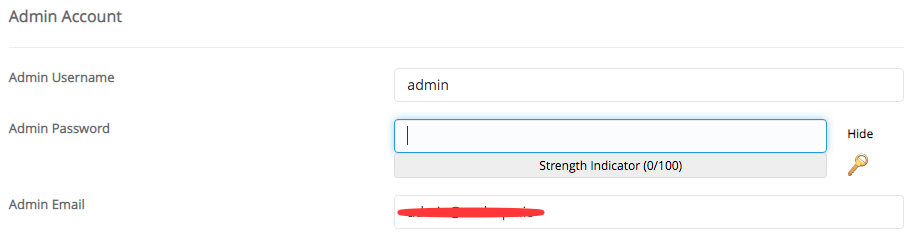
- Admin username – You can give the username of your login account as “admin” or any other name which you prefer(may be your website name)
- Admin password – Give a password which is strong and meet the requirements
- Admin Email – It will be displayed by default. You can check if the displayed mail id is correct. Else give the proper id if it is wrong.
Step 7: Select Language
The next section is Choose Language

From the ” Select Language” dropdown, choose your preferred language for your wordpress site.
Step 8: Plugins and Advanced Options
The next section is Select Plugin(s)
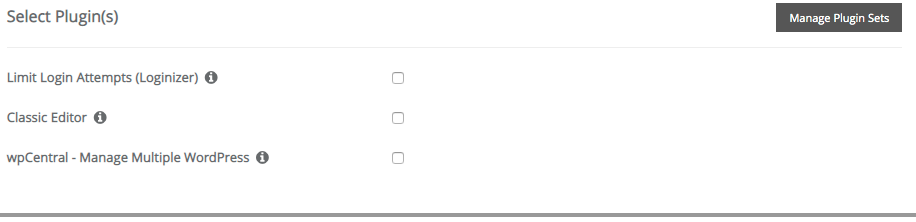
This is optional. If needed, you can install some handy plugins you want from softaculous now. But later it will be very easy to install the plugins from your wordpress admin site.
Here comes the next section “Advanced Options” which you can ignore for now.

Step 9: Choose a Theme
So, at last, here comes the last section “ Select theme“.
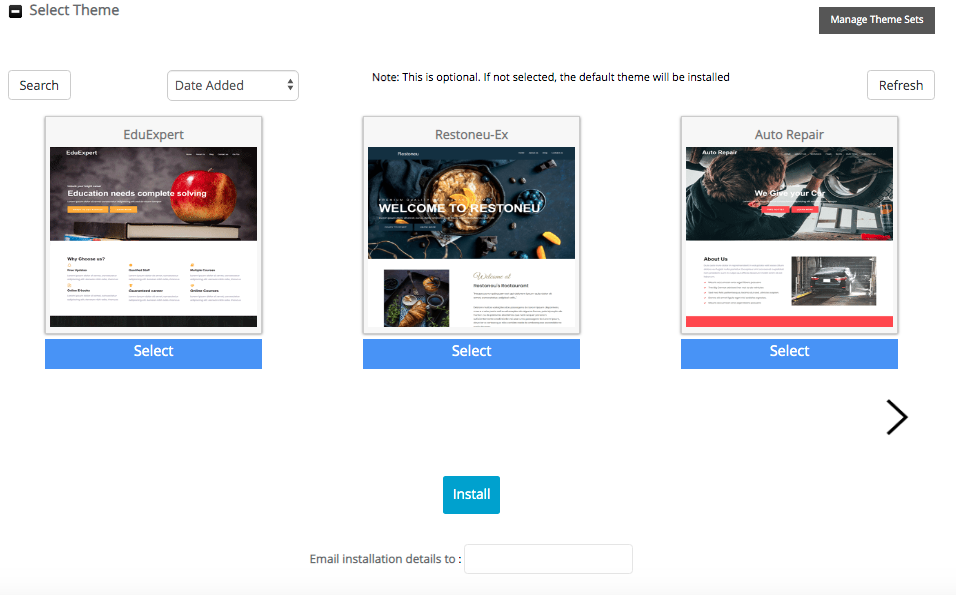
Select a theme for your wordpress site. If not selected, default theme will be installed now. Later you can download and install a theme of your choice from the wordpress admin.
Once all the above sections are filled, Please click on the Install button at the bottom to install wordpress on the site mentioned.
Note: If you want to receive this wordpress account installation details on your email, give your mail id at the text box field "Email installation details to:" which is below theInstallbutton. You should give this id before clicking on theInstallbutton.
Step 10: Complete Installation
Click the Install button. Softaculous will begin the installation process.
After a few minutes, you will see a success message with:
- Your website URL
- Admin login URL (e.g.,
yourdomain.com/wp-admin)
Use your admin credentials to log in and access your WordPress dashboard.
Conclusion
Installing WordPress through cPanel using Softaculous is a quick and efficient way to launch your website without any technical complexity. By following the steps outlined above, you can have your site up and running in just a few minutes.
Once installed, you can start customizing your website by choosing themes, installing plugins, and adding content. WordPress provides endless possibilities, whether you’re building a blog, business website, or online store.
With your WordPress site successfully installed, you’re now ready to bring your ideas to life online.