Introduction
The DNS Cluster feature in WHM provides flexibility for managing DNS zones across multiple servers. Depending on your infrastructure requirements, you may need to modify the role assigned to a server within the DNS Cluster. This guide explains how to update the DNS role for a cluster member.
Prerequisites
- Root access to WHM
- DNS Cluster already configured
- Appropriate permissions to manage cluster settings
Implementation
Step 1
Log in to WHM as the root user on the server where you want to modify the DNS Cluster configuration.
Step 2
Navigate to:
Home → Clusters → DNS Cluster
Step 3
Locate the remote server whose DNS role you want to modify.
Under the DNS Role column, select the desired role from the dropdown menu:
- Standalone
- Synchronize
- Write-Only
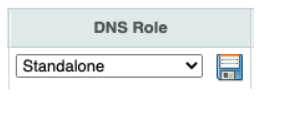
Step 4
After selecting the preferred role, click the Save button (disk icon) to apply the changes.
Conclusion
Changing the DNS role of a cluster member allows you to customize how DNS zones are synchronized and managed across your servers. By updating the role through WHM, you can ensure that your DNS Cluster configuration matches your operational requirements.