
Introduction
This Magento 2 setup guide walks you through installing Magento Open Source 2.4.9 on a fresh Ubuntu server, one step at a time. Magento 2 is one of the most powerful open-source eCommerce platforms. It gives you full control over your catalog, checkout, themes, and integrations, but only when the server stack under it is set up correctly.
Most failed Magento installations come from small mistakes: the wrong PHP version, a missing PHP extension, a search engine that is not running, or wrong file permissions. In this guide, we will install every required service in the right order, using the versions Adobe has tested, so you can install Magento 2.4.9 without surprises.
This is Day 1 of our Magento and eCommerce series. In the coming days, we will build on this installation to configure the store, products, payments, themes, performance, and security.
Key takeaways:
- Magento 2.4.9 is tested with PHP 8.5, MariaDB 12.3 or MySQL 8.4, OpenSearch 3, Composer 2.10, and Nginx 1.30.
- Install Magento with Composer, using your free access keys from Commerce Marketplace.
- Run the installation with the bin/magento setup:install command, not through a browser.
- Set up cron jobs right after installation, or indexing, emails, and scheduled tasks will not run.
On This Page
Why a Correct Magento 2 Setup Matters
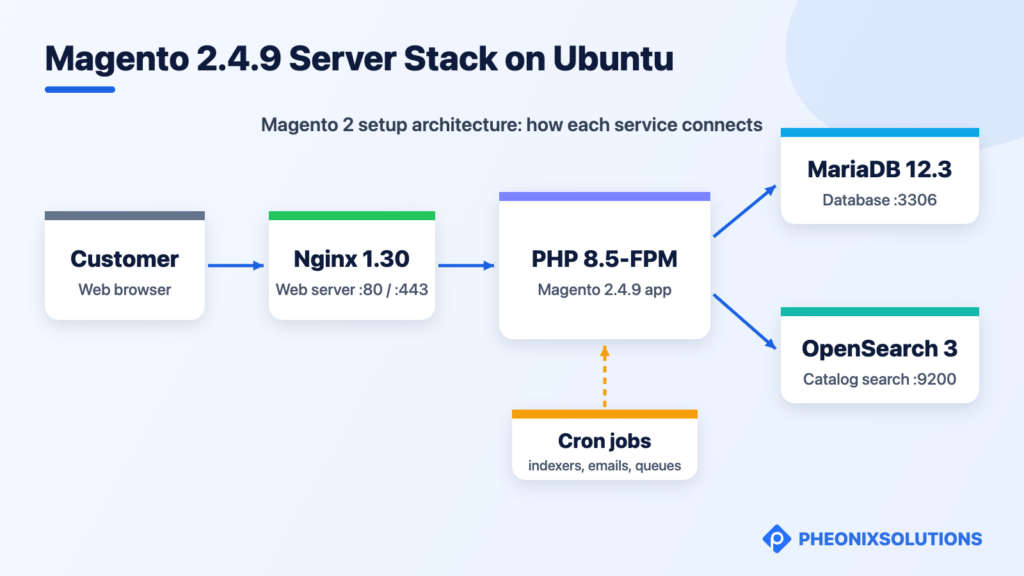
A Magento 2 setup is not like a simple plugin-based website. It is a full PHP application that depends on a web server, PHP-FPM, a database, and a search engine working together. If one of them is the wrong version, the store may install but later break during upgrades, indexing, or checkout.
Magento comes in two editions:
- Magento Open Source: Free and self-hosted. It is the edition we install in this guide.
- Adobe Commerce: The paid edition, with B2B features, advanced marketing tools, and Adobe support.
Both editions use the same installation process. A clean, well-planned Magento 2 setup on day one saves hours of troubleshooting later, and it gives you a stable base for themes, extensions, and performance tuning.
Prerequisites for the Magento 2 Setup
Before you start the Magento 2 setup, make sure you have the following:
- Server: Ubuntu 24.04 LTS (64-bit) with at least 4 GB RAM and 2 CPU cores. Magento needs at least 2 GB RAM for upgrades, so add a swap file on smaller servers.
- Access: SSH access with a user that has sudo rights.
- Domain: A domain or subdomain (for example, shop.example.com) pointed to your server’s IP address.
- Magento access keys: A free Commerce Marketplace account to generate your public and private access keys.
- Basic knowledge: Working with the Linux command line and editing files with nano or vi.
Note: Adobe supports only Linux x86-64 for Magento. Microsoft Windows and macOS are not supported as host operating systems, so use a Linux server, a virtual machine, or Docker for local work.
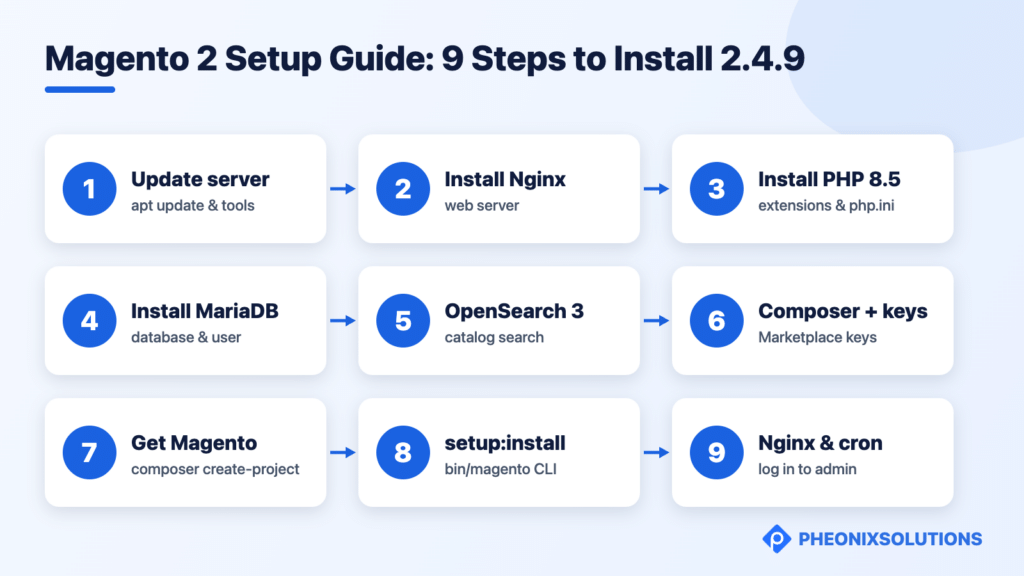
9 Steps to Install Magento 2.4.9 on Ubuntu
Before you install Magento 2.4.9, check the software versions Adobe has tested for on-premises installations. We will install these versions.
| Software | Version for Magento 2.4.9 |
|---|---|
| PHP | 8.5 |
| MariaDB / MySQL | MariaDB 12.3 or MySQL 8.4 |
| OpenSearch | 3 |
| Composer | 2.10 |
| Nginx | 1.30 |
| Valkey (cache, optional) | 9 |
| Varnish (page cache, optional) | 8 |
Step 1: Update the Server and Install Basic Tools
Start the Magento 2 setup by logging in to your server over SSH and updating the system packages.
sudo apt update && sudo apt upgrade -y
sudo apt install -y software-properties-common ca-certificates curl gnupg2 lsb-release unzip git
Create a dedicated file system owner for Magento and add it to the web server group:
sudo adduser magento
sudo usermod -aG www-data magento
Step 2: Install the Nginx Web Server
To install Magento on Ubuntu, you first need a web server. Install Nginx and enable it to start on boot:
sudo apt install -y nginx
sudo systemctl enable --now nginx
nginx -v
Note: The Ubuntu repository may ship an older Nginx version. If you need the exact tested version (1.30), add the official Nginx repository from nginx.org before you install.
Step 3: Install PHP 8.5 and the Required Extensions
Ubuntu 24.04 does not include PHP 8.5 by default, so add the widely used Ondřej Surý PPA and install PHP-FPM with the extensions Magento needs:
sudo add-apt-repository ppa:ondrej/php -y
sudo apt update
sudo apt install -y php8.5-fpm php8.5-cli php8.5-common php8.5-mysql \
  php8.5-xml php8.5-mbstring php8.5-curl php8.5-zip php8.5-gd \
  php8.5-intl php8.5-bcmath php8.5-soap php8.5-xsl
php -v
Next, update the PHP settings that your Magento 2 setup needs. Magento requires at least 2 GB of memory for installation and Composer commands.
for INI in /etc/php/8.5/fpm/php.ini /etc/php/8.5/cli/php.ini; do
  sudo sed -i 's/^memory_limit = .*/memory_limit = 2G/' $INI
  sudo sed -i 's/^max_execution_time = .*/max_execution_time = 1800/' $INI
  sudo sed -i 's/^zlib.output_compression = .*/zlib.output_compression = On/' $INI
  sudo sed -i 's/^;\?realpath_cache_size = .*/realpath_cache_size = 10M/' $INI
  sudo sed -i 's/^;\?realpath_cache_ttl = .*/realpath_cache_ttl = 7200/' $INI
done
sudo systemctl restart php8.5-fpm
Verify the new memory limit:
php -i | grep memory_limit
Output:
memory_limit => 2G => 2G
Step 4: Install MariaDB 12.3 and Create the Magento Database
Running Magento 2.4.9 on Ubuntu needs a supported database. Use the official MariaDB repository setup script to install the tested version:
curl -LsSO https://r.mariadb.com/downloads/mariadb_repo_setup
chmod +x mariadb_repo_setup
sudo ./mariadb_repo_setup --mariadb-server-version="mariadb-12.3"
sudo apt update
sudo apt install -y mariadb-server
sudo mariadb-secure-installation
Now create a database and a database user for Magento. Replace StrongDbPass@123 with your own strong password.
sudo mariadb -e "CREATE DATABASE magento;
CREATE USER 'magento'@'localhost' IDENTIFIED BY 'StrongDbPass@123';
GRANT ALL PRIVILEGES ON magento.* TO 'magento'@'localhost';
FLUSH PRIVILEGES;"
Note: You can use MySQL 8.4 instead of MariaDB. Do not install both on the same server.
Step 5: Install OpenSearch 3
You cannot install Magento 2.4.9 without a search engine, because Magento uses OpenSearch for catalog search. The installation fails if OpenSearch is not running. Add the official OpenSearch APT repository:
sudo mkdir -p /etc/apt/keyrings
curl -fsSL https://artifacts.opensearch.org/publickeys/opensearch-release.pgp \
  | sudo gpg --dearmor -o /etc/apt/keyrings/opensearch.gpg
echo "deb [signed-by=/etc/apt/keyrings/opensearch.gpg] https://artifacts.opensearch.org/releases/bundle/opensearch/3.x/apt stable main" \
  | sudo tee /etc/apt/sources.list.d/opensearch-3.x.list
sudo apt update
For a development or test server, install OpenSearch with the Security plugin disabled so Magento can connect over plain HTTP on localhost:
sudo env DISABLE_SECURITY_PLUGIN=true apt install -y opensearch
sudo systemctl enable --now opensearch
curl -X GET http://localhost:9200
The last command should return a JSON response with “distribution” : “opensearch” and the version number.
Note: Disabling the Security plugin is only for development or test servers where OpenSearch is not reachable from outside. For production, keep the Security plugin enabled, use your own TLS certificates, and pass the --opensearch-enable-auth, --opensearch-username, and --opensearch-password options during installation.
Step 6: Install Composer and Get Your Magento Access Keys
Install Composer globally:
cd ~
curl -sS https://getcomposer.org/installer -o composer-setup.php
sudo php composer-setup.php --install-dir=/usr/local/bin --filename=composer
composer --version
Next, create your Magento access keys:
- Log in to Commerce Marketplace with your Adobe account.
- Go to My Profile > Access Keys.
- Click Create A New Access Key and give it a name.
- Copy the Public Key (used as the username) and the Private Key (used as the password).
Note: Keep your private key secret. Do not commit it to Git or share it in screenshots.
Step 7: Download Magento 2.4.9 with Composer
Create the installation directory and give ownership to the magento user:
sudo mkdir -p /var/www/magento2
sudo chown magento:www-data /var/www/magento2
Switch to the magento user and download Magento Open Source 2.4.9. This is the core step to install Magento on Ubuntu with Composer:
sudo su - magento
cd /var/www/magento2
composer create-project --repository-url=https://repo.magento.com/ magento/project-community-edition=2.4.9 .
When Composer asks for a username and password, enter your public key and private key.
After the download finishes, set the file permissions Magento needs:
cd /var/www/magento2
find var generated vendor pub/static pub/media app/etc -type f -exec chmod g+w {} +
find var generated vendor pub/static pub/media app/etc -type d -exec chmod g+ws {} +
chmod u+x bin/magento
Step 8: Run the Magento 2 Installation Command
Still as the magento user, run setup:install. Replace the domain, database password, and admin details with your own values.
bin/magento setup:install \
--base-url=http://shop.example.com/ \
--db-host=localhost \
--db-name=magento \
--db-user=magento \
--db-password='StrongDbPass@123' \
--admin-firstname=Store \
--admin-lastname=Admin \
--admin-email=admin@example.com \
--admin-user=storeadmin \
--admin-password='Admin@Pass2026' \
--language=en_US \
--currency=INR \
--timezone=Asia/Kolkata \
--use-rewrites=1 \
--search-engine=opensearch \
--opensearch-host=localhost \
--opensearch-port=9200 \
--opensearch-index-prefix=magento2 \
--opensearch-timeout=15
The Magento 2 setup command takes a few minutes. At the end, you will see output similar to this:
[SUCCESS]: Magento installation complete.
[SUCCESS]: Magento Admin URI: /admin_1a2b3c
Save the Admin URI. Magento generates a random admin path, which is harder for attackers to guess.
Note: Do not run setup:install as the root user. Always run bin/magento commands as the file system owner (the magento user in this guide) to avoid permission problems.
Step 9: Configure Nginx, Cron Jobs, and Log In to the Admin
Exit back to your sudo user and create an Nginx virtual host. Magento ships a ready-made Nginx configuration file called nginx.conf.sample, so you only need a small server block:
exit
sudo nano /etc/nginx/sites-available/magento
Add the following configuration:
upstream fastcgi_backend {
    server unix:/run/php/php8.5-fpm.sock;
}

server {
    listen 80;
    server_name shop.example.com;
    set $MAGE_ROOT /var/www/magento2;
    include /var/www/magento2/nginx.conf.sample;
}
Enable the site, test the configuration, and reload Nginx:
sudo ln -s /etc/nginx/sites-available/magento /etc/nginx/sites-enabled/
sudo rm -f /etc/nginx/sites-enabled/default
sudo nginx -t
sudo systemctl reload nginx
Now install the Magento cron jobs as the magento user. Cron runs indexers, sends emails, and processes scheduled tasks.
sudo su - magento
cd /var/www/magento2
bin/magento cron:install
crontab -l
For a development server, switch to developer mode so you can see errors while you build:
bin/magento deploy:mode:set developer
bin/magento cache:flush
Finally, open your store in the browser to confirm that Magento 2.4.9 on Ubuntu is live:
- Storefront: http://shop.example.com/
- Admin panel: http://shop.example.com/admin_1a2b3c (use your own Admin URI)
Log in with the admin username and password you set in Step 8.
Note: Magento enables Two-Factor Authentication (2FA) for the admin by default, and the setup link is sent by email. Make sure your server can send email before you log in. On a local development server only, you can disable 2FA with bin/magento module:disable Magento_AdminAdobeImsTwoFactorAuth Magento_TwoFactorAuth, followed by bin/magento setup:upgrade. Never disable 2FA on a live store.
Note: Before you go live, install an SSL certificate (for example, with Let’s Encrypt) and update the base URLs to HTTPS. We will cover this in a later article in this series.
Common Magento 2 Setup Mistakes to Avoid
- Using an untested PHP version: Always match the PHP version to your Magento release.
- Forgetting OpenSearch: The installer stops with a search engine connection error if OpenSearch is not running.
- Running commands as root: This creates files that the web server cannot write to.
- Skipping cron jobs: Indexes go out of date, and order emails are not sent.
- Low memory: Composer and the installer fail on servers with less than 2 GB RAM and no swap.
- Exposing OpenSearch publicly: Keep port 9200 closed to the internet.
Conclusion
You now have a working Magento 2.4.9 store running on Ubuntu with Nginx, PHP 8.5, MariaDB 12.3, and OpenSearch 3. This Magento 2 setup gives you a clean, supported base to build your online store on.
Quick recap:
- Match every service to the versions Adobe tested for Magento 2.4.9.
- Install Magento with Composer and your Marketplace access keys.
- Run bin/magento setup:install as the file system owner, never as root.
- Configure Nginx with nginx.conf.sample and install cron jobs right away.
- Secure the store with 2FA, SSL, and a closed OpenSearch port before going live.
Bookmark this Magento 2 setup guide for your next server. In the next article of this series, we will explore the Magento 2 admin panel and the key settings every store owner should know.
FAQs
1. What are the system requirements for Magento 2.4.9?
Magento 2.4.9 is tested with PHP 8.5, MariaDB 12.3 or MySQL 8.4, OpenSearch 3, Composer 2.10, and Nginx 1.30 on a 64-bit Linux server. Valkey 9 and Varnish 8 are optional for caching.
2. Is Magento Open Source free to use?
Yes. Magento Open Source is free to download and use. You only pay for hosting, extensions, themes, and development. Adobe Commerce is the paid edition with extra B2B and marketing features.
3. Can I install Magento 2 without OpenSearch?
No. Magento 2.4 and later need a search engine to install and run. For Magento 2.4.9, Adobe tests OpenSearch 3.
4. How long does a Magento 2 installation take?
On a prepared server, downloading Magento with Composer and running setup:install usually takes 10 to 30 minutes, depending on your server speed and internet connection.
5. Can I install Magento 2 on Windows or macOS?
Not directly. Adobe supports only Linux x86-64. On Windows or macOS, use a Linux virtual machine or Docker for local development.
Related Articles
- How to Enable Maintenance Mode in Magento and Customize the Maintenance Page
- How to Reset the Admin Password in Magento 2 Using the Command Line Interface Tool
- How to Resolve the Autoload Error While Installing Magento 2 in Ubuntu
- How to Update Secure and Unsecure URLs Directly in the Magento Database
- How to Set Up and Install Stripe in Magento 2
Official Documentation
- Adobe Commerce System Requirements
- Quick Start On-Premises Installation
- Get Your Authentication Keys
- Install Nginx for On-Premises Deployments
- Advanced On-Premises Installation
- Installing OpenSearch on Debian and Ubuntu
- MariaDB Package Repository Setup and Usage
- Download Composer
Talk to Magento Experts
Setting up Magento 2 the right way takes time, and one wrong version can cost you days of debugging. At Pheonix Solutions, our team builds, hosts, and maintains Magento stores for businesses of every size.
We can help you with:
- eCommerce development on Magento 2, from installation to a fully custom store.
- VPS hosting and DevOps and cloud services tuned for Magento performance.
- Software maintenance and support for upgrades, security patches, and monitoring.
Planning a new Magento store or stuck in the middle of an installation? Talk to our Magento experts and get your store set up correctly the first time.