Introduction
A shared IP address is an IP used by multiple websites hosted on the same server. In some cases, you may need to change the shared IP address due to IP reputation issues, blacklist problems, server migration, or network changes. Changing the shared IP ensures that websites and services continue to function properly with improved connectivity and email reputation.
This guide explains the general process of changing the shared IP address on a hosting server.
Prerequisites
Before changing the shared IP address, ensure the following requirements are met:
- Root or administrative access to the server
- A new active IP address assigned by the hosting provider
- WHM/cPanel access (if using a cPanel server)
- Backup of website data and DNS configurations
- Access to DNS management panel
- Proper maintenance window to avoid service interruption
IMPLEMENTATION
Please follow the below steps to achieve the above.
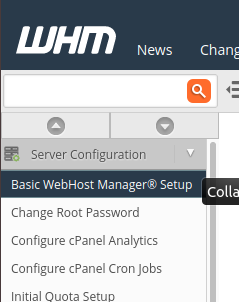
1) Log in to WHM.

2) Navigate to the following location.
Home > Server Configuration > Basic WebHost Manager Setup
3) Change the following setting to the IP you’d like to use.
The IPv4 address (only one address) to use to set up shared IPv4 virtual hosts.
Conclusion
Changing the shared IP address involves updating the server configuration, assigning the new IP to hosting accounts, and modifying DNS records accordingly. Proper verification and DNS updates are essential to minimize downtime and ensure uninterrupted website and email functionality. Always perform a backup and schedule the change during a maintenance window for a smooth transition.