
Post Date: March 15, 2019
Last Updated: October 13, 2026
Introduction
Creating your first Android Studio project is an exciting step toward learning Android application development. Android Studio is the official Integrated Development Environment (IDE) for Android, providing powerful tools to develop, design, test, and debug mobile applications.
In this step-by-step tutorial, you will learn how to create your first Android application using the Login Activity template. We will guide you through selecting a project template, configuring the project settings, exploring the Activity source code and user interface layout, and running your application on an Android emulator.
Whether you are a beginner or just getting started with Android development, this guide will help you understand the fundamentals of creating and running an Android application.
By the end of this tutorial, you will have a working starter project and a clear understanding of the basic Android Studio workflow.
Prerequisites
Before getting started, make sure you have the following:
- Android Studio installed on your computer.
- A basic understanding of programming concepts.
- Sufficient disk space for the Android SDK and emulator.
- An Android Virtual Device (AVD) or a compatible physical Android device for testing.
Note: The screenshots in this tutorial are from an older version of Android Studio. The interface, available templates, and project configuration options may differ in newer versions.
Steps to Create YouStep 1: Open Android Studio
Launch Android Studio on your computer. On the welcome screen, select New Project or Start a new Android Studio project, depending on your version.
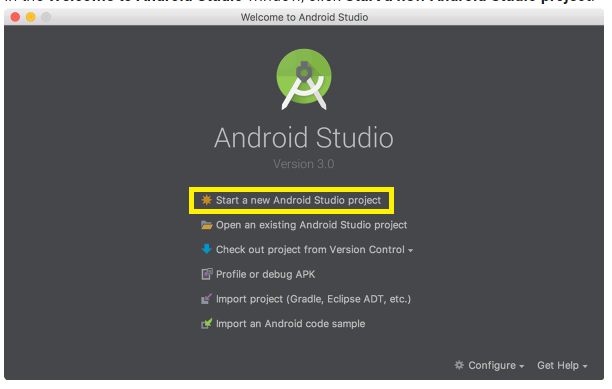
This will open the project creation wizard.r First Android Studio Project
Step 2: Select a Project Template
Choose a suitable project template from the available options.
For this tutorial, select Login Activity and click Next.
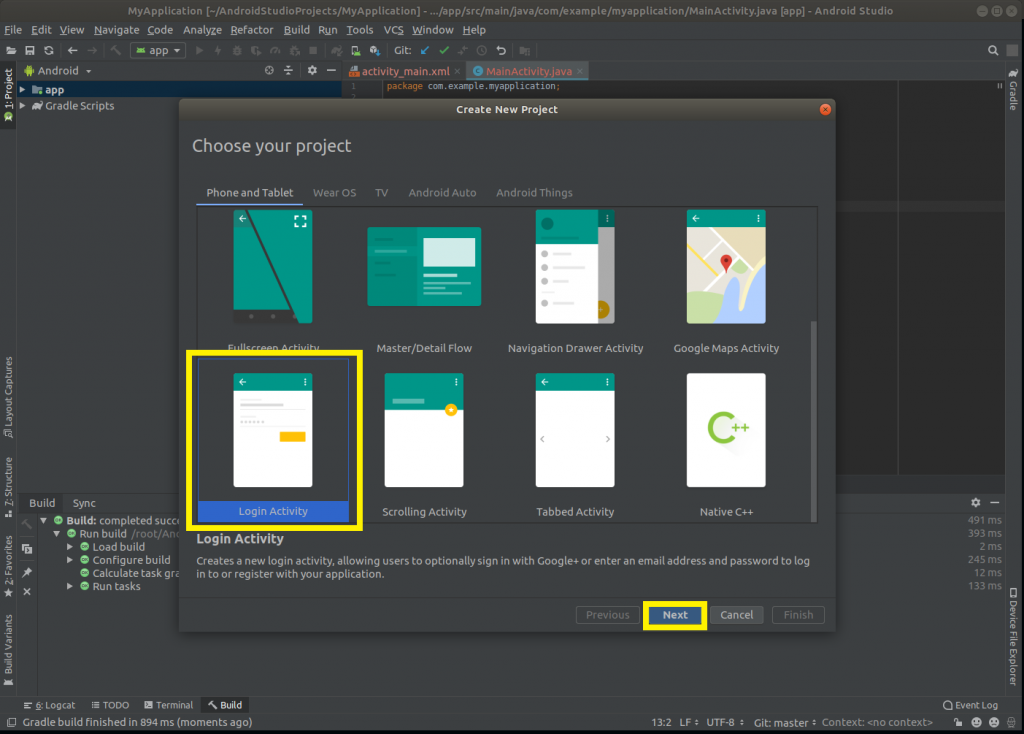
The Login Activity template provides a starting point for an application with a login interface. If this template is unavailable in your Android Studio version, you can select an appropriate Activity template and create the login screen manually.
Step 3: Configure Your Project
Enter the required project details:
- Name: Enter a name for your application.
- Package name: Specify a unique application identifier.
- Save location: Select the directory where the project should be stored.
- Language: Choose Java or Kotlin, depending on the template and your preference.
- Minimum SDK: Select the minimum Android API level your application will support.
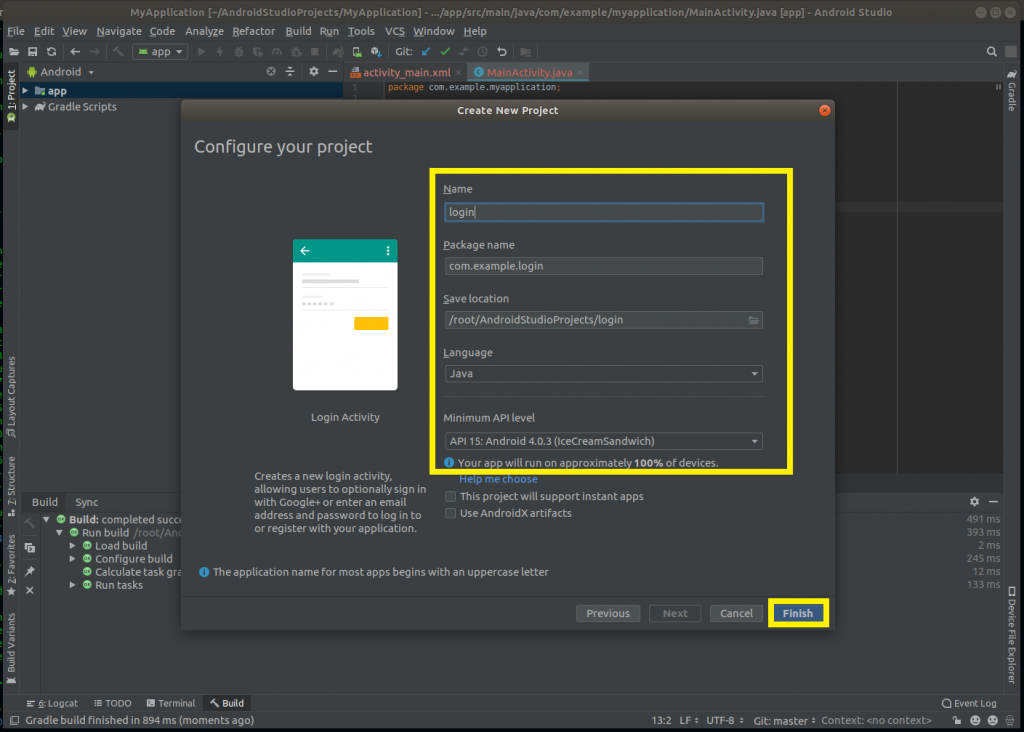
After entering the details, click Finish.
Android Studio will create the project and may download or synchronize the required Gradle dependencies. Wait for the initial setup to complete.
Step 4: Open the Main Activity
Once the project has loaded, locate the Activity source file in the project structure.
For a Java-based project, this may be LoginActivity.java. For a Kotlin-based project, it may be LoginActivity.kt or another Activity file, depending on the selected template.
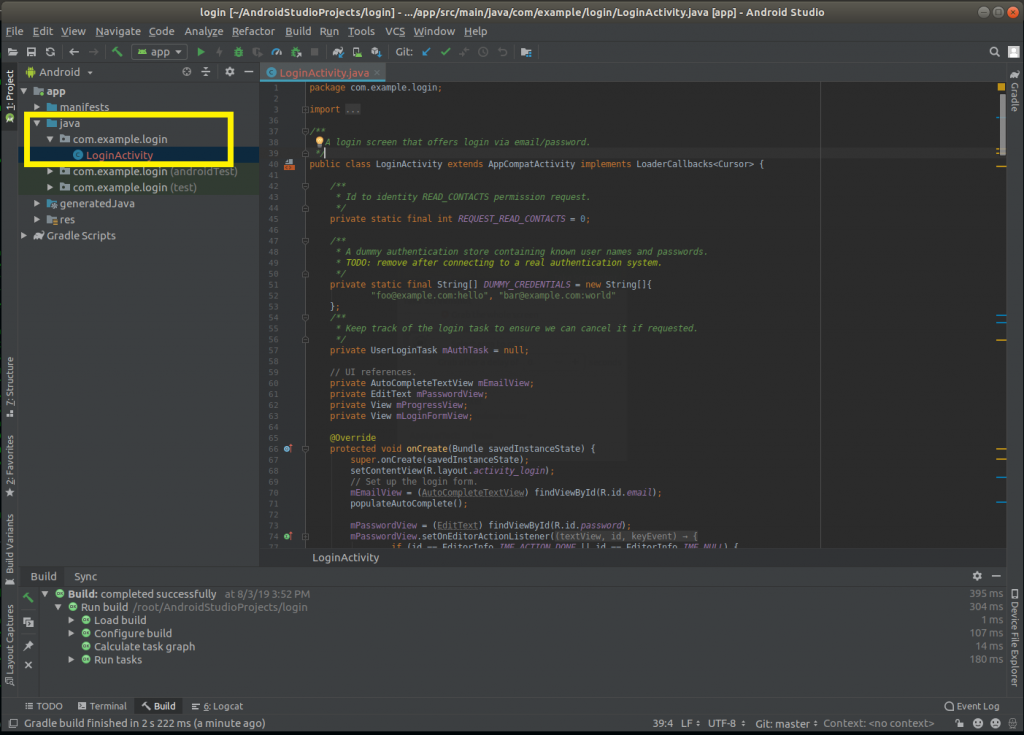
An Activity represents a screen or a major interaction point in an Android application. The generated code contains the initial application logic and may include login-related functionality.
Step 5: Explore the Layout File
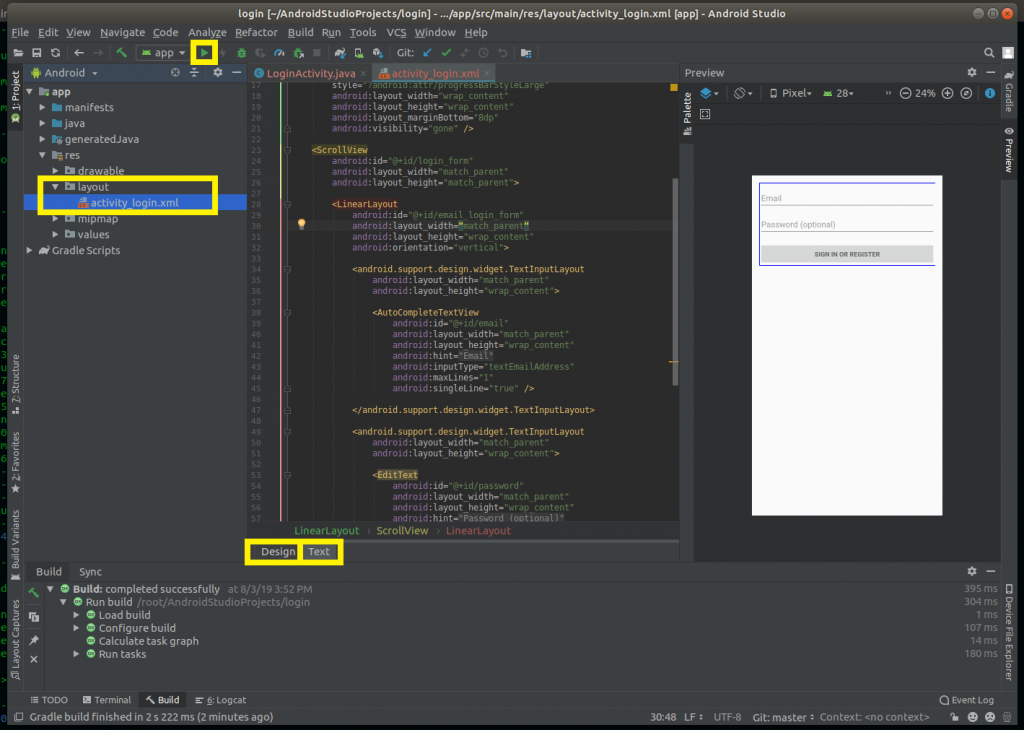
Open the layout resource associated with your Activity, if the project uses XML layouts. For example, the file may be named activity_login.xml and located under res/layout.
The layout file defines the user interface, including elements such as:
- Text fields for entering a username or email address.
- Password input fields.
- Buttons and labels.
- Other interface components.
Depending on the Android Studio version, you may be able to edit the layout using Design, Code, or Split views. Older versions may display Design and Text options.
Make any required changes and save the file.
Important: Some modern Android project templates use Jetpack Compose instead of XML layouts. In those projects, the interface is defined in Kotlin code rather than an XML layout file.
Then to run the project click the Play button.
Step 6: Select a Device and Run the Application
Click the Run button (the green Play icon) in the Android Studio toolbar.
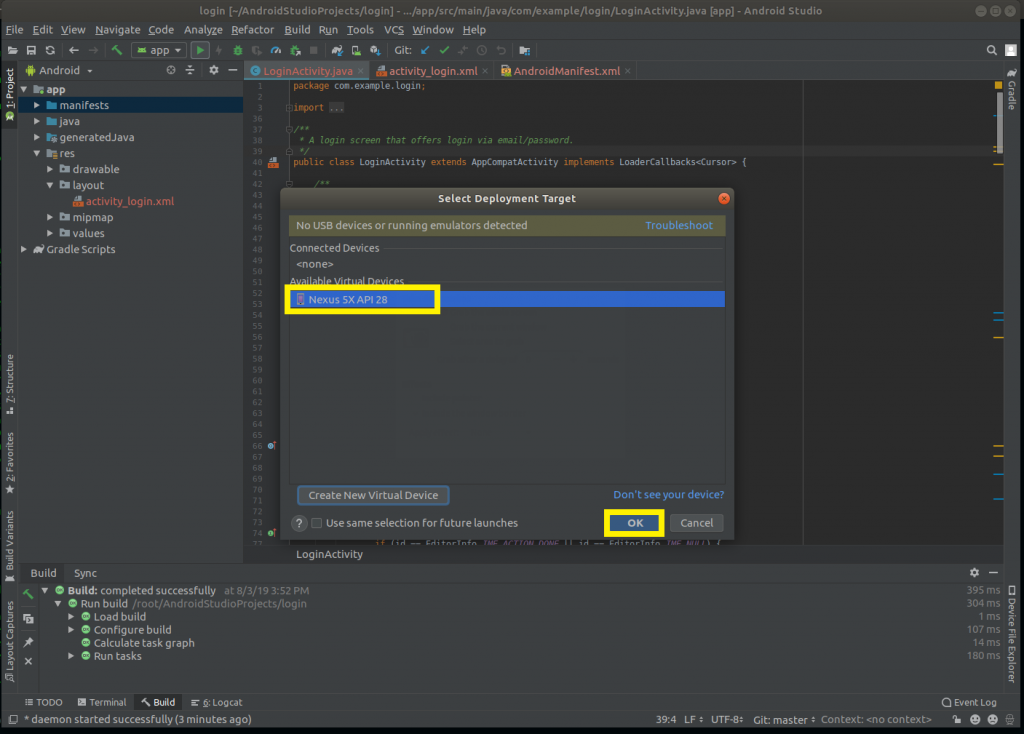
Select an available Android emulator or connected physical device from the deployment target list.
If you do not have an emulator configured, follow our tutorial:
How to Run an Android Studio Project on an Emulator
If Android Studio requests additional SDK components or emulator configuration, complete the setup before running the application.
Step 7: View Your Application
After the build and deployment process finishes, Android Studio will launch the application on the selected device.
You should now see the generated login screen or the initial interface provided by your chosen template.
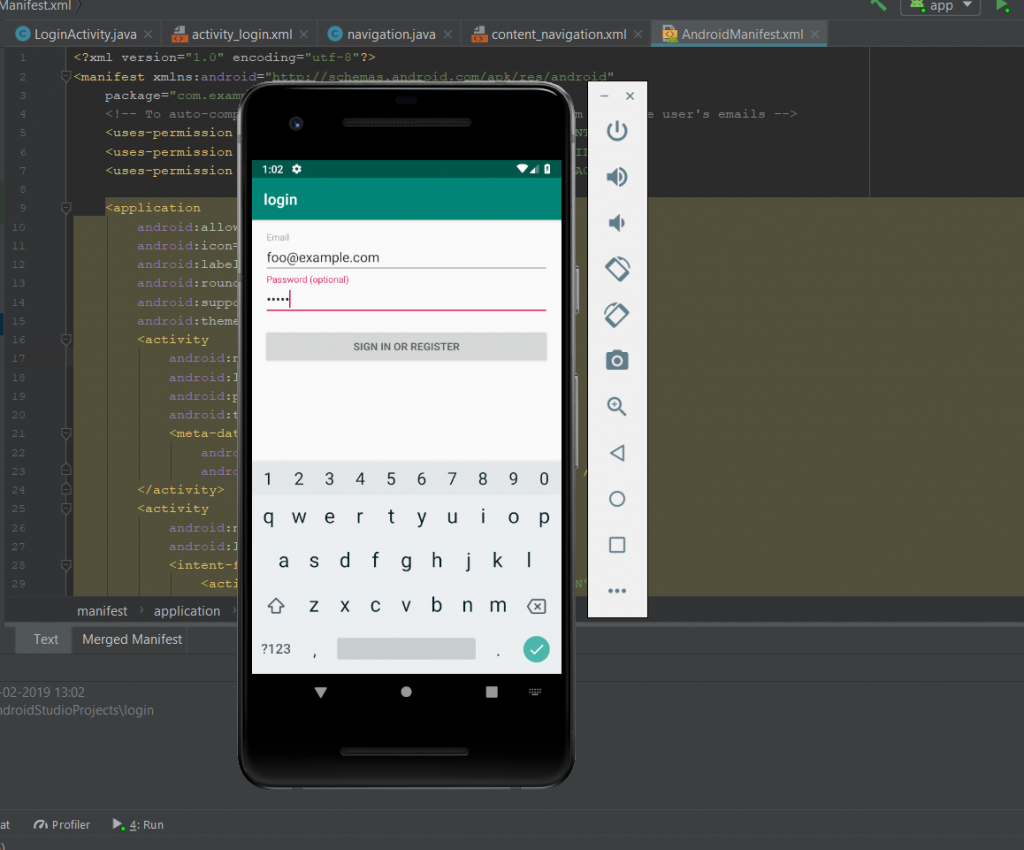
Congratulations! You have successfully created and run your first Android Studio project.
Conclusion
Creating your first Android Studio project is an important milestone in your Android app development journey. In this tutorial, you learned how to create a new project, configure the necessary settings, explore Activity source code and layout files, and run your application on an Android emulator.
Now that you understand the basics, you can take the next step by customizing the login screen, adding input validation, and integrating a backend authentication service. Practicing these features will help you strengthen your Android development skills and build more interactive, user-friendly applications.
Keep exploring Android Studio and experimenting with new features to expand your knowledge and turn your app ideas into reality.
Frequently Asked Questions (FAQs)
1. Is Android Studio free to use?
Yes. Android Studio is available free of charge and provides tools for developing, debugging, testing, and building Android applications.
2. Can I create an Android application without a physical Android device?
Yes. You can use the Android Emulator to run and test your application on a virtual Android device. A physical device is optional, although it can be useful for testing real-world behavior.
3. Should I use Java or Kotlin for my first Android project?
Both Java and Kotlin can be used for Android development. Kotlin is the recommended starting point for many new Android projects, while Java remains useful for learning and maintaining existing applications. Choose the language that best matches your learning goals and project requirements.
Related Articles
- How to Create Your First Project in Android Studio
- How to Run an Android Studio Project/App on an Emulator
Talk to Our Experts
Need help with Android application development or configuring your Android Studio project? Our experts can help you find the right solution for your business.
Get in touch with us: Contact our team
Pingback: Add another activity in Existing activity on Android Studio. - PHEONIX SOLUTIONS