Introduction
Plesk provides user management features that allow administrators to create additional user accounts and assign appropriate access permissions. Creating separate user accounts helps administrators provide users with access to required subscriptions and domains without sharing the main Plesk administrator credentials.
This document explains how to create a new user account in Plesk and assign the required user role and subscription access.
Purpose
The purpose of this document is to provide a step-by-step procedure for creating a user account in Plesk and configuring the appropriate access permissions.
Prerequisites
Before creating a new user account, ensure the following requirements are met:
- Access to the Plesk Panel with sufficient administrative privileges.
- The user’s contact name and personal email address.
- The required user role and permissions.
- Details of the subscription/domain to which the user should have access.
- A suitable Plesk username for the new account.
Procedure
Follow the steps below to create a new user account in Plesk:
Step 1: Log in to Plesk
Log in to the Plesk Panel using an account with the required administrative privileges.
Step 2: Navigate to Users
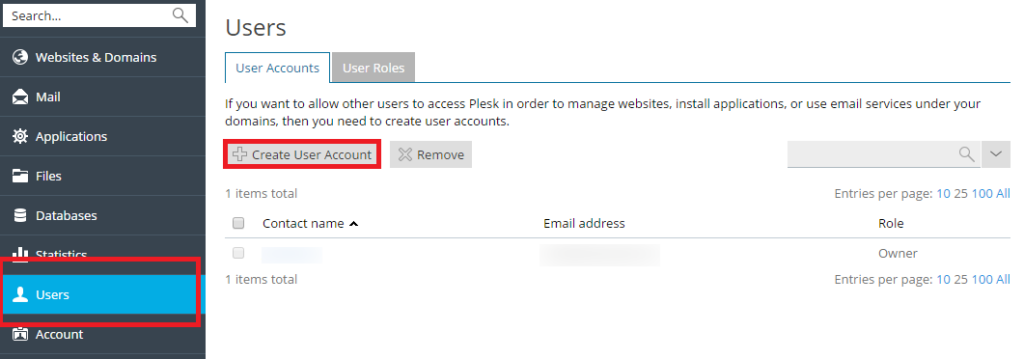
From the Plesk dashboard, navigate to Users.
Step 3: Create a User Account
Click Create User Account.
Step 4: Enter User Details
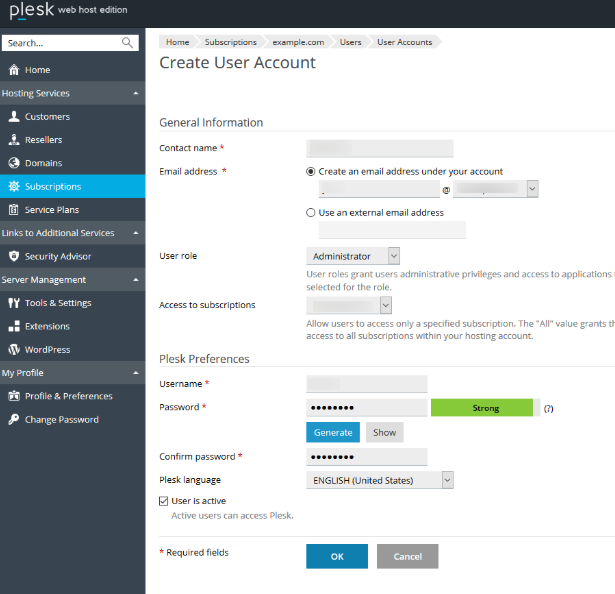
Enter the following information:
Step 5: Select the User Role
Select the appropriate User Role based on the level of access required by the user.
The selected role determines which Plesk features and operations the user can access.
Step 6: Select Subscription Access
Under Access to Subscription, select the required subscription access.
You can provide access to:
- All domains, or
- Specific domain(s)
Select the option according to the user’s requirements.
Step 7: Enter the Plesk Username
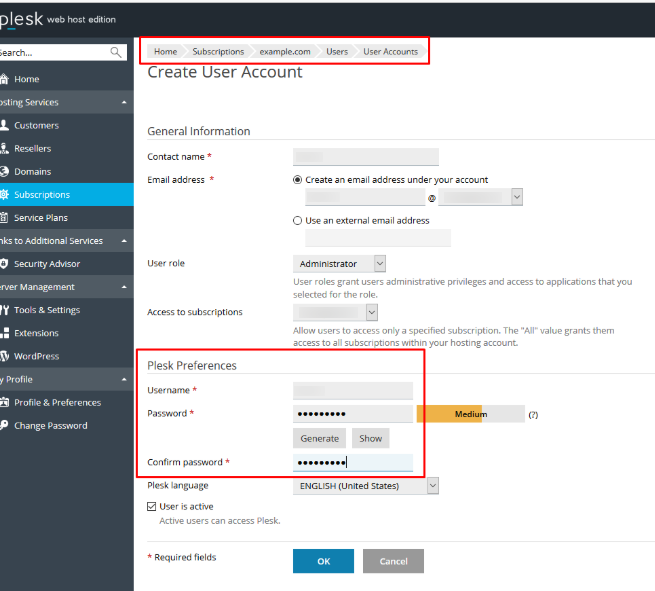
Enter the required Plesk Username for the new user account.
Step 8: Generate a Password
Click Generate to automatically create a secure password for the user.
Step 9: Copy the Password
Click Show to display the generated password and securely copy it.
Note: Passwords should be shared with the user through a secure communication method and should not be exposed in public or unsecured channels.
Step 10: Create the Account
Review the entered details and selected permissions, then click OK.
Result
The new user account is successfully created in Plesk with the selected user role and subscription/domain access.
The user can now log in to Plesk using the assigned username and password and access only the features and subscriptions permitted by the configured role.
Conclusion
Creating individual user accounts in Plesk provides a controlled and secure way to manage access to hosting subscriptions and domains. By assigning an appropriate user role and limiting subscription access according to the user’s requirements, administrators can follow the principle of least privilege while allowing users to perform their required tasks.
This procedure can be used whenever a new user needs access to specific Plesk subscriptions or domains.
FAQ-Frequently Asked Questions
1. How do I add a new user in Plesk?
Log in to Plesk, go to Users → Create User Account, enter the required user details, assign a user role and subscription access, and click OK.
2. What information is required to create a Plesk user?
You typically need the user’s contact name, email address, user role, subscription access, username, and password.
3. Can I give a user access to a specific subscription?
Yes. Plesk allows you to provide access to all subscriptions or a specific subscription, depending on the user’s requirements.
4. What is the purpose of a User Role in Plesk?
A user role controls which Plesk features and operations the user is allowed to access.
Talk to Our Technology Experts
Need help managing users, roles, or subscription access in Plesk? Our team can assist with Plesk configuration, access management, security, troubleshooting, and ongoing server administration.