
Prerequisites
- Ubuntu 18.04/16.04 LTS with minimum 2GB RAM and 1 CPU.
- PostgreSQL Version 9.3 or higher
- SSH access with sudo privileges
- Firewall Port: 9000
MySQL Support for SonarQube is depricated.Increase the vm.max_map_count kernal ,file discriptor and ulimit for current session at runtime.
1) Please follow the below steps to increase the max_map_count.
- $ sudo sysctl -w vm.max_map_count=262144
- $ sudo sysctl -w fs.file-max=65536
- $ sudo ulimit -n 65536
- $ sudo ulimit -u 4096
2) To Increase the vm.max_map_count kernal ,file discriptor and ulimit permanently .Open the below config file and Insert the below value as shown below.
$ sudo nano /etc/security/limits.conf

3) Before installing, Lets update and upgrade System Packages
$ sudo apt-get update
$ sudo apt-get upgrade
4) Install OpenJDK and JRE 11 using following command
$ sudo apt-get install openjdk-11-jdk -y
$ sudo apt-get install openjdk-11-jre -y
5) Install and Setup PostgreSQL 10 Database For SonarQube by following the below steps
a) sudo sh -c ‘echo “deb http://apt.postgresql.org/pub/repos/apt/ lsb_release -cs-pgdg main” >> /etc/apt /sources.list.d/pgdg.list’
b) wget -q https://www.postgresql.org/media/keys/ACCC4CF8.asc -O – | sudo apt-key add –
c) sudo apt-get -y install postgresql postgresql-contrib
d) sudo -Hiu postgres
e) createuser sonaradmin
f) createdb -O sonaradmin sonarqubedb
g) psql
h) ALTER USER sonaradmin WITH ENCRYPTED password ‘changethepassword’;
i) \q
j) exit
6) Fontconfig and FreeType fonts are required for generating SonarQube executive reports. Install them as follows;
apt install fontconfig-config libfreetype6
7) Once all the prerequisites are met, proceed to install SonarQube
wget https://binaries.sonarsource.com/Distribution/sonarqube/sonarqube-8.7.0.41497.zip
8) Extract SonarQube to some directory, e.g the /opt directory
apt install zip
unzip sonarqube-8.7.0.41497.zip -d /opt/
mv /opt/sonarqube{-8.7.0.41497,}
9) SonarQube should not be run as root. As such, you can create an non admin account for running SonarQube as follows;
useradd -M -d /opt/sonarqube/ -r -s /bin/bash sonarqube
chown -R sonarqube: /opt/sonarqube
10) Set database connection details as per your PostgreSQL setup above.
vim /opt/sonarqube/conf/sonar.properties
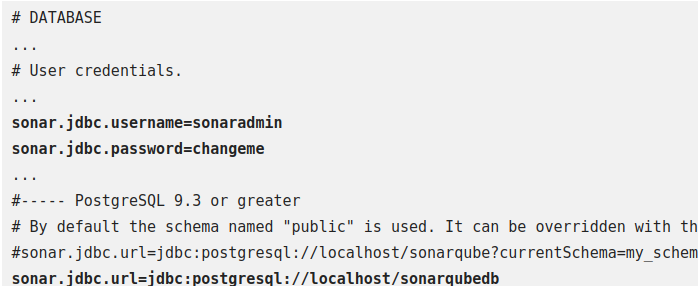
11) Save and exit the file.
12) As much as you can start SonarQube in standalone mode using the /opt/sonarqube/bin/linux-x86-64/sonar.sh script by passing the start option as in /opt/sonarqube/bin/linux-x86-64/sonar.sh start, it is better to use the systemd service unit. Create SonarQube Systemd Service Unit file;
nano /etc/systemd/system/sonarqube.service
Copy and paste the below content
[Unit]
Description=SonarQube service
After=syslog.target network.target
[Service]
Type=forking
ExecStart=/opt/sonarqube/bin/linux-x86-64/sonar.sh start
ExecStop=/opt/sonarqube/bin/linux-x86-64/sonar.sh stop
User=sonarqube
Group=sonarqube
Restart=always
LimitNOFILE=65536
LimitNPROC=4096
[Install]
WantedBy=multi-user.target
13) Save and close the file. Now stop the sonarqube script earlier we started to run using as daemon. Start the Sonarqube daemon by running:
sudo systemctl start sonarqube.service
sudo systemctl enable sonarqube.service
sudo systemctl status sonarqube.service
14) You can find all the logs under, /opt/sonarqube/logs directory.
15) In order to access SonarQube Web interface, you need to install and setup a web server to proxy the requests to SonarQube running locally.
16) You can either use Apache or Nginx web server.
apt install nginx -y
nano /etc/nginx/sites-available/sonarqube
17) Copy and paste the below content
server{
    listen      80;
    server_name sonarqube.kifarunix-demo.com;

    access_log  /var/log/nginx/sonarqube.access.log;
    error_log   /var/log/nginx/sonarqube.error.log;

    proxy_buffers 16 64k;
    proxy_buffer_size 128k;

    location / {
        proxy_pass  http://127.0.0.1:9000;
        proxy_next_upstream error timeout invalid_header http_500 http_502 http_503 http_504;
        proxy_redirect off;

        proxy_set_header    Host            $host;
        proxy_set_header    X-Real-IP       $remote_addr;
        proxy_set_header    X-Forwarded-For $proxy_add_x_forwarded_for;
        proxy_set_header    X-Forwarded-Proto http;
    }
}

18) Check Nginx syntax errors;
nginx -t

19) Enable SonarQube Nginx site;
ln -s /etc/nginx/sites-available/sonarqube /etc/nginx/sites-enabled/
systemctl restart nginx

20) The access SonarQube using the address http://sonarqube-server-host-IP-or-hostname.
You will be prompted to enter login details. Default authentication creds are Username: admin Password: admin