Post Date: 02 September 2018
Last Updated: 03 September , 2026
Introduction
Redis (Remote Dictionary Server) is an open-source, in-memory data structure store widely used as a database, cache server, and message broker. Because Redis stores data in memory rather than on disk, it provides extremely fast read and write operations, making it an excellent choice for improving application performance.
Redis supports several data structures, including:
- Strings
- Hashes
- Lists
- Sets
- Sorted Sets
- Bitmaps
- Streams
- HyperLogLogs
Many modern applications use Redis to cache frequently accessed data, manage user sessions, process real-time analytics, and handle background jobs.
In this tutorial, you will learn how to install Redis Server and the Redis PHP Extension on a CentOS 7 server.
Why Use Redis?
Redis offers several benefits:
- High-speed data access
- Reduced database load
- Improved application performance
- Session storage support
- Real-time analytics processing
- Message queue functionality
- Easy integration with PHP, Python, Java, Node.js, and more
Redis Architecture Overview
The following workflow explains how Redis works as a cache server:
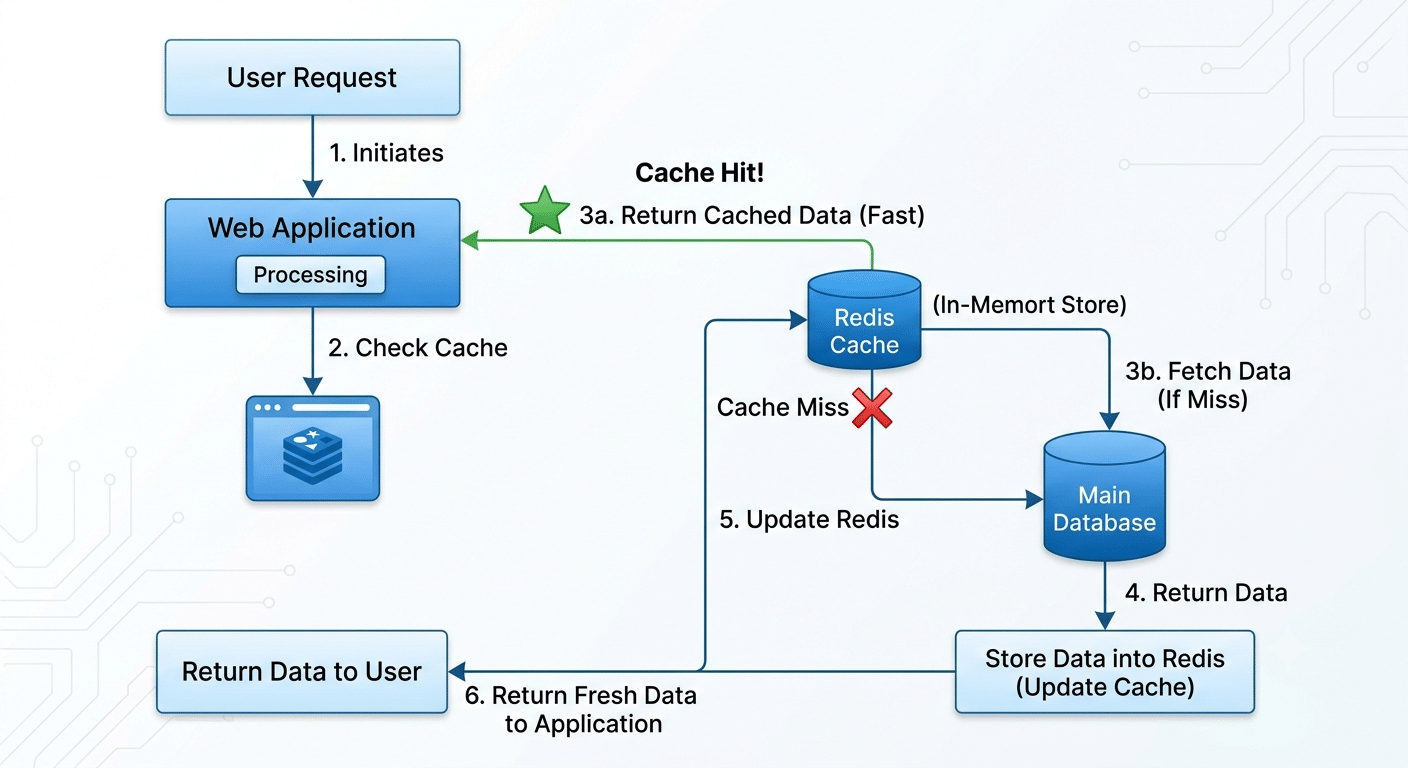
How It Works
- User sends a request to the application.
- Application checks Redis for cached data.
- If data exists (Cache Hit), Redis returns it immediately.
- If data does not exist (Cache Miss), the application queries the database.
- Database results are stored in Redis.
- Future requests are served directly from Redis.
This process significantly improves application response time.
Step 1: Prerequisites
Login to your CentOS 7 server using SSH.
ssh root@your-server-ip
Update existing packages:
yum update -y
Redis packages are available through the EPEL repository.
Install EPEL:
yum install epel-release -y
Expected output:
Package epel-release already installed and latest version
Step 2: Install Redis Server
Install Redis using YUM:
yum install redis -y
After installation, start Redis:
systemctl start redis
Enable Redis to start automatically during server boot:
systemctl enable redis
Verify service status:
systemctl status redis
Expected output:
Active: active (running)
Step 3: Verify Redis Installation
Check Redis version:
redis-server --version
Example output:
Redis server v=6.x.x
Check whether Redis is listening on port 6379:
ss -tulpn | grep 6379
Expected output:
tcp LISTEN 0 128 127.0.0.1:6379
Step 4: Install PHP Redis Extension
First, verify PHP installation:
php --version
Example:
PHP 7.1.23
Install required development packages:
yum install php-devel php-pear gcc make -y
Verify PECL is available:
pecl version
Install Redis extension:
pecl install redis
Enable the extension:
echo "extension=redis.so" > /etc/php.d/redis.ini
Restart Apache:
systemctl restart httpd
Or restart PHP-FPM:
systemctl restart php-fpm
Verify Redis extension:
php -m | grep redis
Expected output:
redis
Step 5: Configure Redis Cache Server
Redis configuration file:
/etc/redis.conf
Open configuration file:
nano /etc/redis.conf
Configure Memory Usage
Example:
maxmemory 256mb
maxmemory-policy allkeys-lru
Configuration Explanation
| Setting | Description |
|---|---|
| maxmemory | Maximum memory Redis can use |
| allkeys-lru | Removes least recently used keys when memory is full |
Redis supports multiple eviction policies:
| Policy | Description |
|---|---|
| noeviction | No key removal |
| allkeys-lru | Remove least recently used keys |
| volatile-lru | Remove LRU keys with expiration |
| allkeys-random | Remove random keys |
| volatile-random | Remove random expiring keys |
Save the file and restart Redis:
systemctl restart redis
Step 6: Secure Redis Server
For production environments, secure Redis properly.
Edit:
nano /etc/redis.conf
Enable protected mode:
protected-mode yes
Bind Redis to localhost:
bind 127.0.0.1
Set password:
requirepass StrongRedisPassword
Restart Redis:
systemctl restart redis
Test authentication:
redis-cli
AUTH StrongRedisPassword
Expected response:
OK
Step 7: Test Redis Connection
Connect using Redis CLI:
redis-cli
Run:
PING
Expected output:
PONG
Store test data:
SET website "Pheonix Solutions"
Retrieve test data:
GET website
Output:
"Pheonix Solutions"
Step 8: PHP Redis Connection Test
Create a PHP file:
<?php

$redis = new Redis();

$redis->connect('127.0.0.1', 6379);

echo $redis->ping();
?>
Run:
php test.php
Output:
+PONG
This confirms successful communication between PHP and Redis.
Useful Redis Commands
Check Redis Status
systemctl status redis
Restart Redis
systemctl restart redis
Stop Redis
systemctl stop redis
View Memory Usage
redis-cli INFO memory
List All Keys
redis-cli KEYS "*"
Flush Current Database
redis-cli FLUSHDB
Flush All Databases
redis-cli FLUSHALL
Conclusion
Redis is one of the most popular caching solutions available today. By storing frequently accessed data in memory, Redis dramatically improves application performance, reduces database load, and enhances user experience.
Following the steps in this guide, you have successfully:
- Installed Redis Server on CentOS 7
- Enabled Redis service
- Installed PHP Redis Extension
- Configured Redis memory settings
- Secured Redis with authentication
- Tested Redis connectivity
- Integrated Redis with PHP applications
Your Redis cache server is now ready for production use.
Frequently Asked Questions (FAQ)
What is Redis?
Redis is an in-memory key-value data store used for caching, database operations, session management, and messaging.
What port does Redis use?
Redis uses port 6379 by default.
Is Redis faster than MySQL?
Redis is significantly faster for cached data because it stores data in memory. However, Redis is not a replacement for relational databases such as MySQL.
Related Article
Talk to our experts
Have a technology challenge or looking for the right solution for your business? Our team can help you with cloud, DevOps, development, infrastructure, design, and more. Feel free to reach out to our experts here.