Introduction
Securing sensitive website directories is an important part of website administration. If your website contains private documents, internal reports, development files, or restricted content, you may want to prevent unauthorized users from accessing them.
Plesk provides a built-in feature called Password-Protected Directories that allows website administrators to restrict access to specific directories using a username and password. You can configure this feature directly from the Plesk control panel without manually editing Apache configuration files.
In this guide, you will learn how to create a password-protected directory in Plesk, configure user credentials, test the authentication process, and troubleshoot common issues.
What Is a Password-Protected Directory in Plesk?
A password-protected directory is a website folder that requires users to authenticate before accessing its contents.
For example, if you have a directory named private, visitors must enter valid login credentials before viewing its protected pages or files.
Common use cases include:
- Protecting confidential documents and reports.
- Restricting access to staging or development content.
- Securing internal project files.
- Sharing private resources with authorized users.
- Limiting access to selected website sections.
Plesk typically implements directory-level password protection through web server authentication, such as HTTP Basic Authentication.
Prerequisites
Before configuring password protection, ensure that you have:
- Access to the Plesk control panel.
- A website or domain hosted on your Plesk server.
- Permission to manage website directories.
- A directory that you want to protect.
- A strong password for the authorized user.
The exact menu names may vary depending on your Plesk version, hosting configuration, and user permissions.
Step 1: Log In to the Plesk Control Panel
- Open your Plesk control panel URL in a web browser.
- Enter your Plesk username and password.
- Click Log In.
- Open the Websites & Domains section.
- Select the domain for which you want to configure directory protection.
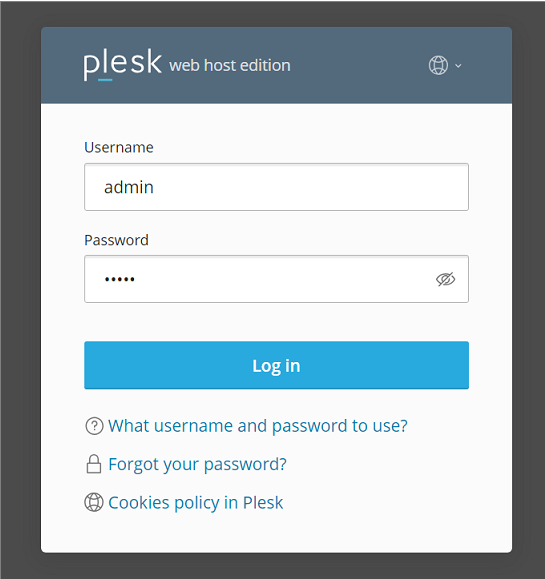
For example:
Your hosting provider may supply a different URL or port for accessing Plesk.
Step 2: Open Password-Protected Directories
- Navigate to Websites & Domains.
- Locate your domain.
- Find the Password-Protected Directories option.
- Click it to open the directory protection settings.
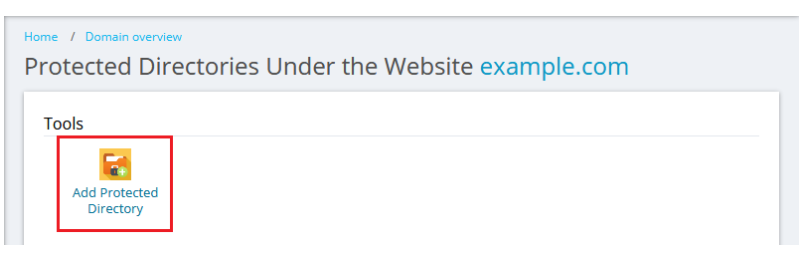
If you cannot find this option, your hosting provider may have disabled it, or your account may not have sufficient permissions.
Step 3: Create a Protected Directory
- Click Add Protected Directory.
- Enter the directory path you want to protect.
- Provide a name for the protected area, such as
Private Documents. - Save the configuration.
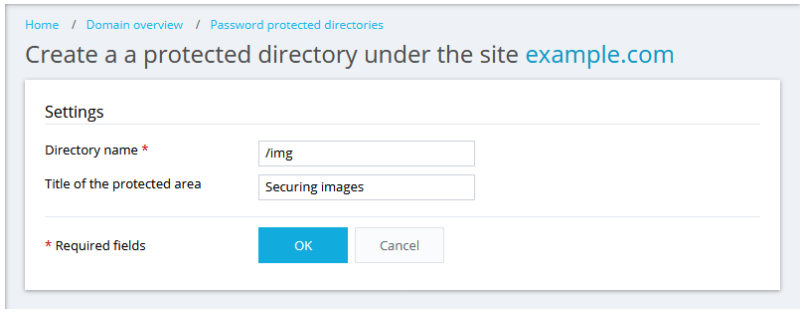
For example, you might protect a directory at:
Depending on your Plesk interface, you may need to specify the directory path relative to the website document root.
Important: Select the correct directory. Protecting the document root or a parent directory may restrict access to more of your website than intended.
Step 4: Create a User Account
After creating the protected directory, you need to configure an authorized user.
- Open the newly created protected directory.
- Select the option to add a user.
- Enter a username, such as
privateuser. - Enter a strong password.
- Confirm the password if requested.
- Save the user account.
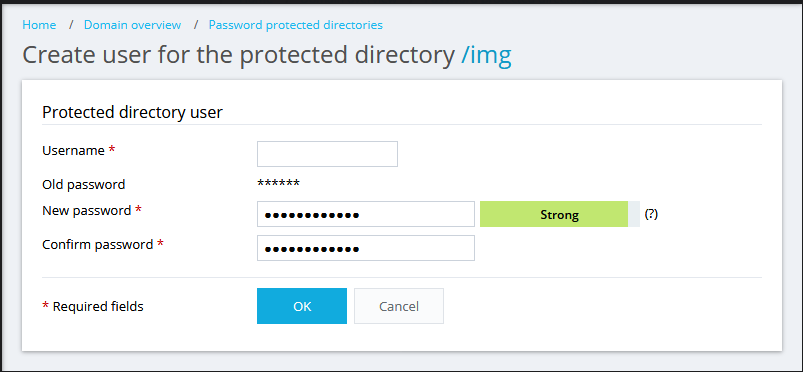
Use a unique password that is not shared with your Plesk administrator account or other services.
You can create additional users if multiple people need access to the protected directory.
Step 5: Test the Password Protection
After saving the configuration, test it from your web browser.
- Open a new private or incognito browser window.
- Visit the protected directory URL.Example:
https://example.com/private/ - Confirm that the browser requests a username and password.
- Enter the credentials you configured in Plesk.
- Verify that authorized users can access the protected content.
- Test again with incorrect credentials to confirm that access is denied.
If the directory contains an index file, the browser may display that page after successful authentication.
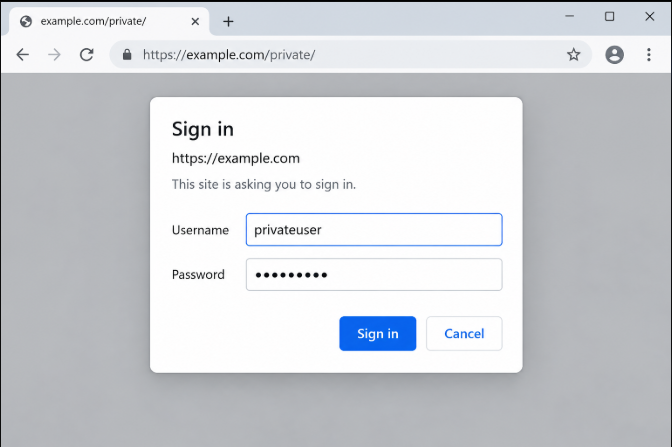
If you are already logged in or have cached credentials, use a private browser window to test the authentication process properly.
Step 6: Verify That the Protection Works
You can also test the protected URL using curl from a terminal.
Check access without credentials
curl -I https://example.com/private/Depending on your web server configuration, you should normally receive an HTTP 401 Unauthorized response when authentication is required.
Test access with valid credentials
curl -I -u privateuser https://example.com/private/The command prompts you for the password rather than placing it directly in the command history.
A successful request should return an appropriate response, commonly 200 OK, although redirects and directory configuration can produce other valid status codes.
Replace example.com, /private/, and privateuser with your actual domain, directory, and username.
Security note: Use HTTPS when testing credentials. Avoid putting passwords directly in shell commands because they may be recorded in shell history or exposed through process information.
Step 7: Manage Users and Directory Access
Plesk allows you to manage access to protected directories after the initial setup.
Depending on the available options, you can:
- Add new authorized users.
- Change existing user passwords.
- Remove users who no longer require access.
- Modify the protected directory description or path.
- Remove password protection when it is no longer required.
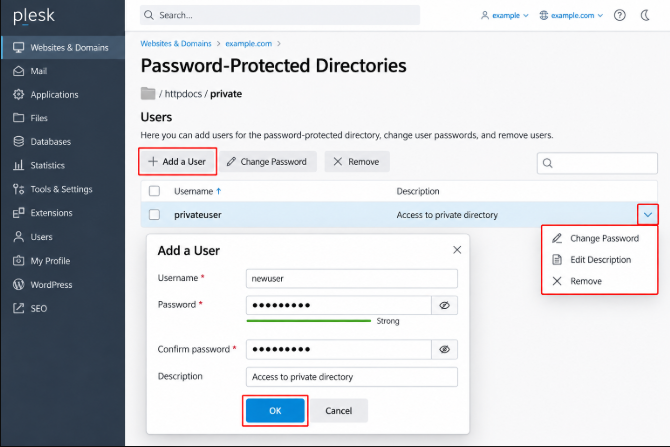
Review user access periodically, particularly when employees, developers, or contractors no longer need access to private resources.
How to Remove Password Protection
If you want to make a directory publicly accessible again, follow these steps:
- Log in to Plesk.
- Navigate to Websites & Domains.
- Open Password-Protected Directories.
- Select the directory you want to make public.
- Remove the directory’s password protection using the available delete or removal option.
- Confirm the change if prompted.
- Test the URL in a private browser window.
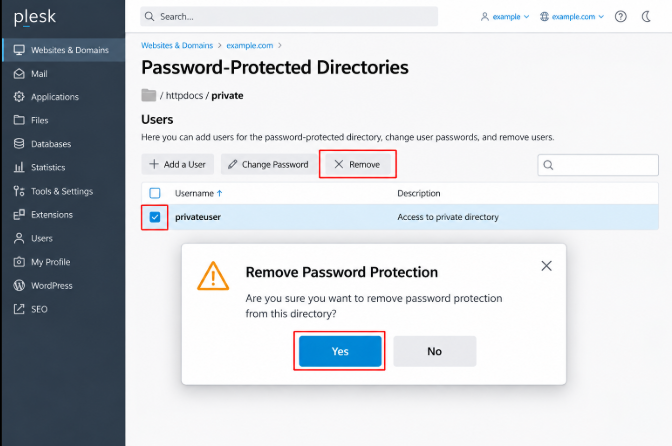
Be careful when removing protection from a directory that contains confidential information. Verify that the content is intended to be publicly accessible before making this change.
Common Problems and Troubleshooting
1. The Password Prompt Does Not Appear
Possible causes:
- The wrong directory was protected.
- The URL points to another directory or virtual host.
- A reverse proxy or web server configuration is interfering.
- The protection settings have not been applied correctly.
Solution:
Verify the protected directory path in Plesk, check the exact URL, and test the page in a private browser window.
2. The Browser Returns HTTP 401 Unauthorized
An HTTP 401 Unauthorized response generally indicates that authentication is required or that the supplied credentials were not accepted.
Solution:
- Confirm the username and password.
- Check whether the user is assigned to the correct protected directory.
- Reset the password in Plesk if necessary.
- Try again using a private browser window.
3. The Browser Returns HTTP 403 Forbidden
A 403 Forbidden response may indicate file permissions, web server access rules, or directory indexing restrictions.
Solution:
Check the directory permissions and web server configuration. Also verify that the directory contains an appropriate index file if directory listing is disabled.
4. Password Protection Works on One Page but Not Another
Some files or URLs may be served from a different directory, application, or virtual host.
Solution:
Check the actual document root and URL mapping in Plesk. Ensure that the files you want to restrict are inside the protected directory.
5. The Password-Protected Directories Option Is Missing
The feature may be unavailable because of hosting-provider restrictions, user permissions, or differences in the Plesk interface.
Solution:
Check your subscription permissions or contact your hosting provider. If you administer the server, review the relevant Plesk configuration and web server support.
Security Best Practices
Follow these recommendations when protecting directories in Plesk:
- Use HTTPS: Protect credentials during transmission by ensuring that the website has a valid TLS certificate.
- Choose strong passwords: Use unique passwords and avoid shared or easily guessed credentials.
- Limit access: Give directory access only to users who need it.
- Keep software updated: Apply security updates to Plesk, the operating system, and the web server.
- Review permissions: Avoid making private files publicly accessible through alternate URLs or application routes.
- Monitor access: Review available web server logs for unusual or repeated authentication failures.
- Use application-level security when needed: For sensitive business information, use proper authorization controls in addition to directory-level authentication.
HTTP Basic Authentication is not a substitute for application-level authorization. It is also important to understand that password protection restricts HTTP access to the configured directory; it does not encrypt files stored on the server.
Conclusion
Creating a password-protected directory in Plesk is a simple way to restrict access to private website content without manually configuring web server authentication.
By navigating to Websites & Domains → Password-Protected Directories, creating a protected directory, and adding authorized users, you can secure selected website resources through the Plesk control panel.
Always test the configuration, use HTTPS, maintain strong passwords, and review access permissions regularly to help keep your website secure.
Recommended next step: Review your Plesk directory permissions and confirm that only the intended website content is protected.
Frequently Asked Questions (FAQs)
1. Can I password-protect a directory without using SSH?
Yes. If your Plesk account provides the Password-Protected Directories feature, you can configure directory protection directly through the control panel.
2. Can I create multiple users for one protected directory?
Yes. Plesk generally supports multiple authorized users for a protected directory, subject to the available configuration and permissions.
3. Does password protection work with HTTPS?
Yes. Directory-level authentication can work with HTTPS. Using HTTPS is strongly recommended because it encrypts the connection, including authentication credentials.
4. Can I protect a WordPress directory using Plesk?
Yes, but proceed carefully. Protecting directories used by WordPress may prevent visitors, plugins, APIs, or administrative functions from working correctly. Test the configuration before applying it to a production website.
5. Does password protection encrypt my files?
No. Password protection controls access through the web server. It does not encrypt files stored on disk. Use file encryption and appropriate server permissions when storage-level protection is required.
6. How can I change the password for a protected directory?
Open Websites & Domains → Password-Protected Directories, select the protected directory, and manage the associated user account. The exact controls depend on your Plesk version.
Related Articles
- How to Add a User in Plesk
- How to Create a User Role in Plesk
- How to Change an Existing User Role in Plesk
Talk to our experts.
Looking for the right technology solution for your business? Our team of experts can help you with development, cloud, DevOps, design, and a wide range of other technology needs. Get in touch with our team here: Contact Page