BUILDING YOUR FIRST ANDROID APP IN JAVA WITH ANDROID STUDIO – A COMPLETE BEGINNER’S GUIDE
Have you ever wanted to create your own mobile app but didn’t know where to start? Don’t worry, you are in the right place. In this beginner-friendly guide, we will walk through the entire process of building your first Android app using Java in Android Studio. This isn’t just a short tutorial, we will elaborate every step, show diagrams, and explain concepts in simple words so even someone new to programming can follow along.
By the end of this guide, you’ll have:
- Installed Android Studio
- Created a new project
- Designed your first screen
- Written Java code to add functionality
- Run your app on a phone/emulator
- Learned the structure of an Android project
Why Android and Java?
Android powers over 3 billion devices worldwide – from phones to TVs, cars, and smart devices.
Java has been the official Android language for years and is still widely used (even though Kotlin is also popular now).
Learning Java in Android gives you strong fundamentals that are useful across many programming areas.
How Android Apps Work (Simple Flow)
Before we jump into coding, let’s understand how an Android app works.
- User Interface (UI) → What the user sees (buttons, text, images).
- Java Code (Logic) → What happens when the user taps or interacts.
- Android System → Connects your app with the phone’s hardware and software.
Step 1: Installing Android Studio
- Go to the official site: https://developer.android.com/studio
- Download for your OS (Windows, macOS, or Linux).
- Run the installer → Follow the setup wizard.
- Install the Android SDK and Virtual Device (Emulator).
Tip: Android Studio needs at least 8GB RAM to run smoothly.
Step 2: Creating Your First Project
- Open Android Studio → Click “New Project”.
- Choose Empty Activity.
- Enter:
- App Name: MyFirstApp
- Package Name: com.example.myfirstapp
- Language: Java
- Minimum SDK: Android 5.0 (Lollipop)
- Click Finish.
Now Android Studio generates a project with:
- MainActivity.java (your app’s main screen logic).
- activity_main.xml (your app’s UI layout).
Step 3: Understanding the Project Structure
When you open the project, you’ll see folders:
- Java folder → contains your logic code (MainActivity.java).
- res/layout → XML files for UI (design).
- res/drawable → images and icons.
- AndroidManifest.xml → tells Android about your app (name, permissions, activities).
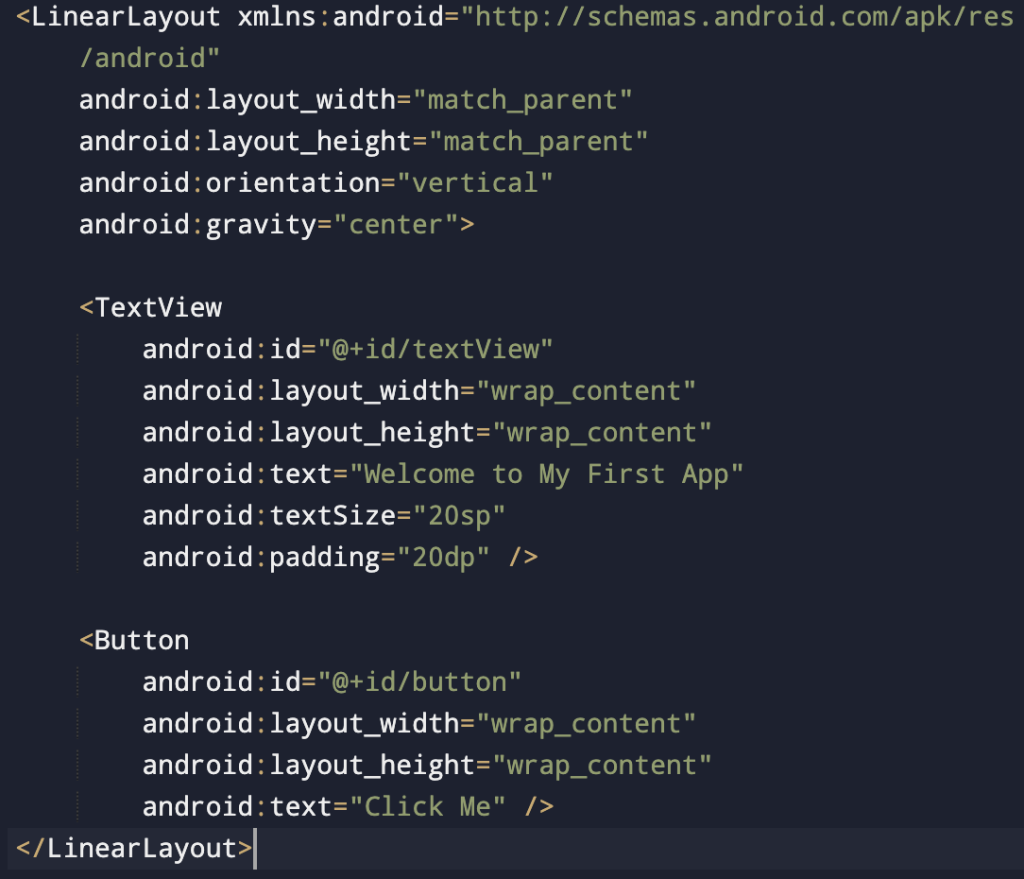
Step 4: Designing the App Screen (UI)
- Open res/layout/activity_main.xml.
- Switch to Design View (you can drag & drop UI elements).
- Add:
- A TextView → Display “Welcome to My First App”
- A Button → Display “Click Me”
The XML looks like this:

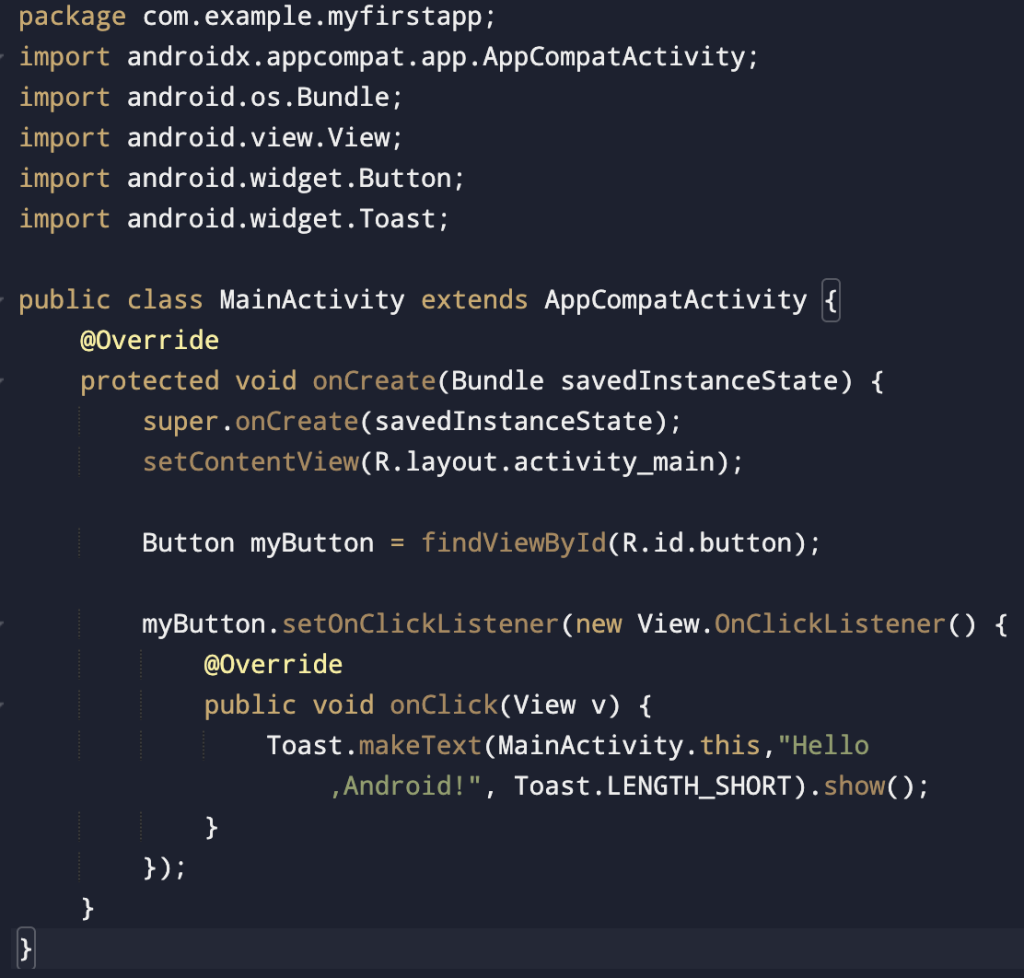
Step 5: Writing Java Code (Making the Button Work)
Now let’s make the button show a message when clicked.
Open MainActivity.java and write:

What happens:
- User taps button → App runs Java code → Displays Toast message.
Step 6: Running the App
You can run your app in two ways:
Option 1: Android Emulator
- Open AVD Manager in Android Studio.
- Create a virtual phone (Pixel 4, Nexus, etc..).
- Run the app → It opens in the emulator.
Option 2: Real Android Device
- Enable Developer Options on your phone.
- Turn on USB Debugging.
- Connect phone via USB → Select your device in Android Studio.
The app will launch with a button. When you tap it, you’ll see a popup:
“Hello, Android!”
Step 7: Exploring More Features
Now that you’ve created your first app, try:
- Adding an EditText for user input.
- Changing the button text dynamically.
- Creating another screen (Activity) and switching between screens.
Example: Turn your app into a small Calculator or To-Do List.
Key Concepts You Learned
- Android Studio basics: Installation, Project creation.
- UI in XML: Designing layouts.
- Java code: Connecting UI with logic.
- Toast messages: Simple feedback to the user.
- Running on emulator/phone.
Conclusion
Building your first Android app with Java in Android Studio is like opening a door to endless possibilities. Today, you made a simple app with a button and a message. Tomorrow, you can make calculators, notes apps, or even AI-powered apps.
The important thing is: Start Small, Build Confidence, and Keep Experimenting. Every big app you see on the Play Store once began as someone’s “first app.”
So, open Android Studio and start building. Your app journey begins today!
