How to Install AVideo/YouPHPTube on Ubuntu Server
Introduction :
AVideo is an open-source video streaming and sharing platform that allows you to host and manage videos on your own server. It is widely used for creating private video portals, online courses, and internal company video libraries. In this guide, we’ll walk through the steps to set up AVideo on a Linux server.
Server Requirements :
Before you start, make sure your server has:
- Ubuntu 22.04 (recommended)
- 4 GB RAM (minimum)
- 2 vCPU or more
- 50 GB disk space or more
- Root or sudo access
- A domain name pointed to the server
Required packages:
- Apache
- PHP 8 +
- MariaDB
Step 1 : Download AVideo on Ubuntu Server
- Log into your Ubuntu 20.04 server via SSH. Then go to the web root directory.
| $ cd /var/www/ |
- Clone the AVideo streamer repository from Github.
| $sudo apt install git $sudo git clone https://github.com/WWBN/AVideo.git |
- Then go into the directory.
| $ cd AVideo/ |
- Clone the AVideo encoder repository from Github.
| $ sudo git clone https://github.com/WWBN/AVideo-Encoder.git |
- It will be saved as AVideo-Encoder. We rename it to upload, so users can have a better idea of what this URL is for when uploading videos.
| $ sudo mv AVideo-Encoder upload |
- Next, we need to make www-data (the web server user) as the owner of the web root.
| $ sudo chown www-data:www-data /var/www/AVideo/ -R |
Step 2: Install Dependencies
- AVideo uses FFmpeg to encode videos. We can easily install FFmpeg from the default Ubuntu repository.
| $ sudo apt install ffmpeg |
- To read and write meta information in multimedia files, we need to install the libimage-exiftool-perl package.
| $ sudo apt install libimage-exiftool-perl |
- You also need to install some common PHP extensions.
| $ sudo apt install php php-cli php-common php-mysql php-curl php-gd php-xml \ php-mbstring php-zip php-readline php-intl php-bcmath php-opcache -y |
- To fetch videos from other sites, we need to install YouTube-DL. Though it’s included in the Ubuntu repository, but it’s outdated. We will install YouTube-DL from the Python Package Index, which always contains the latest version of YouTube-DL.
| $ sudo apt install python3-pip $ sudo -H pip3 install youtube-dl |
- It’s very important that you use the latest version, or you might not be able to download videos from other sites. We can create a Cron job to automatically check and install the latest version.
| $ sudo crontab -e |
- Add the following line at the end of the Crontab file to try upgrading YouTube-DL daily.
| $ @daily sudo -H pip3 install –upgrade youtube-dl > /dev/null |
Step 3: Create Database and User in MariaDB
- Log into MariaDB database server with the following command. Since MariaDB is now using unix_socket plugin to authentication user login, there’s no need to enter MariaDB root password. We just need to prefix the mysql command with sudo.
| $ sudo mysql |
- Create a new database for AVideo. After that, create a user account for the database and set a password for it. Once the user is created, give that user full permission to access and manage the AVideo database.
| $ CREATE DATABASE AVideo; $ CREATE USER ‘AVideo’@’localhost’ IDENTIFIED BY ‘your-password’; $ GRANT ALL PRIVILEGES ON AVideo.* TO ‘AVideo’@’localhost’; $ FLUSH PRIVILEGES; |
- For the AVideo Encoder, create a separate database dedicated to it. Then set up a new database user specifically for the encoder and assign a secure password. After creating the user, provide it with full permissions so it can access and manage the encoder’s database properly.
| $ CREATE DATABASE AVideoEncoder; $ CREATE USER ‘AVideoEncoder’@’localhost’ IDENTIFIED BY ‘your-password’; $ GRANT ALL PRIVILEGES ON AVideoEncoder.* TO ‘AVideoEncoder’@’localhost’; $ FLUSH PRIVILEGES; $ exit |
Step 4: Setting Up Web Server on Apache
- Create a new virtual host file
| $ sudo nano /etc/apache2/sites-available/avideo.conf |
- Add the virtual host configuration inside the file, and replace the sample domain name with your actual domain. Make sure you have created the DNS A-record for that domain in your DNS manager. Also note that the document root path is case-sensitive, and you should not add a forward slash at the end.
| <VirtualHost *:80> ServerName sample.yourdomain.com DocumentRoot /var/www/AVideo <Directory /var/www/AVideo> DirectoryIndex index.php Options +FollowSymLinks AllowOverride All Require all granted </Directory> ErrorLog ${APACHE_LOG_DIR}/avideo.error.log CustomLog ${APACHE_LOG_DIR}/avideo.access.log combined </VirtualHost> |
- Save and close the file. Then enable this virtual host and rewrite module and then ,Restart Apache for the changes to take effect.
| $ sudo a2ensite avideo.conf $ sudo a2enmod rewrite $ sudo systemctl restart apache2 |
- Now visit your domain in the browser, and it should redirect you to the AVideo setup wizard page. If you still see the default Apache welcome page instead of the setup wizard, you need to disable the default virtual host.
| $ sudo a2dissite 000-default.conf |
- Restart Apache.Before entering any information in the setup wizard, we need to enable HTTPS.
Step 5: Enabling HTTPS
- To encrypt the HTTP traffic, we can enable HTTPS by installing a free TLS certificate issued from Let’s Encrypt. Run the following command to install Let’s Encrypt client (certbot) on Ubuntu
- If you use Apache, you also need to install the Certbot Apache plugin and run last command to obtain and install TLS certificate.
| $ sudo apt install certbot $ sudo apt install python3-certbot-apache $ sudo certbot –apache –agree-tos –redirect –hsts –staple-ocsp –email <email-ID> -d <domain> |
The certificate should now be obtained and automatically installed.
Step 6: Finish Installation with the Setup Wizard
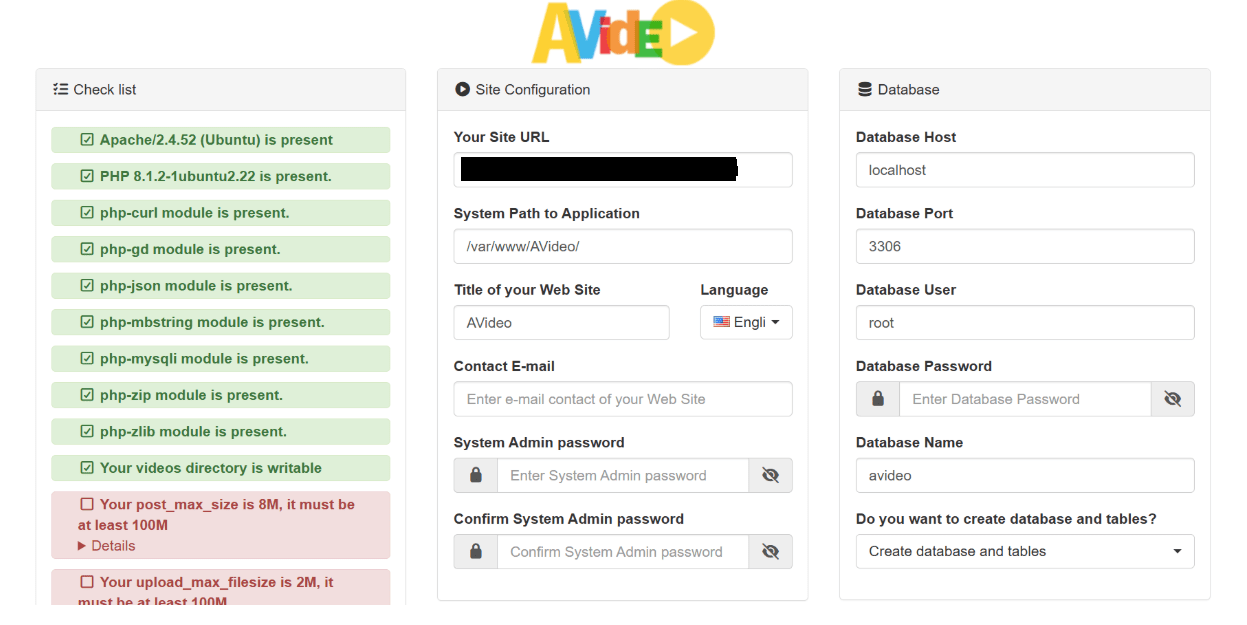
Now go to the domain ,setup wizard will appear. On the left side, you can see if your server meet the requirements.
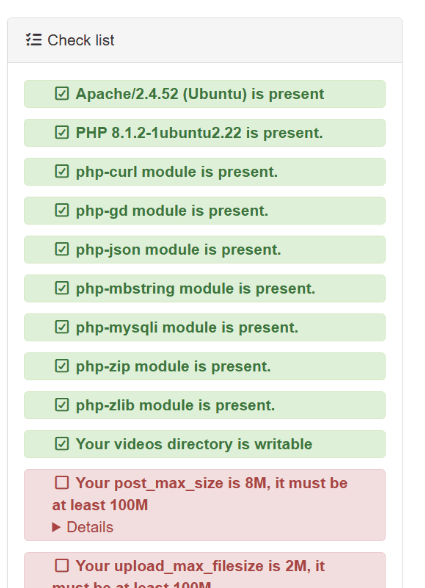
- As you can see, the PHP post_max_size should be at least 100M and upload_max_filesize should be at least 100M. We need to edit the php.ini file to change the two values. If you use Apache web server, then
| $ sudo nano /etc/php/8.1/apache2/php.ini |
- Find the following two lines and change the values in it.
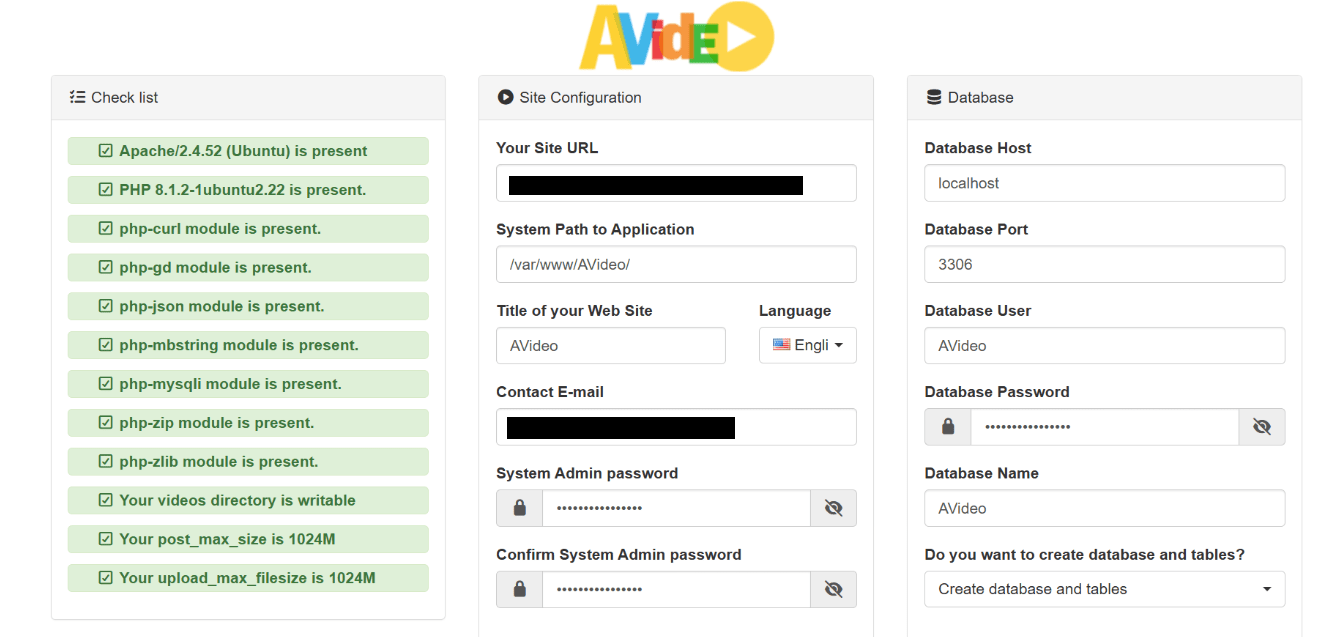
| post_max_size = 8M | post_max_size = 1024M |
| upload_max_filesize = 2M | upload_max_filesize = 1024M |
- Save and close the file. Restart Apache for the changes to take effect.
| $ sudo systemctl restart apache2 |
- Now refresh the AVideo install wizard page. Your server should pass all requirements. Now on the right side, you can enter a title your video site, and set a system admin password. Enter the AVideo database name, user and password your created earlier. (Note: You should use the main database, not the encoder database. Also be aware of case-sensitive.)
- Click the Install now button and AVideo should be installed successfully.

- Now we need to remove the /var/www/AVideo/install/ directory.
| sudo rm /var/www/AVideo/install/ -r |
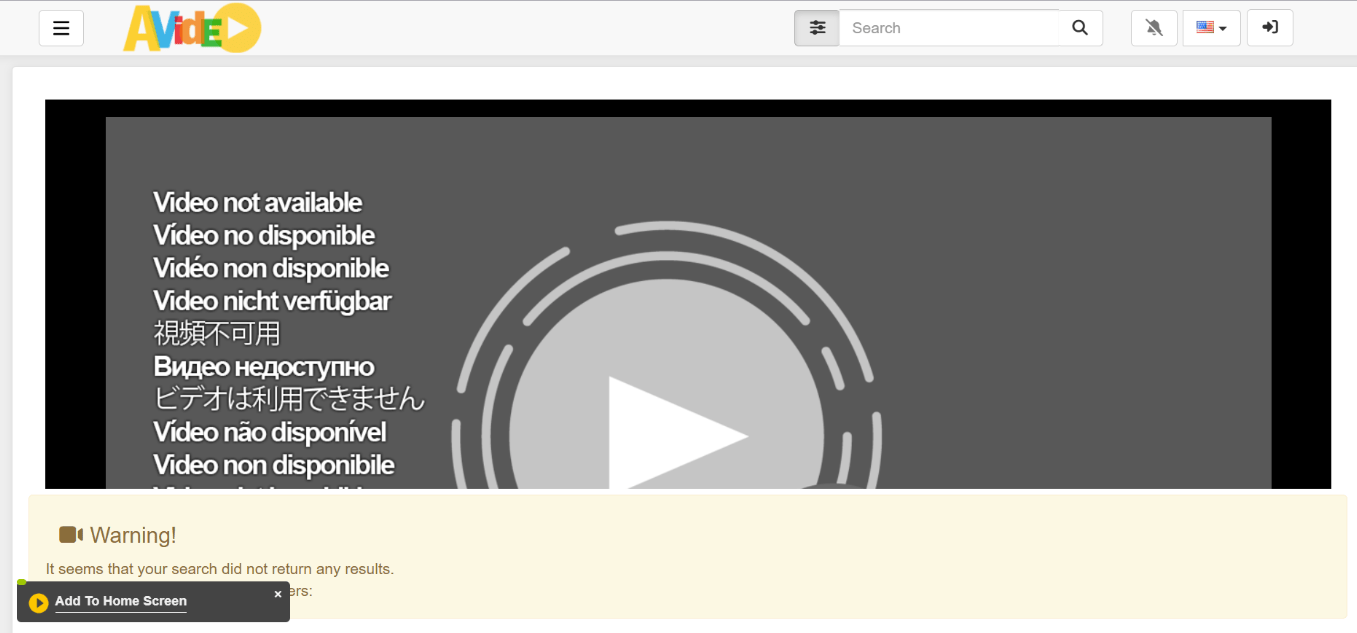
- Click the Go to the main page button and you will see the AVideo main page.
- You can click the drop-down menu on the left and login as the admin user and with the password you set just a few moments ago.
Step 7: Set Up the Encoder
- Go to https://yourdomain.com/upload/. You will be redirected to the Encoder setup wizard. If you are not automatically redirected, then you can manually enter the setup wizard URL.
| https://yourdomain.com/upload/install/index.php/ |
- The left hand side will show you if your server meet the requirements of AVideo Encoder.
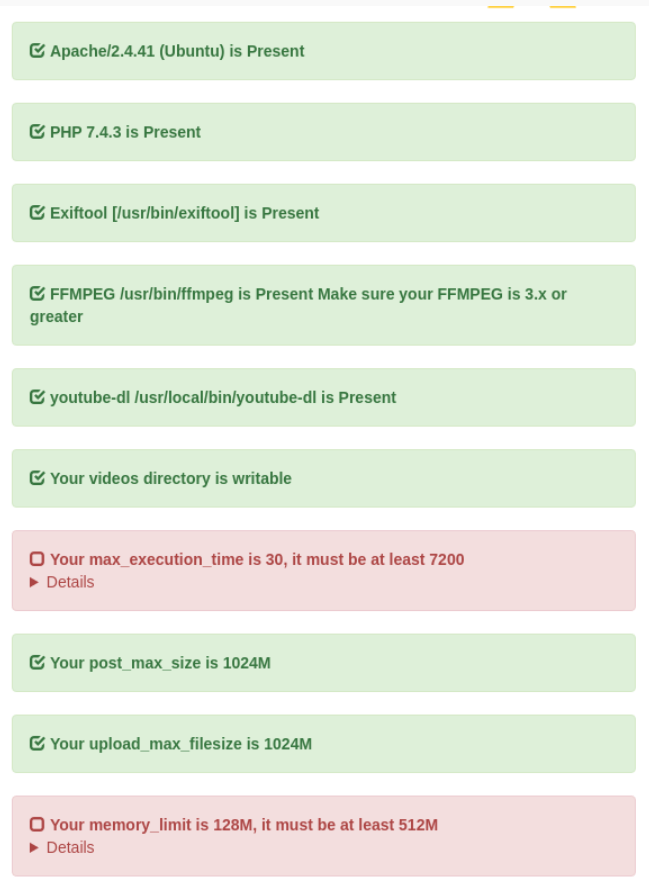
- As you can see the PHP max_execution_time should be at least 7200 and PHP memory_limit should be at least 512M. We need to edit the php.ini file to change the two values.
| $ sudo nano /etc/php/8.1/apache2/php.ini |
- Find the following two lines and change the values in it.
| max_execution_time = 30 | max_execution_time = 7200 |
| memory_limit = 128M | memory_limit = 512M |
- Save and close the file. Restart Apache for the changes to take effect.
| $ sudo systemctl restart apache2 |
- Now refresh the AVideo Encoder install wizard page. Your server should pass all requirements. Now on the right side, you need to enter the AVideoEncoder database name, user and password your created earlier. Be aware of case-sensitive and enter the streamer site’s admin password.
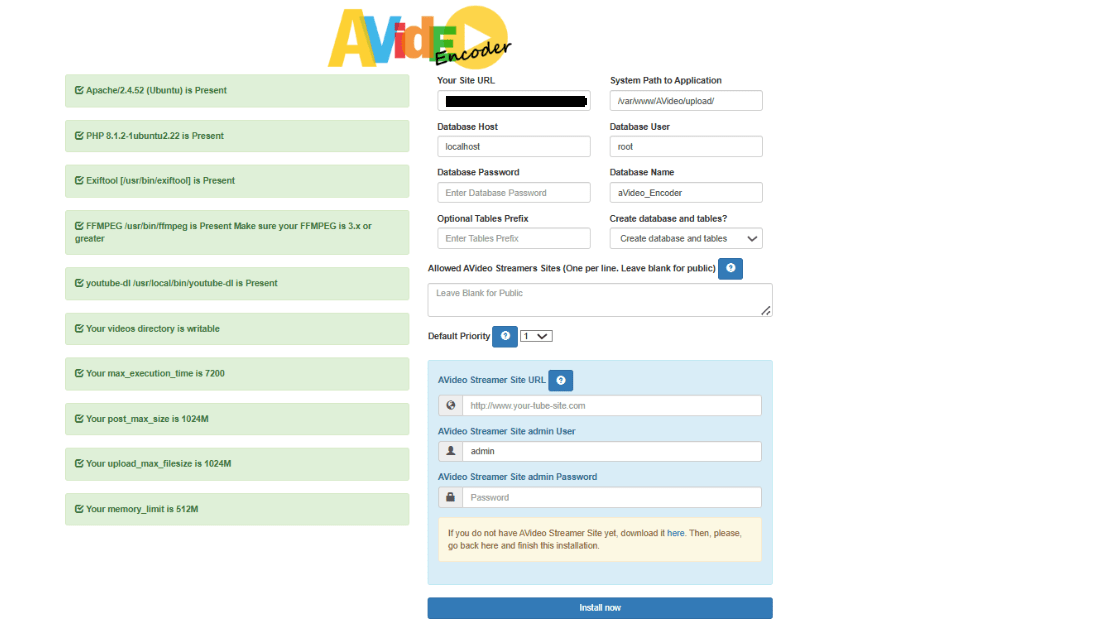
- Click the Install Now button and AVideo Encoder will be installed and go to the main page.
- Remove the install directory.
| $ sudo rm /var/www/AVideo/upload/install/ -r |
Step 8 : Change the Encoder URL
- By default, AVideo uses the public encoder for uploading videos. To use your own encoder, sign in as admin in AVideo (not AVideo Encoder) and go to the admin panel from the left sidebar.
- Go to settings -> site settings -> advanced configuration. Change the Encoder URL to https://yourdomain.com/upload/. Save the settings, clear the cache directory and generate a new sitemap.
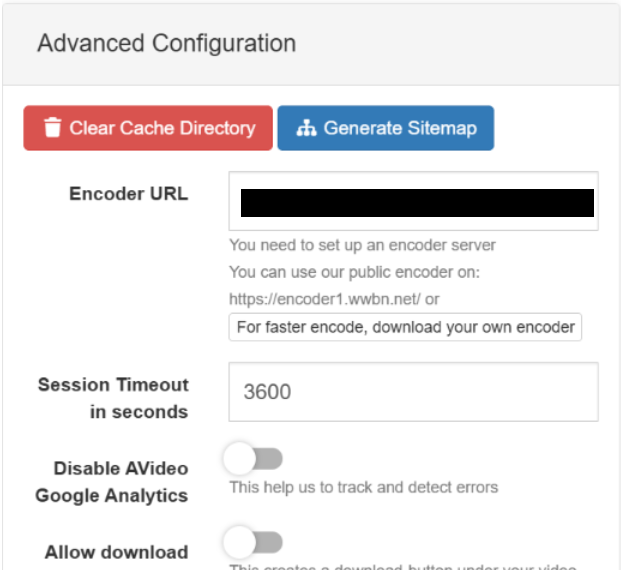
- Now log out and log back in. If you click the encode video and audio button on the upper-right corner, you will be taken to your own encoder to upload videos.
Step 9: Configure SMTP
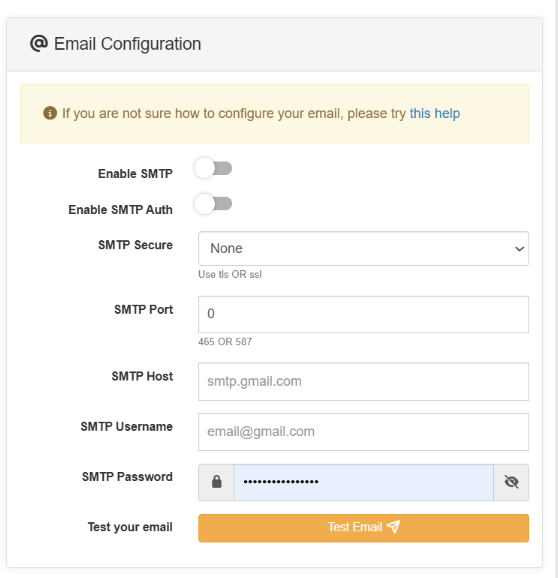
- You can test email sending by going to the admin panel -> Setttings -> Site Settings -> Advanced Configuration, you can find SMTP configuration. Use the following settings.
- Enable SMTP.
- Enable SMTP Auth.
- Use tls in SMTP Secure.
- Use 587 as the SMTP port.
- Enter your mail server’s hostname.
- Enter an SMTP username and password.
- Click the Save button to save the settings.
Once all the details are filled correctly , then click the Test email to see if it’s working.
If everything working fine , this output will come .

Conclusion :
AVideo provides a powerful and flexible solution for hosting and managing videos on your own server without relying on third-party platforms. With its Streamer and Encoder components working together, it delivers a complete end-to-end video platform from uploading and processing to organizing and publishing content. Its rich set of admin controls, user management options, and plugin support make it suitable for organizations that need privacy, custom branding, and full control over their media. By setting up AVideo, you gain a secure, scalable, and customizable video streaming environment tailored to your specific needs.