How to Configure the Bitbucket credentials in Jenkins
Introduction :
Configuring Git credentials in Jenkins is essential for automating your build and deployment pipelines. By securely storing and managing your Git credentials, you can:
- Automate CI/CD pipelines: Seamlessly integrate Git repositories into your Jenkins jobs for automated builds, tests, and deployments.
- Enhance security: Protect sensitive information like usernames and passwords by storing them securely within Jenkins.
Prerequisites :
- A running Jenkins server
- A Git repository and Git access
- Jenkins administrator privileges
- Required necessary plugins (e.g., Git Plugin, Credentials Plugin).
Steps to Configure :
Step 1: SSH Key Pair for Jenkins User
Switch to Jenkins User
sudo su - jenkins
View the Public Key and copy that Key
cat ~/.ssh/id_rsa.pub
Step 2: Add Public Key to Bitbucket
Log in to Bitbucket:
- Navigate to Personal settings > SSH keys.
- Add a new SSH key by pasting the copied content.
Step 3: Add Bitbucket’s SSH Host Key to Known Hosts
Bitbucket’s SSH Host Key is added to Jenkins verification command :
ssh-keyscan bitbucket.org >> ~/.ssh/known_hosts
Step 4: Test SSH Connection to Bitbucket
Test SSH Connection:
ssh -T git@bitbucket.org
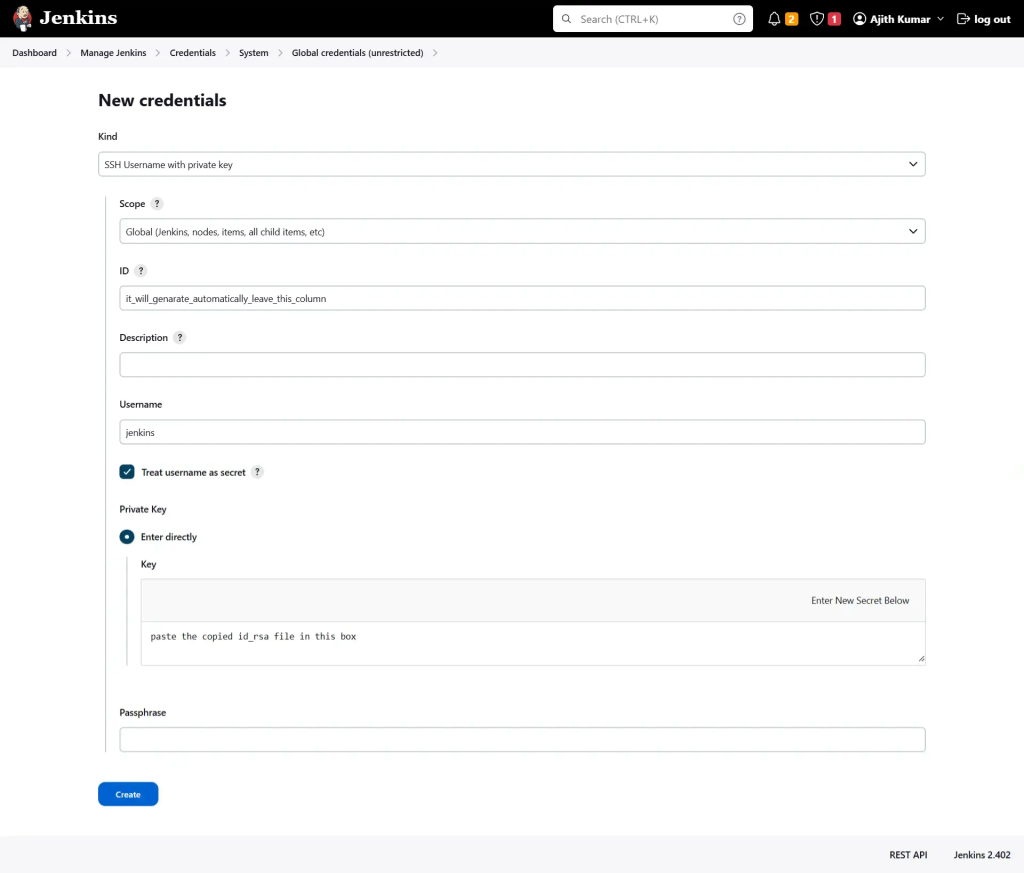
Step 5: Add SSH Credentials to Jenkins
- Open Jenkins: Go to your Jenkins URL and log in.
- Manage Jenkins: Navigate to
Manage Jenkins>Manage Credentials. - Add SSH Key:
- Select the system → Global credentials.
- Click on
Add Credentials. - Choose
SSH Username with private key. - Enter the following details:
- Username: Your Bitbucket username.
- Private Key: Select
Enter directlyand paste the contents of ~/var/lib/jenkins/.ssh/id_rsa.
- Choose Create it will give you an ID (3opcasc-xxxx-xxxx-xxxx-xxxu9)

Step 6: Configure Jenkins Pipeline
example :
sample pipeline configuration to checkout git
 stages {
        stage('Checkout example Repository') {
            steps {
                git(
                    branch: 'main',
                    credentialsId: '37ef07ad-xxxx-xxxxx-xxxx-xxxx6709be',
                    url: 'git@bitbucket.org:orange/example.git'
                )
            }
        }
    }
