
Post Date: May 9, 2019
Last Updated: October 20, 2026
Introduction
This guide explains how to install Webuzo on CentOS 7. The Webuzo control panel comes from the Softaculous team and lets you install hundreds of web applications from a browser, with a web server, database, DNS, mail, and FTP set up for you. It’s often described as being like cPanel without WHM.
The original guide called Webuzo a “single user” panel, but Webuzo’s own documentation now describes it as a multi-user shared hosting control panel, so I’ve updated that. I also checked the requirements against Webuzo’s current documentation. Two things changed that matter: the installer is now downloaded over HTTPS, and SELinux must be disabled, which the original never mentioned.
Note: CentOS 7 reached end-of-life in June 2024. To install Webuzo on CentOS 7 today, you can still follow these steps, but for a new server, AlmaLinux, Rocky Linux, or an Ubuntu LTS release are better choices. The steps are essentially the same on each.
Prerequisites
Before you install Webuzo on CentOS 7, check Webuzo’s system requirements and make sure you have:
- A freshly installed supported operating system, with root access
- At least 1 GB of RAM (2 GB recommended) and 5 GB of free disk space (10 GB recommended)
- No Apache, PHP, or MySQL already installed. The installer sets these up itself
- SELinux disabled (covered in Step 2)
- A firewall that lets through Webuzo’s ports (covered in Step 3)
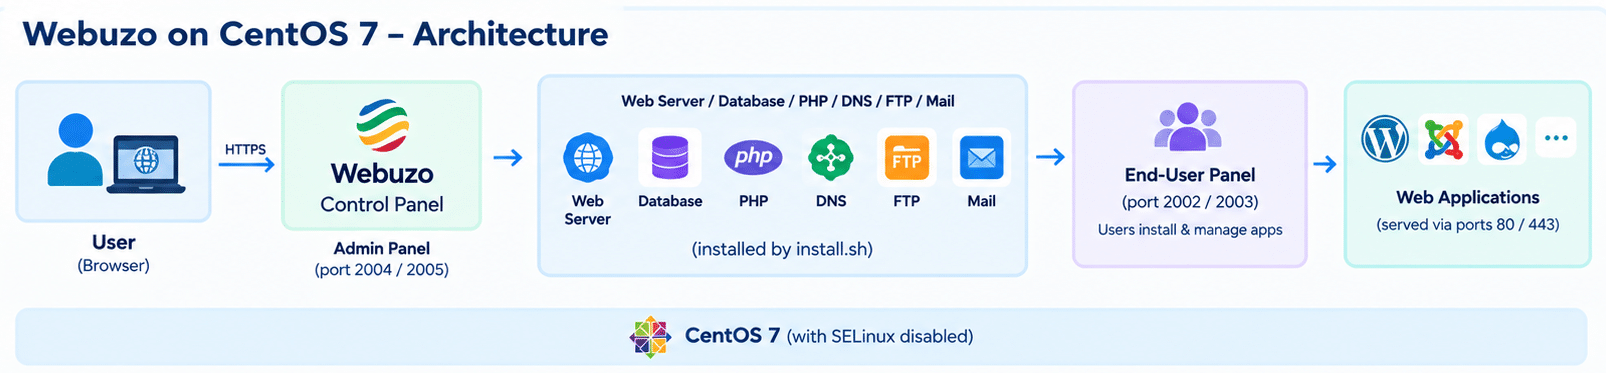
Architecture
- The
install.shscript installs Webuzo along with a default stack: web server, database, PHP, DNS, FTP, and mail services - The Webuzo control panel then runs two panels on their own ports. The admin panel (ports 2004 and 2005) manages the server and its users. The end-user panel (ports 2002 and 2003) is where each user installs and manages apps
- Apps installed from the end-user panel are served by the web server, which uses ports 80 and 443
The diagram below shows what happens when you install Webuzo on CentOS 7:
Steps to Install Webuzo on CentOS 7
1. Start from a Clean, Updated Server
Start from a fresh server before you install Webuzo on CentOS 7. Update it first:
sudo yum update -y
Confirm Apache and MySQL aren’t already installed:
rpm -qa | grep -Ei "httpd|mysql|mariadb|php"
If this prints anything, the server isn’t clean. Webuzo’s installer expects to set those up itself, so reinstall the OS rather than layering Webuzo on top.
2. Disable SELinux
Webuzo’s documentation says SELinux must be disabled before you install Webuzo on CentOS 7. Check the current state:
getenforce
If it says Enforcing, turn it off for now and make the change permanent:
sudo setenforce 0
sudo sed -i 's/^SELINUX=.*/SELINUX=disabled/' /etc/selinux/config
The permanent change takes full effect after a reboot.
Note: Disabling SELinux removes a layer of protection. Webuzo requires it, so compensate with a tight firewall and regular updates.
3. Open the Firewall Ports
To install Webuzo on CentOS 7 successfully, open the ports Webuzo recommends: 2002, 2003, 2004, 2005, 21, 22, 25, 53, 80, 110, 143, 443, 465, 587, 993, 995, and 3306.
for p in 2002 2003 2004 2005 21 22 25 53 80 110 143 443 465 587 993 995 3306; do
  sudo firewall-cmd --permanent --add-port=${p}/tcp
done
sudo firewall-cmd --permanent --add-port=53/udp
sudo firewall-cmd --reload
Security note: You don’t need every port open to everyone. Port 3306 (MySQL) in particular should be reachable only from IPs that need remote database access. Consider limiting the admin panel ports (2004 and 2005) to your own IP address.
4. Download the Installer
To install Webuzo on CentOS 7 safely, download the installer over HTTPS rather than the plain http:// link from the original guide, since you’re about to run this script as root:
wget -N https://files.webuzo.com/install.sh
chmod 0755 install.sh
5. Run the Installer Inside screen
Install screen if you don’t have it, then start a session so a dropped SSH connection doesn’t interrupt the installation:
sudo yum install -y screen
screen -S webuzo
Then run the installer:
./install.sh
This will install Webuzo on CentOS 7 with its default stack. To choose which apps are installed, use the --install option with a comma-separated list, for example a web server and DNS only:
./install.sh --install=apache2,bind
To install Webuzo on its own, with no stack at all (you can add apps later from the end-user panel):
./install.sh --install=none
Note: The original example used
lampas an app name. Current Webuzo documentation names apps individually (such asapache2andbind), so check Webuzo’s installation guide for the exact names before using--install.
The installation can look like it has stalled on a slow connection. Let it continue. The installer writes a log to /root/webuzo-install.log, which you can follow from another terminal with tail -f.
6. Complete the Initial Setup
When the installer finishes, open the Webuzo admin panel in your browser and fill in the setup form with a username, email address, and a strong password. Submit it, and Webuzo configures the server. This typically takes a few minutes.
7. Log In to the Webuzo Admin Panel
Open the Webuzo admin panel using HTTPS:
https://your-server-ip:2005/
Log in with the username and password you chose during setup.
Notes:
- The plain HTTP address on port 2004 also works, but it sends your password unencrypted. Use the HTTPS port.
- The panel uses a self-signed certificate at first, so your browser will show a security warning. That’s expected.
If Something Goes Wrong
If you can’t install Webuzo on CentOS 7 cleanly, check these:
- The installer complains about existing software: Apache, PHP, or MySQL is already on the server. Start from a fresh OS
- The panel won’t load: confirm SELinux is disabled with
getenforceand that ports 2004 and 2005 are open - The installation seems stuck: wait, then check
/root/webuzo-install.log - Your SSH session dropped mid-install: reconnect and run
screen -r webuzoto see whether it’s still running
Conclusion
To install Webuzo on CentOS 7: start with a fresh server, disable SELinux, open the firewall ports, download the installer over HTTPS, and run it inside screen. Then complete the setup form and log in to the Webuzo admin panel on port 2005 to start using the Webuzo control panel. Since CentOS 7 is past end-of-life, plan to use AlmaLinux, Rocky Linux, or Ubuntu LTS for any new installation.
Frequently Asked Questions
Can I install Webuzo on CentOS 7 if Apache or MySQL is already there? No. Webuzo’s installer expects a clean system and sets up its own web server and database. Reinstall the OS first.
Is it still a good idea to install Webuzo on CentOS 7? It works, but CentOS 7 no longer receives security updates. For a new server, choose AlmaLinux, Rocky Linux, or Ubuntu LTS and follow the same steps.
Why does Webuzo need SELinux disabled? Webuzo’s documentation requires it for compatibility. If you can’t disable SELinux on a server, Webuzo isn’t the right panel for it.
Which ports does the Webuzo control panel use? The admin panel uses 2004 (HTTP) and 2005 (HTTPS), and the end-user panel uses 2002 (HTTP) and 2003 (HTTPS). Prefer the HTTPS ports.
Related Articles
How to install MySQL 8.0 on CentOS 7
How to Install OpenVZ 7 on CentOS 7
Talk to Our Technology Experts
Setting up a new hosting control panel or migrating from one to another? Our team can help with control panel installation, server hardening, and ongoing hosting support.