
Post Date: February 15, 2018
Last Updated: October 07, 2026
Introduction
Rundeck is an open-source runbook automation platform that helps system administrators and DevOps teams automate routine operational tasks across multiple servers.
Instead of manually logging in to individual servers and executing the same commands repeatedly, you can create jobs and workflows in Rundeck and run them from a centralized web interface.
Rundeck can be used for tasks such as:
- Server maintenance
- Application deployment
- Log collection
- Service restart
- Backup operations
- Scheduled administration tasks
- Running Ansible playbooks
- Auditing and operational automation
It also provides useful features such as access control, job scheduling, workflow management, execution logs, node management, and integration with automation tools such as Ansible.
In this guide, we will install Rundeck on a CentOS 7 server and then configure it to work with Ansible.
Important: CentOS 7 is an end-of-life operating system. This guide is intended primarily for existing or legacy CentOS 7 environments. For a new deployment, use a currently supported operating system and the current Rundeck requirements. Current Rundeck documentation requires Java 17.
Prerequisites
Before installing Rundeck, make sure you have:
- CentOS 7 server
- Root or sudo access
- Minimum 2 CPU cores
- At least 4 GB RAM for a small installation
- At least 20 GB disk space
- Java 17
- Network access to the Rundeck repository
- Port 4440 available for HTTP access
For production environments, use a supported operating system and size the server according to the current Rundeck system requirements.
Step 1: Update the Server
First, update the existing packages.
yum update -y
Check the operating system:
cat /etc/centos-release
Example:
CentOS Linux release 7.x
Step 2: Install Java
Rundeck is a Java-based application. Current Rundeck documentation requires Java 17 for supported current releases.
Install Java 17:
yum install java-17-openjdk -y
Verify the installation:
java -version
Example:
openjdk version "17.x.x"
You can also check the Java path:
which java
If multiple Java versions exist, make sure Java 17 is the active version.
alternatives --config java
Step 3: Add the Rundeck Repository
The official Rundeck CentOS installation procedure uses the Rundeck RPM repository.
Run:
curl https://raw.githubusercontent.com/rundeck/packaging/main/scripts/rpm-setup.sh 2> /dev/null | bash -s rundeck
Verify that the repository is available:
yum repolist | grep rundeck
Step 4: Install Rundeck
Install the Rundeck package:
yum install rundeck -y
Verify the package:
rpm -qa | grep rundeck
Step 5: Configure Rundeck Server URL
By default, Rundeck may use localhost as its server URL. When users access Rundeck from another machine, configure the server URL with the server IP address or domain name.
Edit:
vi /etc/rundeck/rundeck-config.properties
Set:
grails.serverURL=http://YOUR_SERVER_IP:4440
Example:
grails.serverURL=http://192.168.1.100:4440
For a production setup behind DNS and HTTPS, use your actual domain.
Example:
grails.serverURL=https://rundeck.example.com
Step 6: Start Rundeck
Start the service:
systemctl start rundeckd
Enable it at boot:
systemctl enable rundeckd
Check the service status:
systemctl status rundeckd
You can also monitor the Rundeck log:
tail -f /var/log/rundeck/service.log
Rundeck is ready when the application starts successfully and listens on port 4440.
Step 7: Check Port 4440
Verify that Rundeck is listening:
netstat -nltp | grep 4440
Expected output will look similar to:
tcp 0 0 0.0.0.0:4440 0.0.0.0:* LISTEN
If netstat is unavailable:
ss -nltp | grep 4440
Step 8: Allow the Firewall Port
If firewalld is enabled, allow port 4440:
firewall-cmd --permanent --add-port=4440/tcp
firewall-cmd --reload
Verify:
firewall-cmd --list-ports
For production environments, it is better to expose Rundeck through a reverse proxy with HTTPS rather than directly exposing port 4440 to the internet.
Step 9: Access the Rundeck Web Interface
Open a browser and visit:
http://SERVER_IP:4440
Example:
http://192.168.1.100:4440
The default login is:
Username: admin
Password: admin
Change the default password immediately after the first login.
Rundeck’s installation documentation also documents the default administrative login for a fresh installation.
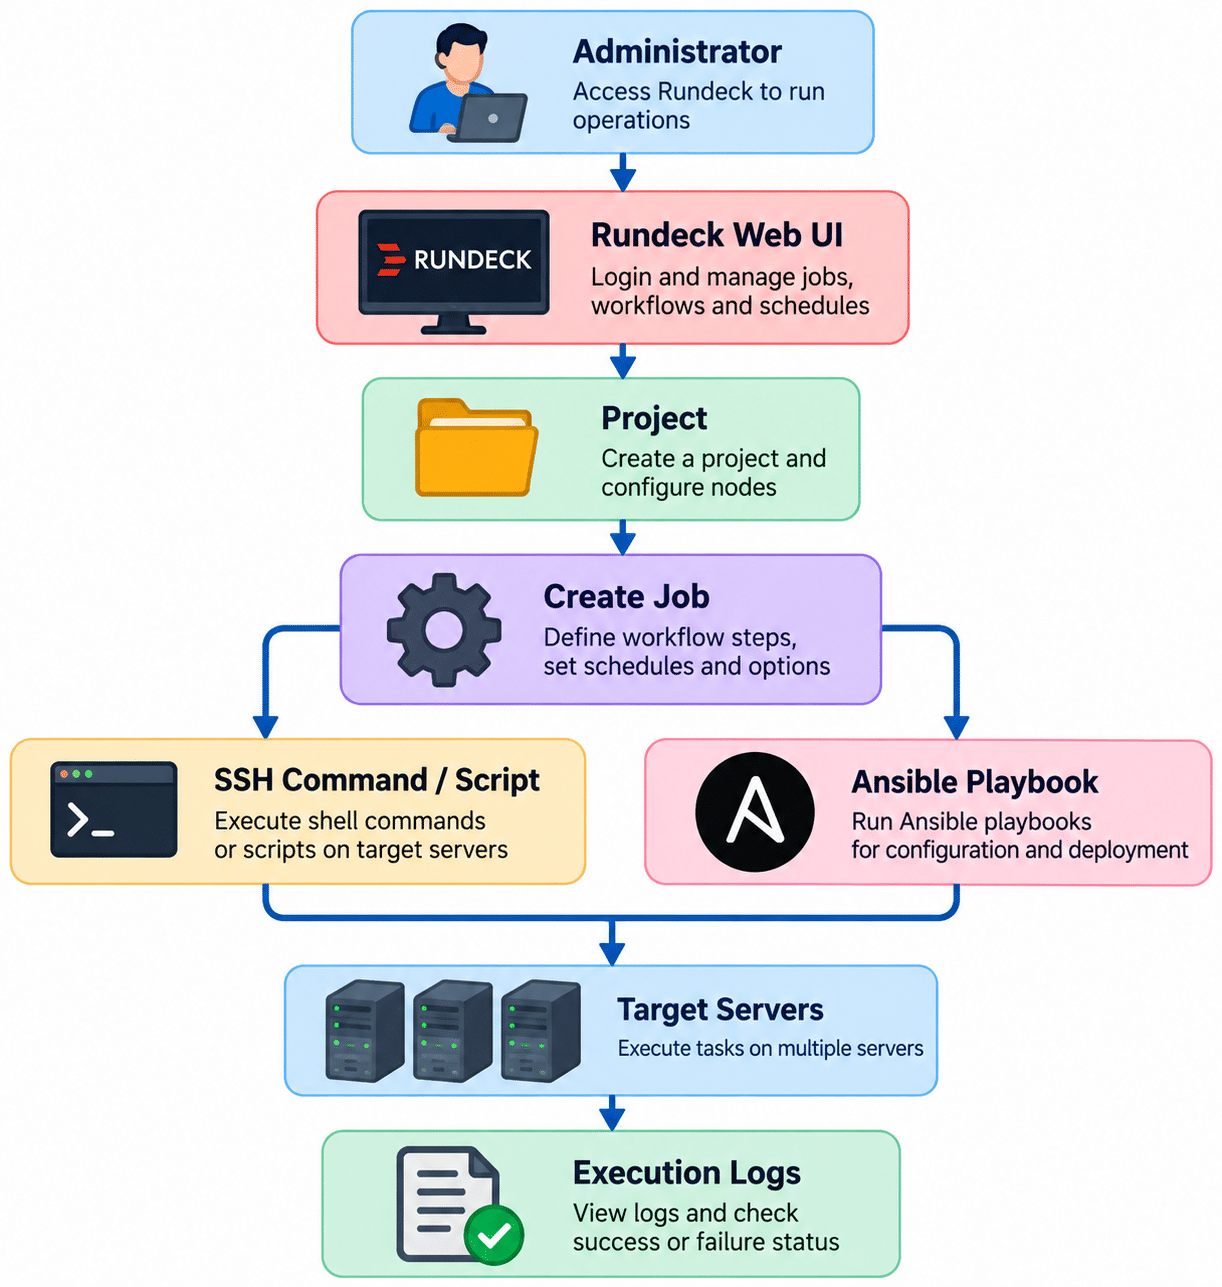
Rundeck Working Flow
The basic Rundeck automation workflow looks like this:
Example
Suppose you need to restart Nginx on 20 servers.
Without Rundeck:
Login Server 1
Run command
Login Server 2
Run command
Login Server 3
Run command
...
With Rundeck:
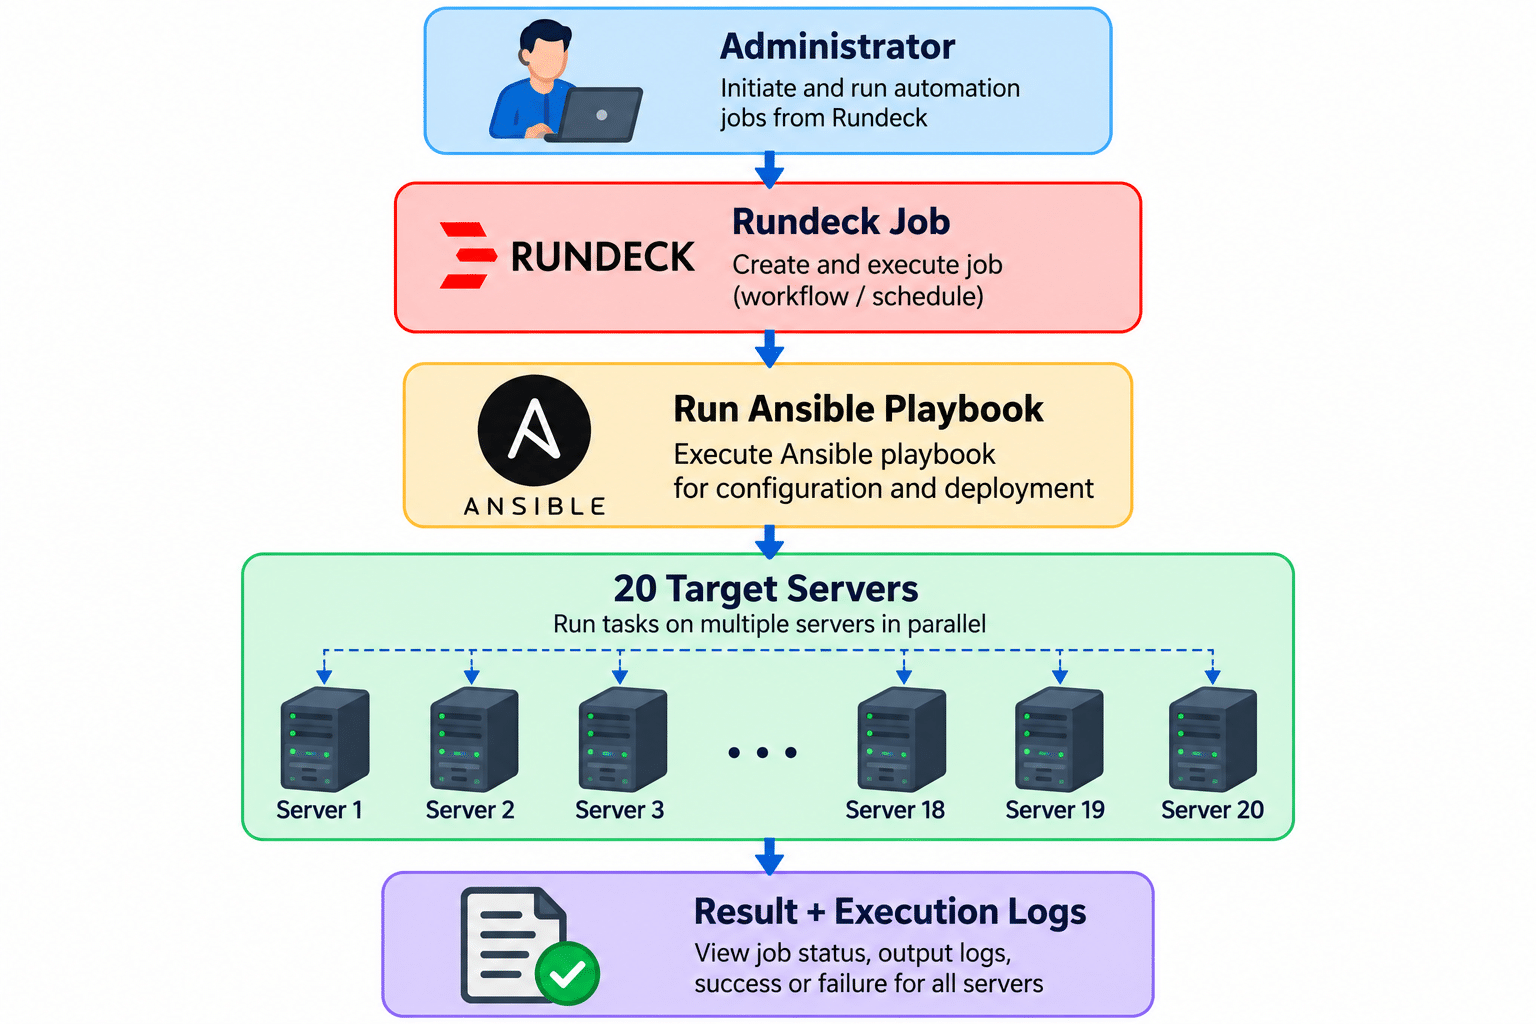
This is where Rundeck becomes useful: operational tasks become repeatable, controlled, scheduled, and auditable.
Configure Rundeck with Ansible
Rundeck can integrate with Ansible so that Rundeck becomes the web-based automation layer while Ansible handles configuration and server execution.
The current Rundeck Ansible plugin provides support for importing Ansible inventory, running Ansible modules and playbooks, and using Ansible as a node executor.
Step 10: Install Ansible
On your automation server, install Ansible using the package source appropriate for your environment.
Verify:
ansible --version
Example:
ansible [core ...]
Step 11: Install the Rundeck Ansible Plugin
The Ansible plugin is maintained in the official rundeck-plugins GitHub organization.
The plugin files are placed under:
/var/lib/rundeck/libext/
For the exact plugin version you deploy, use the corresponding release artifact from the plugin’s official repository rather than an old 2019 download URL.
After installing the plugin, restart Rundeck:
systemctl restart rundeckd
Check:
systemctl status rundeckd
Step 12: Configure the Ansible Inventory
Create or use an Ansible inventory file.
Example:
[webservers]
web01 ansible_host=192.168.1.101
web02 ansible_host=192.168.1.102
[dbservers]
db01 ansible_host=192.168.1.110
Test connectivity:
ansible all -i inventory -m ping
Expected:
web01 | SUCCESS => {
    "changed": false,
    "ping": "pong"
}
Step 13: Create a Rundeck Project
Log in to Rundeck and create a new project.
Example:
Project Name: Infrastructure
Add your target nodes to the project.
Once the nodes are available, you can create jobs such as:
Restart Nginx
Disk Usage Check
Clear Application Cache
Backup Database
Deploy Application
Restart Docker
Run Ansible Playbook
Step 14: Create a Job
Create a Rundeck job with:
Job Name:
Restart Nginx

Workflow:
1. Select target nodes
2. Execute command
3. systemctl restart nginx
4. Verify service status
5. Store execution result
You can also add:
- Schedules
- Multiple workflow steps
- Failure handling
- Notifications
- Access permissions
- Execution logging
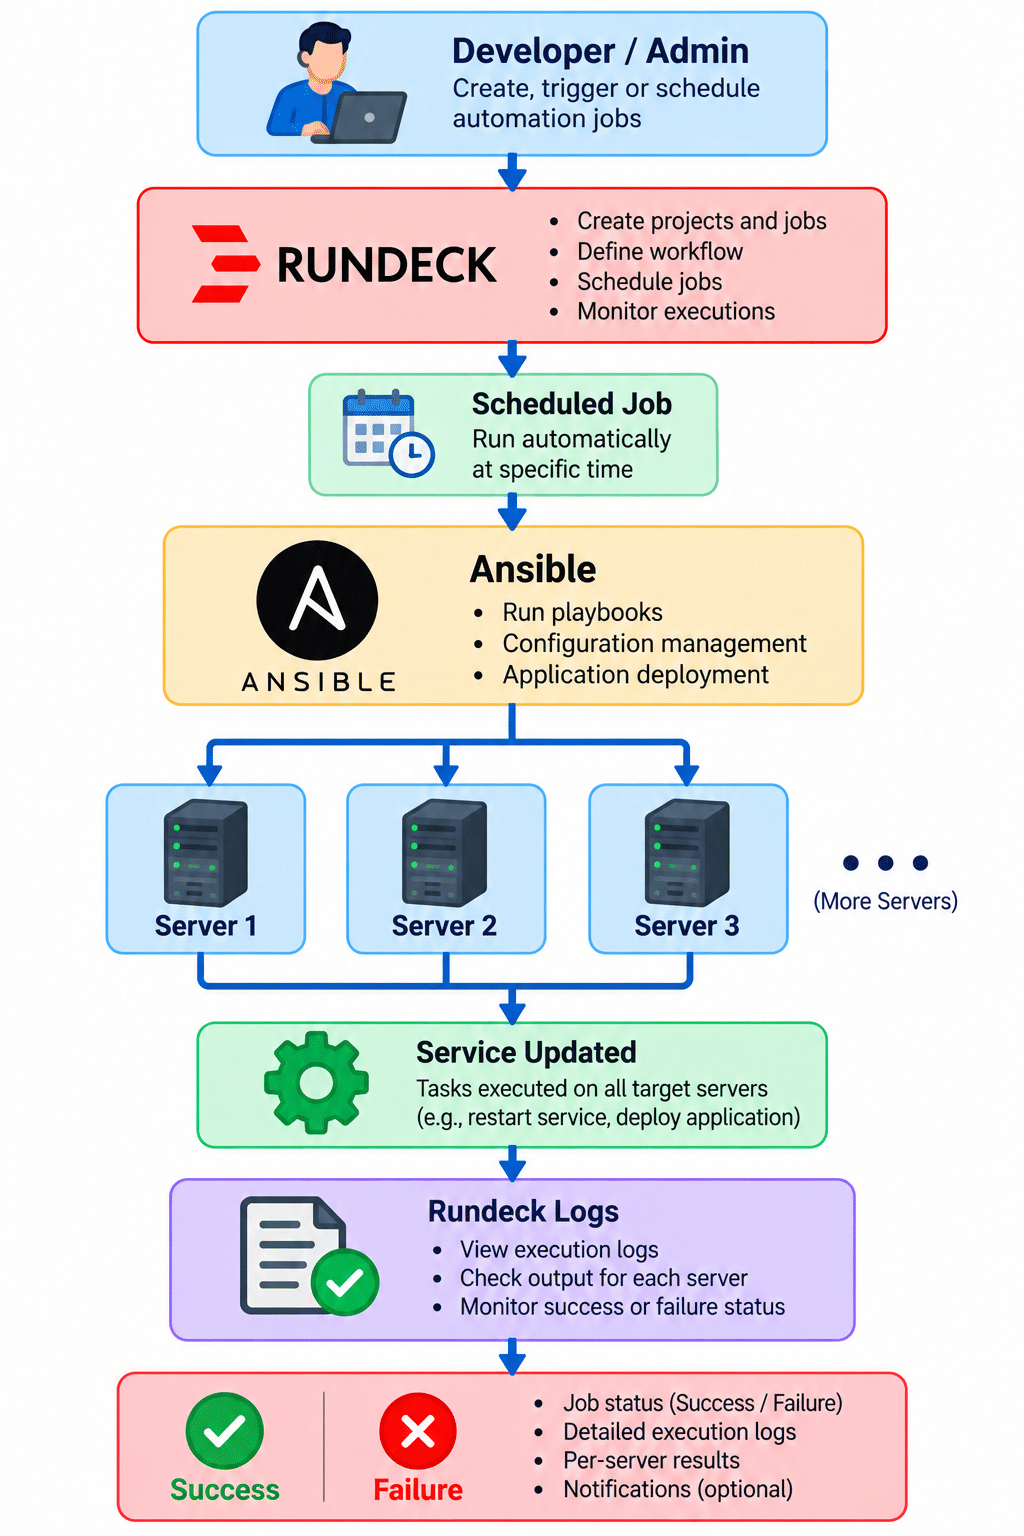
Example Automation Flow
A practical DevOps flow could look like:
Common Rundeck Use Cases
Rundeck can be used for many recurring infrastructure operations.
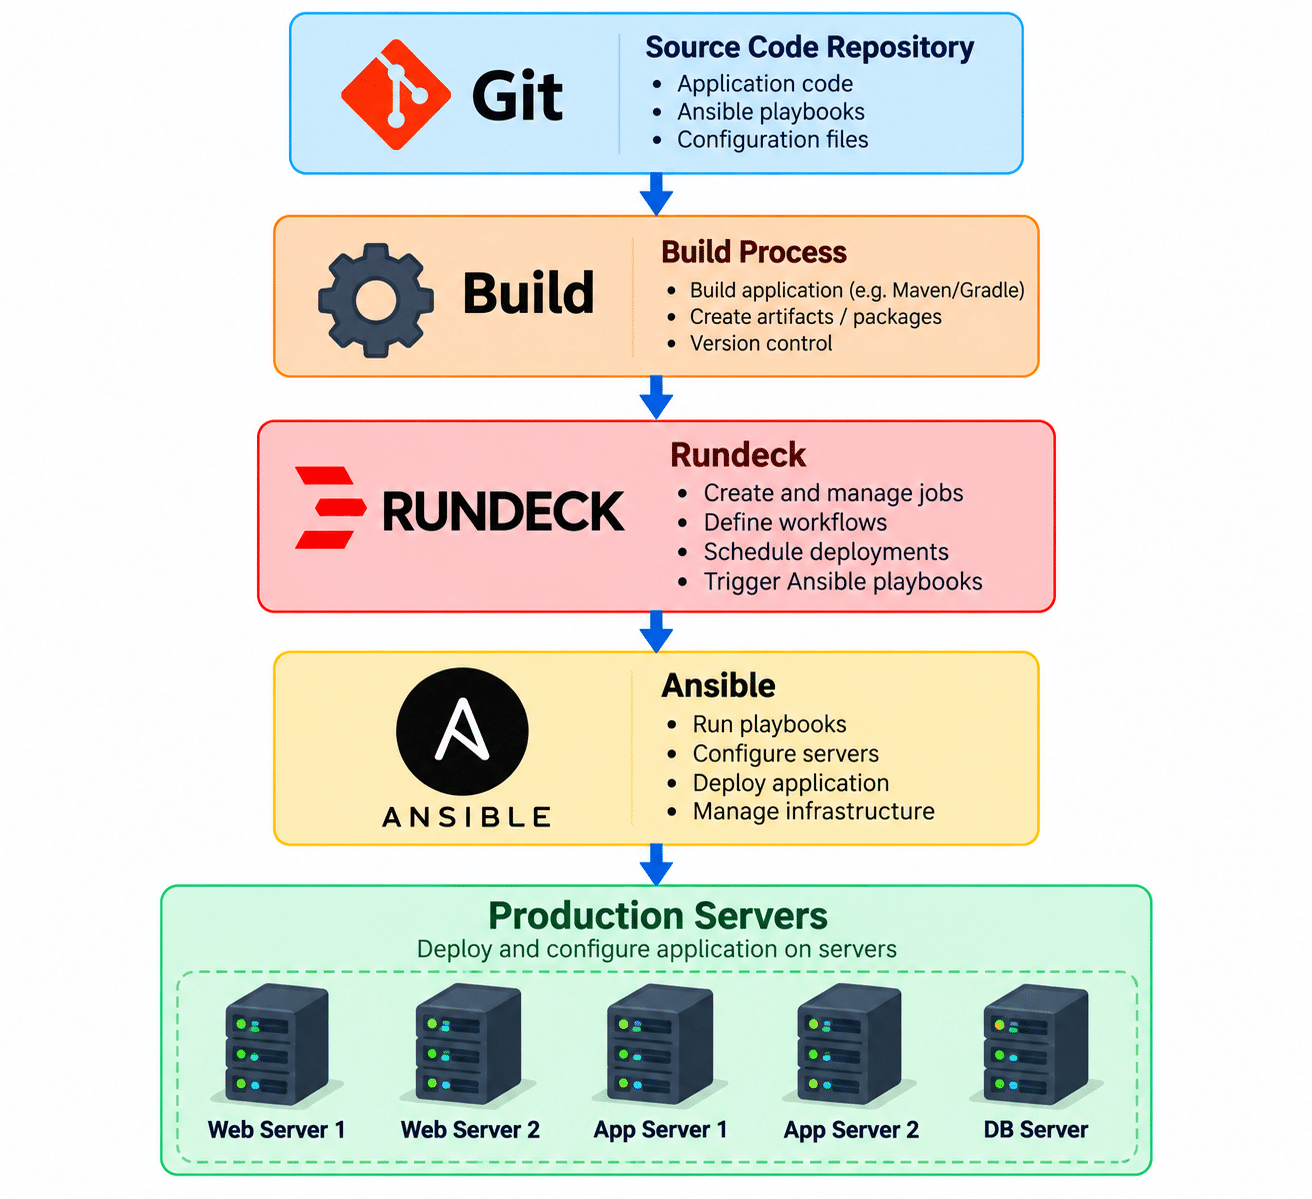
Application Deployment
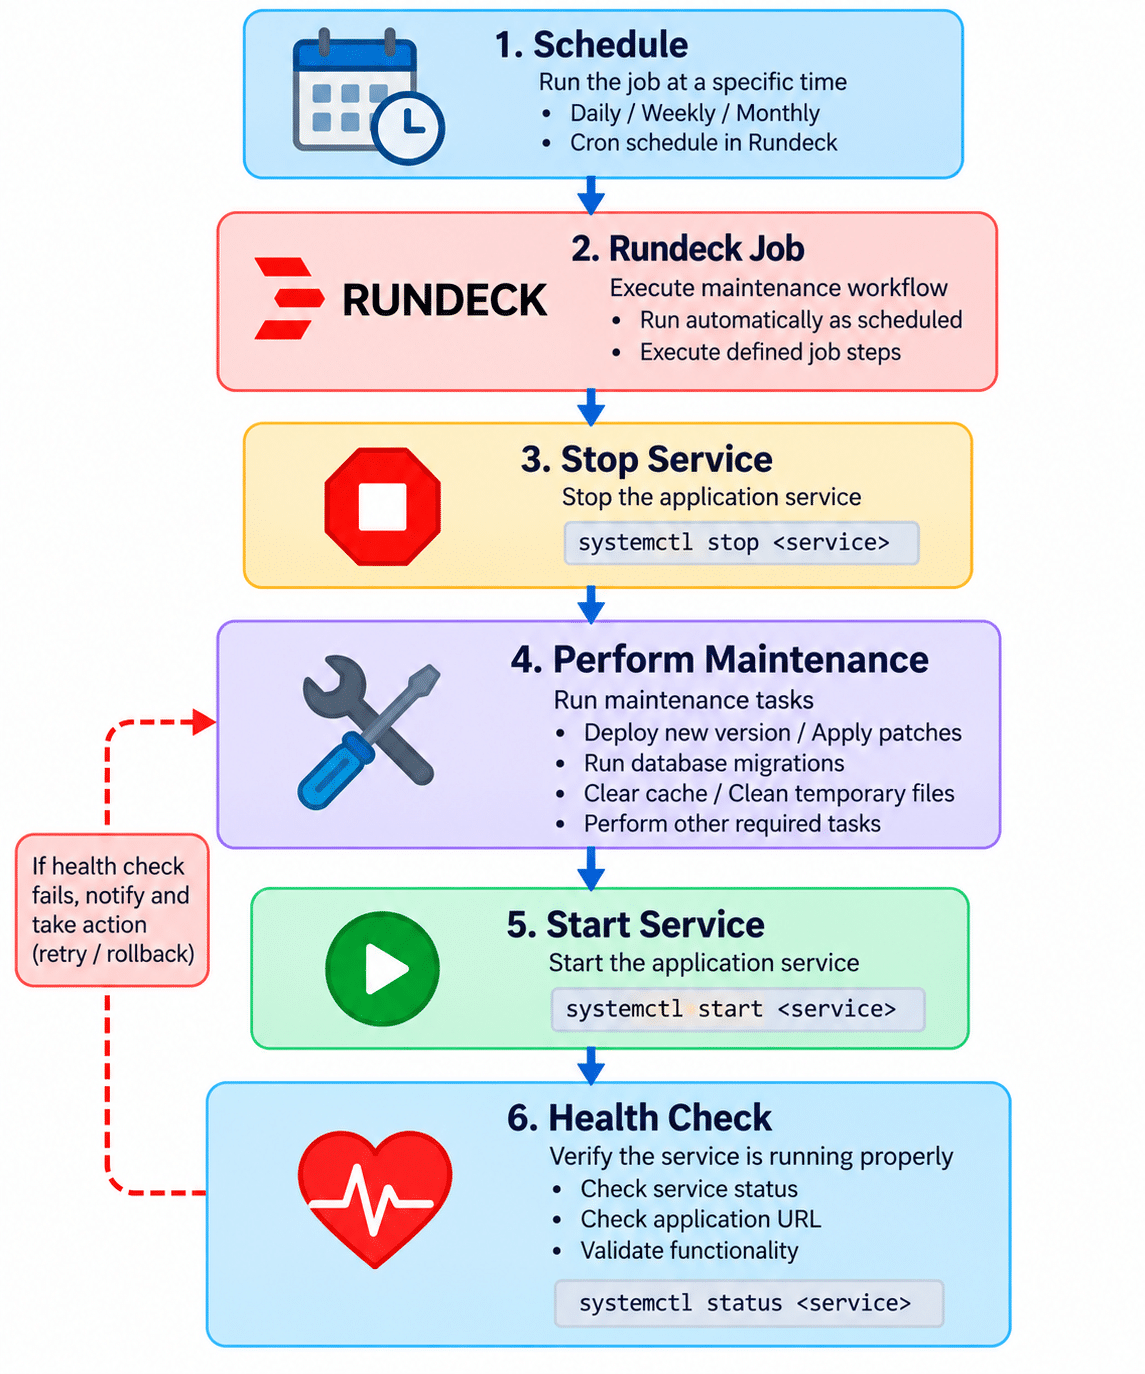
Server Maintenance
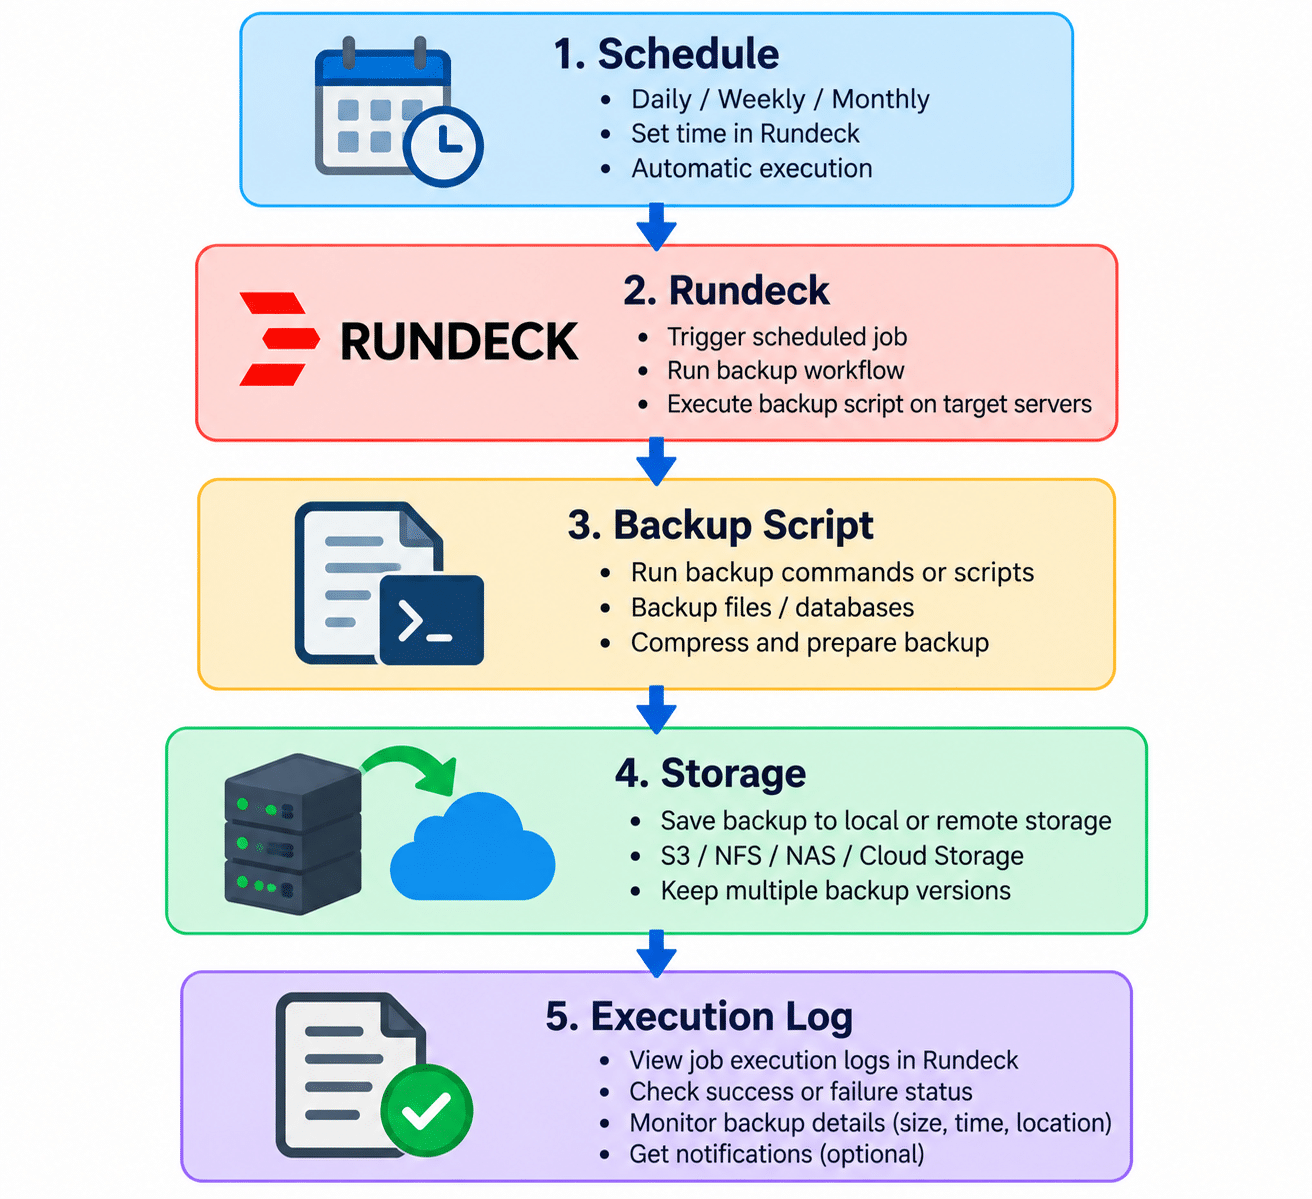
Backup Automation
Security Recommendations
For production environments, do not leave the default credentials unchanged.
Recommended practices include:
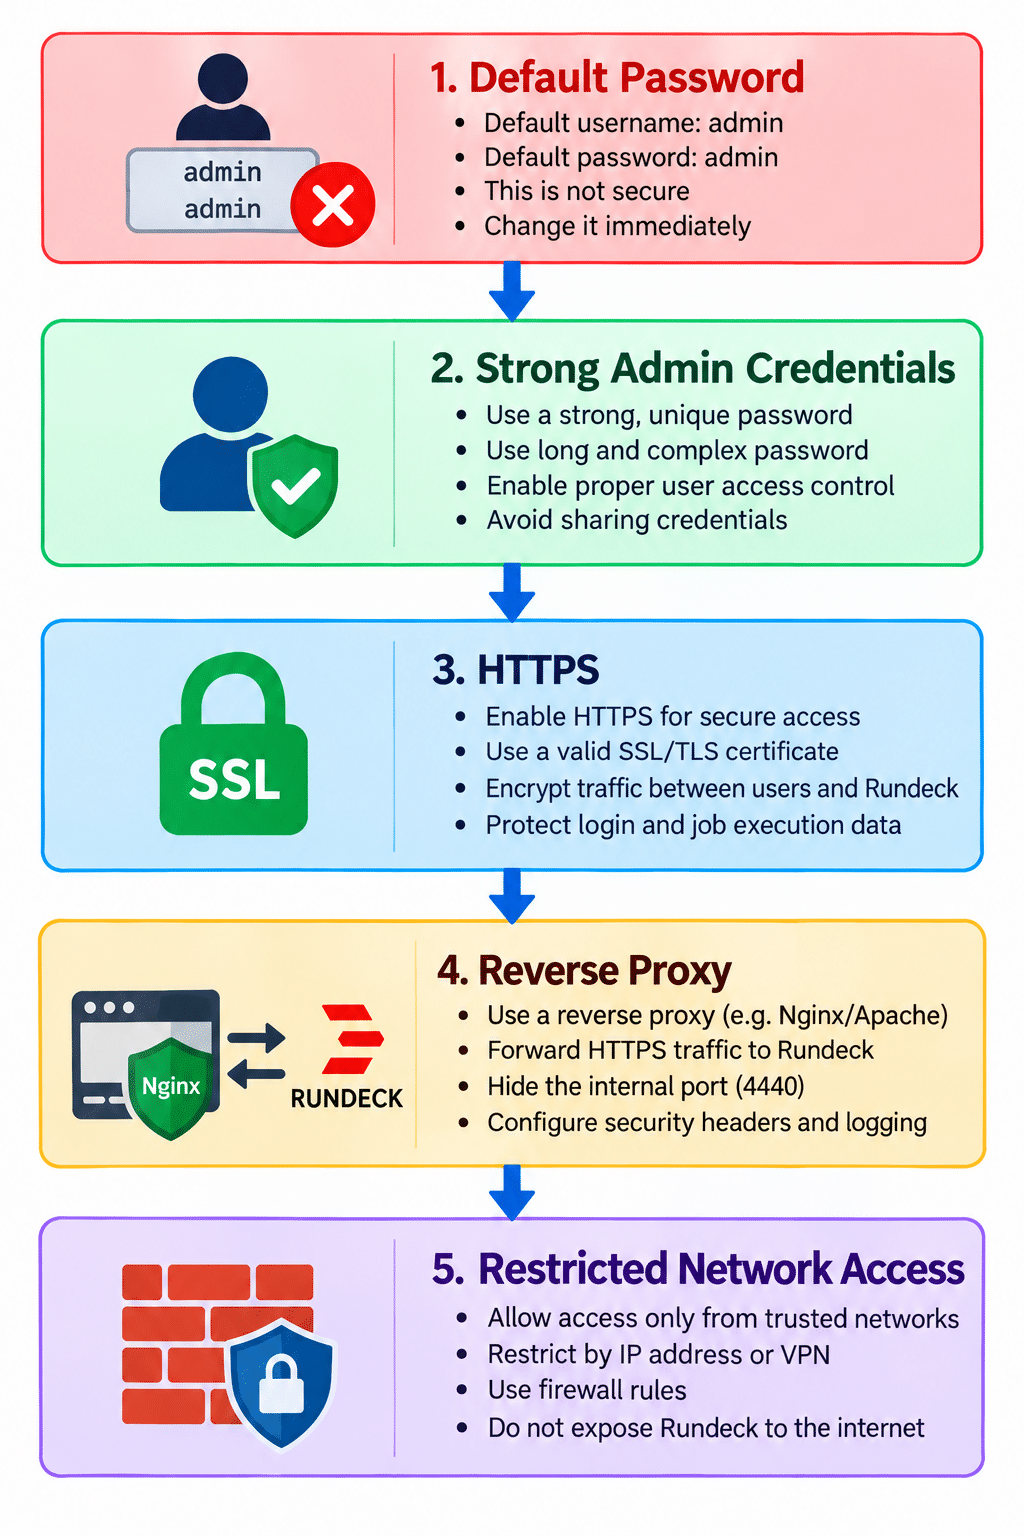
Also consider:
- Restricting Rundeck access to trusted networks
- Using HTTPS
- Using role-based access control
- Limiting administrative permissions
- Using SSH keys instead of passwords where appropriate
- Protecting Ansible inventory and credentials
- Auditing job execution logs
Rundeck also supports authentication and authorization controls that are useful for shared operational environments.
Conclusion
Rundeck provides a simple way to centralize infrastructure operations and automate repetitive tasks across multiple servers.
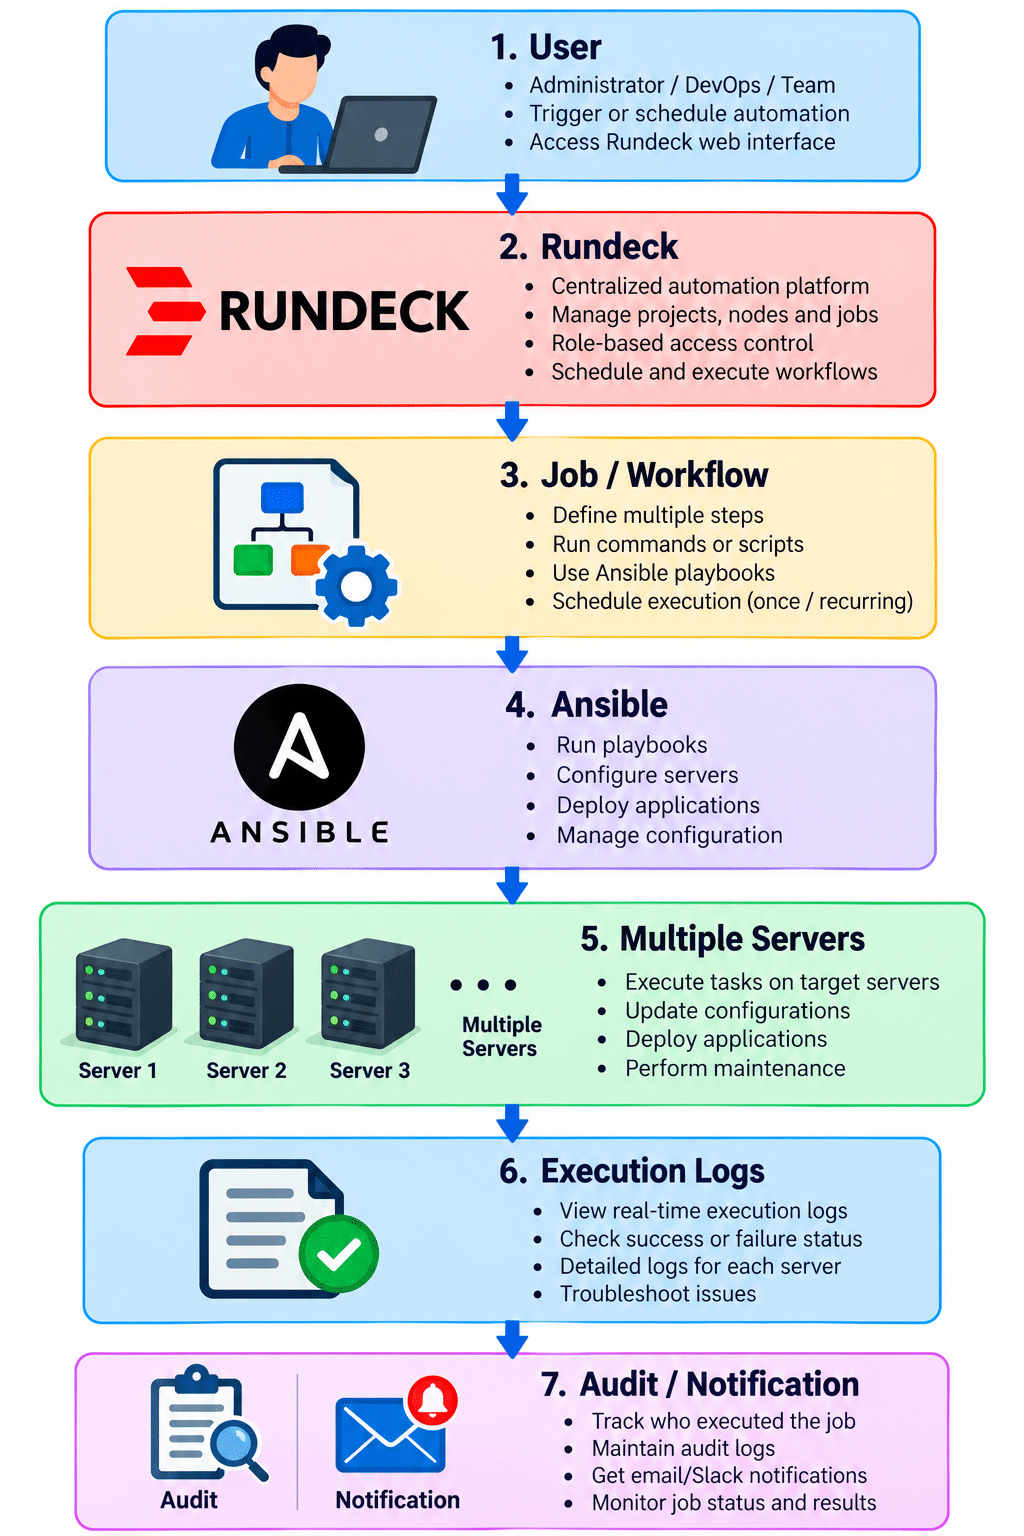
By combining Rundeck + Ansible, teams can build a controlled automation workflow where administrators trigger jobs from a web interface, while Ansible performs the actual configuration and server operations.
A typical environment can be summarized as:
For legacy CentOS 7 environments, this setup can still be useful, but new deployments should use a currently supported operating system and the current Rundeck release requirements. Java 17 is required by current Rundeck releases.
With Rundeck in place, repetitive infrastructure tasks can become standardized, scheduled, repeatable, and easier to audit.
Frequently Asked Questions
1. What is Rundeck used for?
Rundeck is used to automate and schedule operational tasks across multiple servers. It provides a central interface for executing commands, scripts, workflows, and automation jobs.
2. Can Rundeck work with Ansible?
Rundeck is used to automate and schedule operational tasks across multiple servers. It provides a central interface for executing commands, scripts, workflows, and automation jobs.
Yes. Rundeck can integrate with Ansible for inventory management and execution of Ansible modules and playbooks. This allows teams to use Rundeck as the operational interface and Ansible as the automation engine.
3. Which port does Rundeck use?
The default HTTP port is:
4440
Current Rundeck installations also support HTTPS on port:
4443
The exact port configuration can be changed according to your deployment.
Related Articles
Talk to our experts
Have a technology challenge or looking for the right solution for your business? Our team can help you with cloud, DevOps, development, infrastructure, design, and more. Feel free to reach out to our experts here.