Setup password authentication for Apache2 in Centos
Dated on 28/09/2018
Setup password authentication for Apache2 in Centos
Step 1. Login to server using ssh.
Step 2. To create the authentication of the apache2 it is necessary to have the apache2 on server. Check whether the server has already installed apache2 and check the version here we have already installed apache2 so we just updated the apache2 service.

Step 3. If you doesn’t have apache2 service you can use yum install to install the apache2 service in server.

Step 4. When you installed the httpd service it will not start the service automatically you have to start this manually using systemctl restart httpd.service or service httpd restart
Step 5. Add the new user for the httpd using
sudo htpasswd -c /etc/httpd/.htpasswd username
Here you have to use -c for the first user alone because it is used to create the specified file so in the first time it will create the specified file so no need to use this for next time.After executing this commands it will ask for the password and Re-type the password.
Step 6. After setting the password goto the configuration file of the domain here our configuration path file is /etc/httpd/conf.d here we can find the conf file if your domain config file is not you can create a new config file for your domain. In the extension of .conf

Step 7. Here our config file is example.conf . These are the content on the example.conf file.
<VirtualHost *:80>
ServerName www.example.com
ServerAlias www.example.com
DocumentRoot /var/www/example.com/html/example
ErrorLog /var/www/example.com/html/example/error.log
CustomLog /var/www/example.com/html/example/access.log combined
<Directory “/var/www/example.com/html/example”>
AuthType Basic
AuthName “Restricted Content”
AuthUserFile /etc/httpd/.htpasswd
Require valid-user
</Directory>
</VirtualHost>
Here we set the alias name as www.kumaran.com this will be used as the url after completing all the steps here. Don’t forgot to change the AuthUserFile in the conf because it may vary for some people.
Step 8. Have to include the .htaccess file in your domain file don’t panic like the file is not created its a hidden file you can find by listing the hidden files using ls -la.
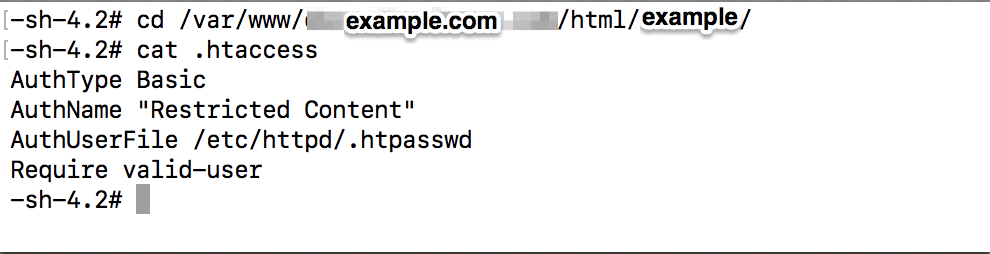
Add these lines in .htaccess file.
Step 9.Congrats, that’s all now you can able to see the authentication of your httpd or apache on your browser like this.
Step 10. After entering your username and password you can able to go the apache.
Step 11. Here we have routed the file like the user to do this you can go the file in the location /etc/hosts open this hosts file and make the changes like
youripaddress domainname
xxxxxxxxxxxx www.example.com
That’s all after you hit the browser with the domain name it will redirect you to that page.
==========END===========