Setting up Django and your web server with uWSGI and nginx on Ubuntu
Setting up Django and your web server with uWSGI and nginx
Date posted: 05-oct-2018
In this article, we will see how to setup a Django web application on Ubuntu 16.04 server. We’ll use UWSGIservice to deploy our webapp along with Nginx.
Requirements:-
Python 3.6
Django 2.0.7
Nginx 1.10.3
Ubuntu 16.04
Install Python basic packages
sudo apt-get install python3-dev python3-pip
sudo apt-get install python3-setuptools
sudo apt-get install python3-kivy
Install Virutal Environment
pip3 install virtualenv virtualenvwrapper
Install Django
pip3 install django
Install UWSGI
sudo pip install uwsgi
Now we need to create the vassals folder, which is the folder where our .ini files (called vassals) will reside upon. Inside vassals we will have two other folders: available and enabled. The first will contain all the (.ini) configuration files. While the second (enabled) will contain a symlink to the files at available
cd /etc/
sudo mkdir uwsgi
cd uwsgi
sudo mkdir vassals
cd vassals
sudo mkdir enabled
sudo mkdir available
Now we need to create an emperor.ini file, which will contain the path for the other vassals at enabled:
sudo nano /etc/uwsgi/vassals/emperor.ini
Add this lines to the file:
[uwsgi]

emperor = /etc/uwsgi/vassals/enabled
Now, it’s time to deamonize uwsgi. In order to do it, create a usgi.service file at /etc/systemd/system/:
sudo vi /etc/systemd/system/uwsgi.service
Now, paste the following content into it:
[Unit]
Description=uWSGI Emperor
After=syslog.target

[Service]
ExecStart=/usr/local/bin/uwsgi --ini /etc/uwsgi/vassals/emperor.ini
# Requires systemd version 211 or newer
RuntimeDirectory=uwsgi
Restart=always
KillSignal=SIGQUIT
Type=notify
StandardError=syslog
NotifyAccess=all

[Install]
WantedBy=multi-user.target
To start the service
sudo systemctl start uwsgi
To check service status
systemctl status uwsgi
Lets enable the service. So that it starts at boot
sudo systemctl enable uwsgi
To stop the service
sudo systemctl stop uwsgi
Lets configure our django project to run with uwsgi.
Lets create a file /etc/uwsgi/vassals/available/kb_web.ini
vi /etc/uwsgi/vassals/available/web_app.ini
# webapp_uwsgi.ini file
[uwsgi]

# Django-related settings
# the base directory (full path)
chdir           = /var/www/webapp
# Django's wsgi file
module          = webapp.wsgi
enable-threads = true

# process-related settings
# master
master          = true
# maximum number of worker processes
processes       = 10
listen  = 100
# the socket (use the full path to be safe
socket          = /var/www/webapp/webapp/web_app.sock
# ... with appropriate permissions - may be needed
chmod-socket    = 666
# clear environment on exit
vacuum          = true
max-requests = 1000
#limit-as = 128
daemonize =  /var/log/uwsgi-emperor.log
Lets create a symlink to enabled folder
ln -s /etc/uwsgi/vassals/available/kb_web.ini /etc/uwsgi/vassals/enabled/
Please make sure you’ve uploaded your project folder under /var/www
ls -l /var/www/webapp
drwxr-xr-x 3 www-data www-data 4096 Sep 14 05:41 bin
drwxr-xr-x 6 root     root     4096 Oct  4 13:46 webapp
-rwxr-xr-x 1 root     root      538 Aug 10 02:14 manage.py
-rw-r--r-- 1 root     root      275 Aug 10 02:14 requirements
Lets manually verify the application by running this command
python3 manage.py runserver 0.0.0.0:8000
# python3 manage.py runserver 0.0.0.0:8000
Performing system checks...

System check identified no issues (0 silenced).
October 05, 2018 - 12:17:12
Django version 2.0.7, using settings 'kb1988.settings'
Starting development server at http://0.0.0.0:8000/
Quit the server with CONTROL-C.
It looks fine and no python module errors.
Configure nginx domain
Lets configure nginx virtual host
vi /etc/nginx/sites-available/webapp.com
Enter the below contents. You can adjust the folder path as per your needs.
upstream web_app {
     server unix:///var/www/webapp/webapp/kb_web.sock; # for a file socket
}
server {
    # the port your site will be served on
    listen      80;
    # the domain name it will serve for
    server_name pheonixsolutions.com
    charset     utf-8;

    # max upload size
    client_max_body_size 75M;   # adjust to taste
    location /media  {
        alias /var/www/webapp/webapp/media;  # your Django project's media files - amend as required
    }

    location /static {
        alias /var/www/webapp/webapp/static;
    }

    # Finally, send all non-media requests to the Django server.
    location / {
        uwsgi_pass  web_app;
        include     /etc/nginx/uwsgi_params; # the uwsgi_params file you installed
    }
}
Verify nginx syntax test
nginx -t
Reload nginx service
/etc/init.d/nginx reload
Restart UWSGI
service restart uwsgi
Your domain should work at http://pheonixsolutions.com
Added tips:-
To create superuser admin
virtualenv command , which will give platform to run source/bin/activate.
source /var/www/webapp/bin/activate
python3 manage.py createsuperuser --username=devops --
email=devops@pheonixsolutions.com
Enter password: ********
To collect static files from all the apps in one place
python3 manage.py collectstatic
If you run into errors, You should mention STATIC_ROOT path in your settings.py file. And then run above command again.
STATIC_ROOT = '/var/www/webapp/webapp/static/'
Steps to eradicate Django migration errors-“core_module issue” :
In python you need to do migrate the changes on prod while its running. If we didn’t complete the migration properly.
This kind of error will make us more disappointing at a last stage of migration. we will see errors like shown below.
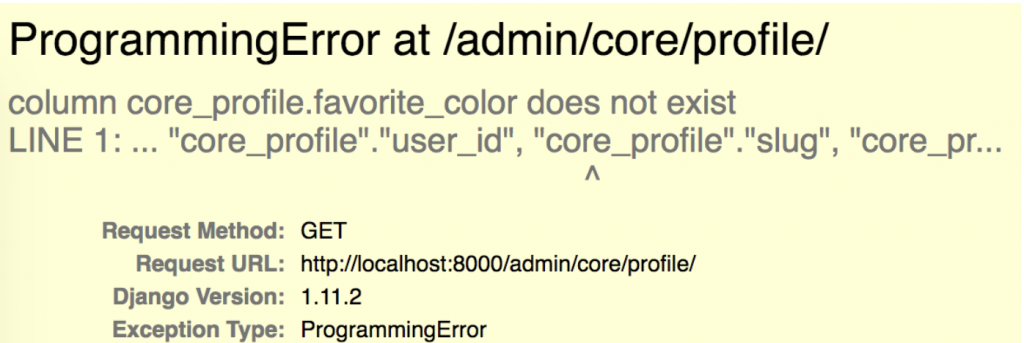
As the error stats that this is an issue with core module. We believe that the code migration didn’t applied completely.
To resolve that we need to run below commands:-
python3.6 manage.py makemigrations core
python3.6 manage.py migrate core
Now login to your django admin panel and check. The errors should be gone.
That’s it. We’re done with the setup!