Fundamental things to know in android activity and fragment
Fundamental things to know in android activity and fragment
Date : 12/06/2019
Activity
The Activityclass is basically a crucial component of an Android app, and the way activities are launched and put together is a fundamental part of the platform’s application model.
Hence an activity provides the window in which the app draws its UI.
Actually an XML file and Activity for implementation works together to display a single screen in a app.
Most apps contain multiple screens, which means they comprise multiple activities.
Each activity can then start another activity in order to perform different actions. To do this we have to INTENT.
For your app to be able to use activities, basically you must declare the activities, and certain of their attributes, in the manifest.
<manifest>
   <application>
     <activity android:name=".ExampleActivity"/>

   </application>
</manifest>
You must implement onCreate() in every activity, which fires when the system creates your activity.
Your implementation should initialise the essential components of your activity: For example, your app should create views and bind data to lists here. Most importantly, this is where you must call setContentView() to define the layout for the activity’s user interface.
Every Activity has a life-cycle which is independent of other activities.
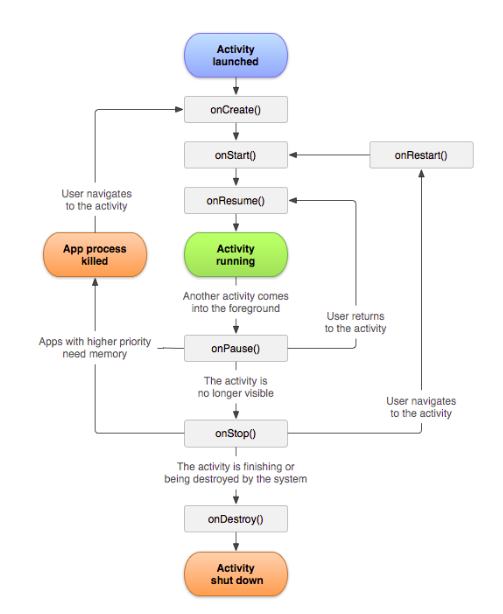
Methods in activity
ONCREATE()
This method receives the parameter savedInstanceState, which is a Bundle object containing the activity’s previously saved state. Because if the activity has never existed before, the value of the Bundle object is null.
When onCreate() finishes, quickly the next callback is always onStart().
ONSTART()
The
onStart()
call
makes the activity visible to the user, as the app prepares for the
activity to enter the foreground and become interactive.
ONRESUME()
This is where therefore user can see the UI clearly.
ONPAUSE()
From this, either the can goto resume state or navigate to onDestroy() to be destroyed.
FRAGMENT
- You can think of a fragment as a modular section of an activity, which has its own lifecycle, receives its own input events, and which you can add or remove while the activity is running.
- sort of like a “sub activity” that you can reuse in different activities.
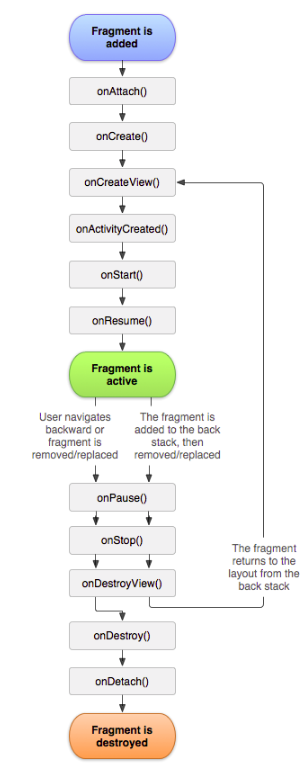
- To create a fragment, extend the
Fragmentclass, then override key lifecycle methods to insert your app logic, similar to the way you would with anActivityclass.
FRAGMENT TRANSACTIONS:
To move to next fragment, Actually we have to perform few things. For users this is to open new page in the app.
Fundamentally we can use either ACTIVITY or FRAGMENT within a ACTIVITY to display new screen.
Hence in fragment, we do this
Fragment newFragment = new ExampleFragment();
FragmentTransaction transaction = getSupportFragmentManager().beginTransaction();
// Replace whatever is in the fragment_container view with this fragment,
// and add the transaction to the back stack
transaction.replace(R.id.fragment_container, newFragment);
transaction.addToBackStack(null);
transaction.commit();
Thank you for using pheonixsolutions.
If you find it useful, share with your friends to keep it alive.