

Date Posted: April 26, 2019
Last Updated: October 19, 2026
Introduction
Node.js is a JavaScript runtime environment that allows developers to execute JavaScript outside a web browser. It can also be used to create a web server that delivers HTML pages to users.
In this article, we will explain how to install Node.js on Windows, verify the installation, create a simple web server, and run a sample Hostnode webpage in a browser.
Node.js provides built-in modules such as HTTP and File System (FS), which make it possible to create a basic web server without installing additional packages. The HTTP module handles incoming requests, while the File System module reads the HTML file and sends its contents to the browser.
By following this tutorial, you will learn how to install Node.js, create the server file, prepare an HTML page, and access the webpage through a local browser URL.
Prerequisites
Before proceeding, ensure that you have the following:
- A Windows computer.
- An internet connection to download Node.js.
- A text editor such as Notepad or Visual Studio Code.
- Access to Command Prompt or PowerShell.
- Basic knowledge of HTML and JavaScript.
Steps to Install and Run a Simple Web Page
Step 1: Download and Install Node.js
Download Node.js from the official website:
Select a suitable supported version for Windows and download the installer. Run the downloaded file and follow the installation instructions.
After installation, open Command Prompt or PowerShell and execute the following command to verify the installed version:
node --version
If Node.js has been installed successfully, the terminal will display the installed version.
You can also verify the npm installation using:
npm --version
npm is the package manager distributed with Node.js and is commonly used to install and manage dependencies in Node.js projects.
Step 2: Test the Node.js Installation
To confirm that Node.js can execute JavaScript, open Command Prompt and run:
node
This command opens the Node.js interactive environment, where you can execute JavaScript statements directly.
Enter the following code:
console.log("Welcome To Node.js");
The expected output is:
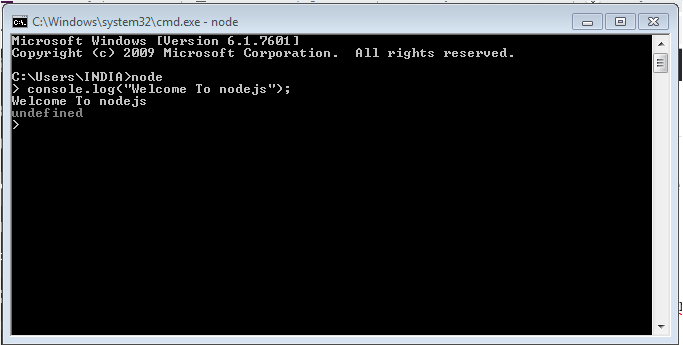
This confirms that Node.js is working correctly.
To exit the interactive environment, enter:
.exit
Step 3: Create the Node.js Server File
Open a text editor and create a file named index.js. This file will contain the code required to create the web server and serve the HTML page.
Add the following code to index.js:
var http = require("http");
var fs = require("fs");

var server = http.createServer(function (req, res) {
    console.log('request was made: ' + req.url);
    res.writeHead(200, {'Content-Type': 'text/html'});

    var myReadStream = fs.createReadStream(__dirname + '/login.html', 'utf8');
    myReadStream.pipe(res);

    // Send the response body as "Hello World"
});

server.listen(8084, '127.0.0.1');

// Console will print the message
console.log('Server running at http://127.0.0.1:8084/');
Save the file as index.js.
Understanding the server code
The code uses two built-in Node.js modules:
- HTTP module: Creates the web server and handles requests from the browser.
- File System module: Reads the contents of the HTML file.
The createServer function is executed whenever a request reaches the server. The request URL is displayed in the terminal, and the writeHead method sends an HTTP 200 response with an HTML content type.
The createReadStream method reads login.html from the current project directory. The pipe method sends the file contents to the browser without requiring the entire file to be read into memory first.
Finally, the listen method starts the server on port 8084 and binds it to the local address 127.0.0.1.
The server expects the HTML file to be named login.html and saved in the same directory as index.js.
Step 4: Create the HTML Page
Create another file in the same directory and name it login.html.
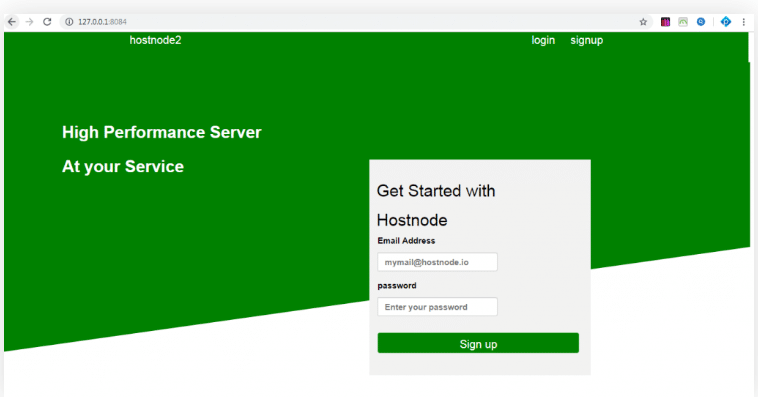
This HTML file contains the webpage that Node.js will serve to the browser. The original example uses a Hostnode-themed layout with a green background, navigation links, a heading, and a signup form.
Copy the following complete HTML code into login.html.
<!DOCTYPE html>
<html lang="en">
   <head>
      <meta charset="utf-8">
      <!-- This file has been downloaded from Bootsnipp.com. Enjoy! -->
      <title>Full screen background cover page. - Bootsnipp.com</title>
      <meta name="viewport" content="width=device-width, initial-scale=1">
      <link href="http://netdna.bootstrapcdn.com/bootstrap/3.2.0/css/bootstrap.min.css" rel="stylesheet">
      <link href="css/site.css" rel="stylesheet">
      <style type="text/css">

         .background {
         background-color: green;
         margin-left: -10px;
         margin-top: 150px;
         position: absolute;
         opacity: 1;
         left: 0px;
         top: 0px;
         bottom: 10px;
         width: 100%;
         height: 50%;
         -ms-transform: rotate(-50deg); /* IE 9 */
         -webkit-transform: rotate(-6deg); /* Safari 3-8 */
         /*transform: rotate(-20deg);*/
         background-repeat: repeat-x;
         transform: skewY(-8deg);
         /* z-index: -1;
         background-size: 100% 100%;
         */
         }
         .background1 {
         background-color: green;
         margin-right: -10px;
         margin-left: -13px;
         position: absolute;
         opacity: 1;
         left: 0px;
         top: 0px;
         bottom: 10px;
         width: 100%;
         height: 50%;
         }
         .background2 {
         color:white;
         margin-left: 248px;
         margin-top: 0px;
         font-size: 20px;
         }
         .background3 {
        background-color: white;
        font-size: 20px;
        margin-top: 10px;
        color: black;
        margin-left: 50px;
         }
         .loging{
         margin-left: 629px !important;
         }
         .singup{
         margin-left: 24px !important;
         }


         .big-title{
        font-size: 30px;
    color: #ffffff;
    font-weight: 700;
    line-height: 62px;
    margin-bottom: 25px;
    position: absolute;
    margin-top: 150px;
}
.button{

        background-color: green;
        width: 364px;
        height: 37px;
        font-size: 20px;
}
.reduse{
  padding-bottom: 20px;
}


@import url('https://fonts.googleapis.com/css?family=Numans');

html,body{

background-size: cover;
background-repeat: no-repeat;
height: 100%;
font-family: 'Numans', sans-serif;
}

.container{
height: 100%;
align-content: center;
}

.card{

margin-top: 80px;
margin-bottom: auto;
width: 400px;
background-color: #f2f2f2;
padding: 30px;


}
.align{
  margin-top: -10px !important;
  color: black;
      margin-left: -17px;

}


.social_icon span{
font-size: 60px;
margin-left: 10px;
color: #FFC312;
}

.social_icon span:hover{
color: white;
cursor: pointer;
}

.card-header h3{
color: black;
}

.social_icon{
position: absolute;
right: 20px;
top: -45px;
}

.input-group-prepend span{
width: 50px;
background-color: #FFC312;
color: black;
border:0 !important;
}

input:focus{
outline: 0 0 0 0  !important;
box-shadow: 0 0 0 0 !important;

}


.remember input
{
width: 20px;
height: 20px;
margin-left: 15px;
margin-right: 5px;
}

.chngcolor{

  color: black;
  font-size: 15px;
   margin-top: -20px !important;
}
.alignimage{
  margin-top: 90px;
  height: 242px;
  width: 282px;
}


      </style>
      <a href="http://code.jquery.com/jquery-1.11.1.min.js" target="_blank" rel="noopener">http://code.jquery.com/jquery-1.11.1.min.js</a>
      <a href="http://netdna.bootstrapcdn.com/bootstrap/3.2.0/js/bootstrap.min.js" target="_blank" rel="noopener">http://netdna.bootstrapcdn.com/bootstrap/3.2.0/js/bootstrap.min.js</a>
   </head>
   <body>
      <div class="container">


         <div class="row">
            <div class="background1">
               <a class="background2" href="">hostnode2</a>
               <a class="background2 loging" href="">login</a>
               <a class="background2 singup" href="">signup</a>
            </div>
         </div>

         <div class="row background">
          </div>

          <div class="big-title">
            <div class="col-md-6">
               <div class="row">
              High Performance Server<br>At your Service
               </div>

                   <div class="row">
                                     </div>
            </div>


         <div class="col-md-3">
         </div>


 <div class="col-md-3">

<div class="row big-text-form">
         <div class="row big-text-form">
            <div class="d-flex justify-content-center h-100">
               <div class="card">

                  <div class="card-body">

                    <div class="card-header align">
                     <p></p><h2 id="get-started-with" tabindex="-1">Get Started with</h2><p></p>
                      <p></p><h2 id="hostnode" tabindex="-1">Hostnode</h2><p></p>
                  </div>
                     <form>


                   <div class="row">
                        <div class="input-group form-group">

                          <p class="chngcolor">Email Address</p>
                        </div>
                        <div class="input-group form-group">
                           <div class="input-group-prepend">
                              <span class="input-group-text"><i class="fas fa-key"></i></span>
                           </div>
                           <p class="chngcolor">password</p><input type="password" class="form-control chngcolor" placeholder="Enter your password">
                        </div>
                        <div>
                           <button type="button" class="btn btn-success button">Sign up</button>
                        </div>
                     </form>
                  </div>

               </div>
            </div>
         </div>
    </div>
   </div>

      </div>
   </body>
</html>
Save the file as login.html.
The webpage uses CSS styling for the background, navigation links, card layout, text, and signup button. It also references Bootstrap and Google Fonts. The original page includes a CSS file at css/site.css; if that file is unavailable, the page may still load, but styles defined in that external file will not be applied.
Step 5: Check the Project Files
Ensure that index.js and login.html are saved in the same project directory.
For example, your directory structure should be:
node-webpage/
├── index.js
└── login.html
If you save the files in different directories, Node.js may not find the HTML file when the server attempts to read it.
Step 6: Run the Node.js Server
Open Command Prompt or PowerShell and navigate to the project directory.
For example:
cd path\to\node-webpage
Execute the following command:
node index.js
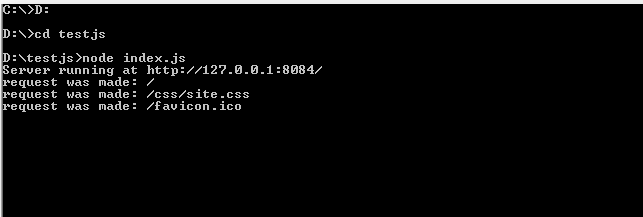
If the server starts successfully, the terminal displays:
Server running at http://127.0.0.1:8084/
Keep the terminal open while accessing the webpage. The server will continue running until you stop it by pressing Ctrl+C.
Step 7: Open the Web Page in a Browser
Open a web browser and enter the following URL:
The Node.js server will read login.html and send the HTML contents to the browser. You should see the sample Hostnode webpage.
When a browser request reaches the server, the requested URL will also appear in the terminal. This demonstrates how the server handles HTTP requests and serves a webpage locally.
The sample form is only a visual demonstration. It does not implement actual user registration, login authentication, or data submission.
Conclusion
Node.js makes it possible to create a simple web server using JavaScript and its built-in modules. By installing Node.js on Windows, creating an HTTP server in index.js, and preparing an HTML page in login.html, you can serve and view a webpage locally in a browser.
This tutorial demonstrates the basics of creating a server, reading a file, handling browser requests, and delivering HTML content. You can extend this example by adding routing, form handling, database connectivity, and backend application logic.
Frequently Asked Questions
1. How can I check whether Node.js is installed on Windows?
Open Command Prompt or PowerShell and run node –version. If Node.js is installed correctly, the command displays the installed version.
2. Why is the webpage not loading in the browser?
Ensure that the Node.js server is running, that index.js and login.html are in the same directory, and that you are accessing http://127.0.0.1:8084/. Also check whether another application is already using port 8084.
3. Can I run a simple webpage using Node.js without installing additional packages?
Yes. Node.js includes built-in HTTP and File System modules that can serve a basic HTML file without requiring additional packages.
Related Links
Talk to Our Experts
Need help with Node.js installation, web server configuration, or application deployment? Our experts can help you find the right solution for your business.
Get in touch with us: Contact our team